
Stages of cavity restoration and composite polymerization
Machine translation
Original article is written in RU language (link to read it) .
Volumetric reconstruction of destroyed chewing teeth is a standard clinical picture that occurs every day in the practice of a dentist. The specialist must solve the following problems: create a reliable restoration, achieve a high level of aesthetics and not spend too much time on the procedure. The use of composite materials has grown significantly over the past decades, which is due to the constant modernization of their physical, mechanical and optical characteristics.
Learn more about aesthetic restorations in the webinar Strategies for success of direct composite restoration of the aesthetic zone using the Styleitaliano method. Part 1 .
Sequence of stages of compositional restoration
Black class I cavity is restored in the following sequence:
Selecting the shade of the material.
Anesthesia.
The working field is isolated using a rubber dam.
The tooth being restored and its neighbors are cleaned with a brush and paste.
All stages of cavity preparation are performed.
Adhesive preparation.
Direct modeling of composite restoration.
Finishing processing.
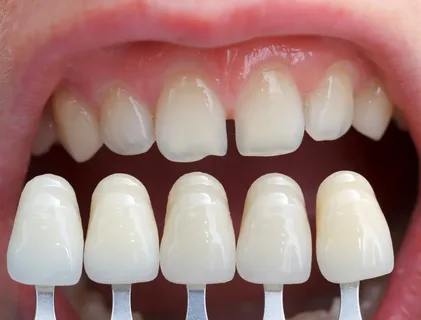
Figure 1. Selecting the color of the restoration.
Black class II cavity is restored in the following sequence:
Choice of shade.
Anesthesia.
Isolation of the working field.
The tooth being restored and the two adjacent ones are cleaned, and the contact surfaces must be treated with strips.
At the beginning of the preparation, a metal strip is installed, which should protect the adjacent tooth from damage by the bur, and a wedge is fixed to protect the gingival papilla.
All stages of cavity preparation are performed.
The metal strip and wedge are removed.
The matrix is applied, fixed with a wedge, and the quality of fit of the matrix system is assessed with a probe.
Adhesive preparation.
Direct modeling of composite restoration.
We extract the matrix system.
We do the final finishing. It is recommended to remove the wedges immediately before processing the contact surface.
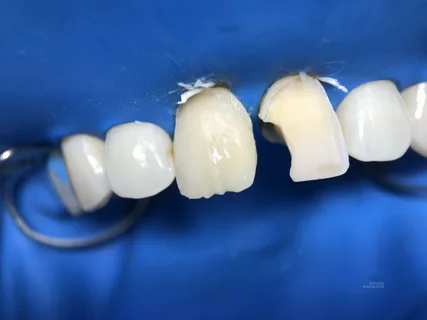
Figure 2. Isolation of the work area.
Black class V cavity is restored in the following sequence:
Choice of shade.
Anesthesia.
Isolation of the work area.
The tooth being restored and its neighbors are cleaned with a brush and paste.
All stages of cavity preparation are performed.
A retraction cord is placed.
Let's start with the adhesive preparation.
Direct modeling of composite restoration.
The final finishing is carried out, the retraction thread is removed only after microcontouring is completed.
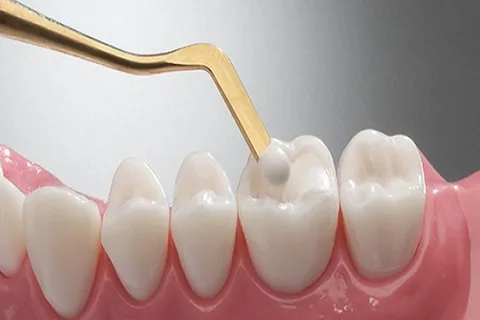
Figure 3. Cavity restoration.
What is important to know at the stage of composite polymerization
Polymerization shrinkage and polymerization stress are the main disadvantages of composite materials to this day, despite the ongoing efforts of manufacturers to eliminate or minimize them.
To reduce shrinkage during polymerization in traditional composite materials, the percentage of filler in them is increased by reducing the proportion of resin. This helps reduce the percentage of shrinkage, increase the density of the material itself and its elasticity, but the polymerization stress remains high.
Polymerization stress is the stress created in a material as a result of polymerization shrinkage. This stress is transferred to the adhesive surface, causing the following adverse effects:
the appearance of secondary caries along the edge of the restoration,
postoperative sensitivity,
lack of a tight marginal fit,
deformation of the tubercles,
the occurrence of chips and microcracks in the tissues surrounding the material,
loss of restoration.
To minimize shrinkage during the polymerization process, various techniques have been developed and put into practice.
Parquet technology
Involves layer-by-layer introduction of composite material. It was originally developed for microhybrid composites; it is recommended to apply them in portions no more than 2 mm thick, with the first layer not exceeding 0.5 mm. At the same time, the microhybrid composite is applied to one, maximum two surfaces.
When packable composites were released, in which shrinkage did not exceed 2%, and in some it was even lower, the technique of introducing them into the cavity made it possible to lay them in horizontal layers and even abandon directional polymerization.
The peculiarity of the packable material is its dense consistency, low level of elasticity of the material after polymerization relative to microhybrid composites; for this reason, it was not possible to eliminate the problem of polymerization stress, in particular, this applies to the use of the packable composite within the enamel.
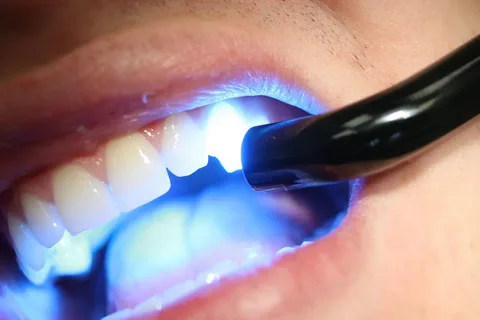
Figure 4. Composite polymerization.
Smooth start
This is another technique that allows reducing polymerization stress; it is based on prolonging the pre-gel phase during the polymerization reaction of the composite material.
During the pre-gel phase, the composite has the qualities of a liquid body; compensation for polymerization stress is carried out due to its fluidity. As it moves into the post-gel phase, the composite hardens, since the duration of the pre-gel phase increases, and at the interface of hard tissues and restoration, the stress is formed at a lower value relative to conventional polymerization.
It is important to take into account the fact that the duration of polymerization of the composite with full-intensity light in time must correspond to the manufacturer’s recommendations. If, according to the instructions, a portion of the material needs to be polymerized for 30 seconds, this is done as follows: during the first 10 seconds we follow the smooth start technique, and then, according to the instructions, we carry out polymerization with a flow of full intensity for the specified 30 seconds.
Directional polymerization
This technique involves preliminary polymerization with a flow of reduced power. The light is directed through the tooth tissue, as a result, the flow power is partially weakened. In this case, the duration of the stage is half the time required for polymerization, which is indicated by the manufacturer, approximately 15 seconds. Next, the light flux is directed directly onto the material being cured; the duration of illumination is equal to the time recommended by the manufacturer.
It is important to take into account that during the restoration process under the influence of a lamp, polymerization of the material does not exceed 60%; over the next day, polymerization of the composite material is completed by another 30-35%, and over the course of another week - by the remaining 5-10%.
C-factor
High polymerization stress is typical for cavities with a high C-factor. This indicator is due to the configuration of the cavity and the ability of the material to reduce stress through elastic deformation of the walls.
The higher the number of walls the material is in contact with, the higher the value of the indicator. The most unfavorable value of the C-factor belongs to cavities of classes I and V, since they are distinguished by five surfaces in contact with the material and only one free one.
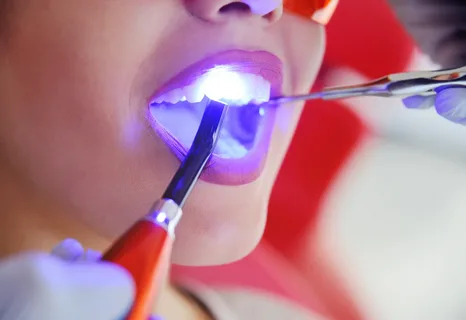
Figure 5. Layer-by-layer curing of the material.
Techniques for creating composite restorations
Volumetric cavities can be restored using one of the presented techniques:
Sandwich technique.
Layer-by-layer application technique.
Bertolotti technique.
Restoration using liquid volumetric masses.
Sandwich technique
The sandwich technique for volumetric restoration of damaged teeth, which involves the mandatory use of glass ionomer cement as the first layer, has the following advantages:
shrinkage of the material is compensated by hygroscopic expansion;
formation of chemical bonds with dentin;
fluoride release for caries prevention;
Cement is added in large portions, which is convenient.
Negative aspects of this technique:
low strength of glass ionomers;
labor-intensive to operate, the technique involves many stages and time for implementation,
increased abrasion; on the occlusal surface, the glass ionomer must be covered with a layer of composite;
weak adhesion between cement and composite.
Layer-by-layer restoration technique
The technique involves a combination of composites with different elasticity indicators. To compensate for polymerization stress, a layer of flowable composite is added to the bottom of the cavity; it plays the role of a liner; the portion size should be up to 2 mm. Next, the cavity is restored using traditional composites using the “parquet technique”.
Bertolotti technique
At the end of the adhesive preparation, take a portion of the chemical-curing composite and introduce it into the cavity, then, without waiting for the end of curing, the light-curing composite is introduced.
Restoration using liquid volumetric masses
SDR is a smart dentin substitute, a fluid-flowing volumetric composite material that has gained wide popularity recently; its portion can reach 4 mm in thickness. It has the property of self-adaptation, is able to level the surface after application, which means there is no need for its condensation, fills undercuts well and does not leak out of the cavity.
More relevant information on this topic at the webinar Stress-reduced direct composite restoration (SRDC) technique .