
Sequence of restoration of chewing teeth
Machine translation
Original article is written in RU language (link to read it) .
Volumetric restorations of cavities in chewing teeth are a common clinical situation that is observed every day in the practice of a dentist, when it is necessary to solve several problems at the same time: to ensure the reliability and durability of the restoration, to achieve optimal aesthetics and not to spend too much time at the restoration stage.
Learn more about the technique of modeling chewing teeth at the webinar Injection Molding Technique. Step-by-Step Protocol for Posterior Restorations.
Choosing the color of the future restoration
The doctor determines the color of the restoration based on the frontal teeth. First, the shade of the anterior teeth is identified using the Vita scale standards. To do this, you need to clean the upper front teeth from plaque using a professional paste and a nylon brush, then wash off the paste. You should not spend more than 2-3 minutes on hygienic preparation, as your teeth may dry out, which will lead to a change in their appearance.
Before comparing the anterior teeth with the Vita scale standards, both the teeth and the standards are moistened. For better identification, the lighting should be dim, but sufficient to avoid eye strain or glare.
The color perception potential remains high for no more than 30-40 seconds; if during this period it was not possible to find a close standard, you need to let your eyes rest for 3-4 minutes, then try again.
First, it is determined how light or dark the teeth are (standard 1, 2, 3, 3.5 or 4), then the color group is determined (A, B, C or D). To finally make sure that the color is chosen correctly, one of the front teeth is dried and a test portion of the composite material is polymerized. After that, the identified teeth are re-moistened and the appearance of the polymerized composite is compared with the central part of the tooth crown.
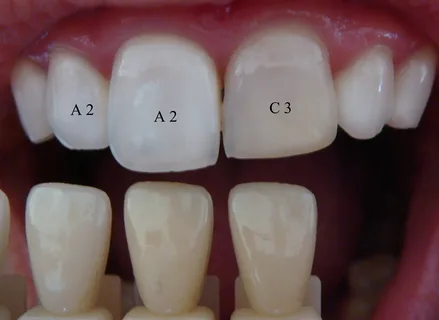
Rice. 2. Selecting the shade of the composite material.
The principle of restoration of a class I cavity according to Black
- At the first stage, dentin restoration is carried out, with the number of portions corresponding to the number of tubercles of the occlusal surface.
- At the second stage, the base enamel is restored. The number of servings is equal to the number of servings on the dentin layer.
- The final stage is restoration of the surface layer of enamel. Here it is very important to grind the material from the center of the occlusal surface to the edge of the enamel.
The principle of restoration of a class II cavity according to Black
- To eliminate or reduce the risk of polymerization separation of the side wall, it is recommended to pre-glue the bottom of the cavity.
- Restoration of the contact surface. The contour matrix is fixed with an interdental wedge, the latter is inserted with force, tightly pressing the matrix to the vestibular and oral surfaces. The transparent shade of the composite is applied in a single portion and rubbed into the edges of the cavity. Before polymerization, it is necessary to push through the contact point area with a plugger.
- To save time at the modeling stage, you can add four separate portions of material that correspond to the cusps of the tooth and polymerize them simultaneously. Then fill the gaps between portions with composite and perform final polymerization. The top layer of restoration is made using the traditional method.
The principle of restoration of a class V cavity according to Black
- At the first stage, dentin restoration is performed, the latter is introduced in two parts, they are glued together or with the walls of the cavity according to the principle of directional polymerization. Polymerization is performed vestibular-mesial from the neck along the surface.
- The second stage is the restoration of the base enamel, also performed with two portions of a composite of normal transparency.
- The final stage is restoration of the surface enamel. Polymerization is carried out from the occlusal surface through the vestibular tubercles.
The principle of restoration of a class VI cavity according to Black
Considering that the class VI cavity has a minimum depth, the dentin layer is either not applied at all, or a small portion of it is placed in the area of the tubercles.
The peculiarities of the restoration of the base enamel are also determined by the volume of the defect, which does not allow adding more than one portion of the enamel opaque material, since it is still necessary to provide space for a transparent shade.
The principle of directional polymerization involves the placement of the light guide diagonally below the occlusal surface through the vestibular and oral surfaces. In this case, each portion of the material must be “attracted” by light to the marginal enamel.
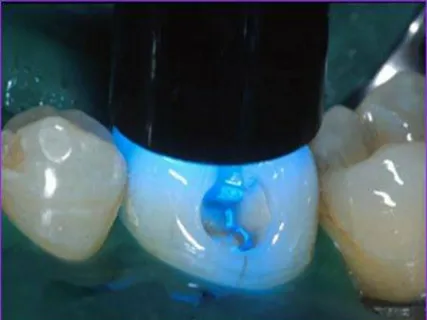
Rice. 3. Polymerization of the composite.
The final stage is restoration of the surface enamel. A layer of transparent shade is located at the base of the tubercle. It is important not to forget about the differences between the tubercles during the modeling process.
The apices of the buccal cusps of the lower teeth are located closer to the central fissure, the lingual cusps are shifted towards the lingual surface. It’s the opposite with the upper teeth: the tops of the palatal cusps are located closer to the central fissure, and the vestibular ones are shifted to the buccal surface.
When arranging the cones of the cusps, it is necessary to conditionally draw parallels passing through the cusps of adjacent intact teeth, as well as perpendiculars to them, connecting the central points of the most convex points of the buccal and lingual surfaces.
In case of significant destruction of the cusps, it is recommended to use the mock-up technique. The tooth to be restored is covered with a layer of composite, and the patient closes the teeth. On the resulting imprint, the height of the tubercles is assessed, which is used to guide the process of restoration of the occlusal surface.
Wax-up is another technique that is designed to make it easier to restore severely damaged teeth. First, impressions are taken and models are cast from them. The latter are cast into an occluder or articulator, where, using wax, taking into account the occlusion, the shape of the destroyed teeth is modeled. Next, the model is compressed in a vacuum apparatus with a special polymer plate. The output is a mouth guard, which is cut into segments and grooves are made in them to remove excess composite material. These segments are used as templates for restoration.
Finishing of posterior restorations
Finishing steps
- Macrocontouring of the filling is performed with highly abrasive instruments.
- Microcontouring of the filling. Involves correction of occlusal contacts, correction of lateral surfaces, instruments of standard abrasiveness are used.
- Polishing, at this stage, low abrasive pastes and tools are needed.
- Superpolishing involves the use of pastes and tools that have very low abrasiveness.
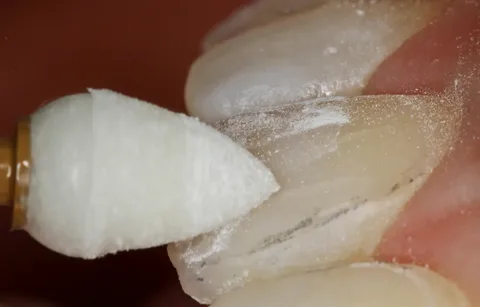
Rice. 4. Polishing the restoration.
To contour restorations, it is customary to use diamond heads with a red color code, as well as carbide burs with 8-16 edges, movements should be directed from the composite material to the tooth tissues.
Contouring of the chewing surface is done with olive-shaped diamond heads with low abrasiveness. Polishing is performed with cup-shaped or flame-shaped silicone polishers.
Finishing restorations for class II cavities is more difficult. Here it is very important not to disturb the formed contact point during the finishing process.
After removing the matrix, use a thin finishing bur on a long, flame- or peak-shaped stem to smooth out the corners and transitions of the proximal surface. Discs are also suitable for these purposes. The most convex part of the contact point is ground with a metal fine-grained abrasive strip; the wedge ensures the preservation of the working space for manipulation.
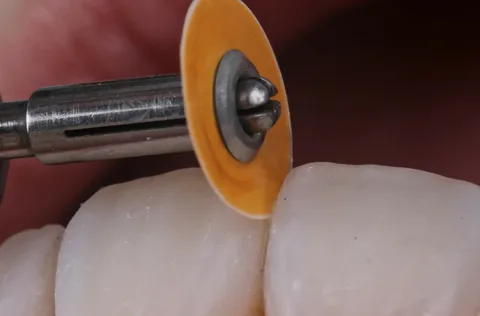
Rice. 5. Finishing the restoration.
The abrasive strip is installed as deep as possible in the interdental space, then the wedge is removed, and a separating strip is used to protect the contact point.
Concave areas of contact surfaces are processed with coarse-grained and fine-grained sections of the strip according to the following algorithm:
- 10 reciprocating movements along the proximal surface,
- 10 - along the angle of transition to the oral surface,
- 10 - along the angle of transition to the vestibular surface.
The transitions from the proximal to the oral and vestibular surfaces in the subgingival area are treated with a finishing bur (with a yellow stripe) of a cone-shaped or cylindrical shape, or 8-, 16-, 30-sided carbide finishers with a non-aggressive tip are used.
Consistent and thorough implementation of all stages of treatment is the key to successful dentistry. Mastery of modeling techniques and the use of matrix systems guarantees the achievement of optimal results and savings in time spent on finishing restorations.
Learn more about restoring severely damaged chewing teeth in the online lesson Biomimetic Restoration of Structurally Weakened Posterior Teeth.