
Modeling of composite restorations of posterior teeth
Machine translation
Original article is written in RU language (link to read it) .
Modeling restorations of posterior teeth is a labor-intensive process that includes various techniques and execution principles. It is important to note that the degree of damage to the hard tissues of the tooth by the carious process directly affects the choice of methodological variation of the restoration.
Restoration modeling includes the following manipulations:
Diagnostics and preparation.
Composite polymerization.
Restoring the contact point.
Direct modeling.
Finishing processing.

Rice. 1. Modeling restorations of chewing teeth.
In the literature you can find descriptions of various methods for modeling restorations of chewing teeth; in this article we will consider some of them.
Modeling according to Lomiashvili
L. M. Lomiashvili is the author of the technique, which is based on modeling the tooth crown using an odontometer module, a structural unit for constructing more complex structures. The canine acts as an odontometer module. The number of odontometer modules and canines that need to be used is determined by the morphological identity of the tooth and the degree of its destruction.
Odontomer modules are positioned in such a way that they tend to the fissure of the first order, they are placed in the form of a crown, trying not to distort the natural anatomical shape of the tooth, the remaining space is filled with filling material.
Algorithm proposed by a group of foreign authors
The technique is based on a strict sequence of the order of modeling the molars of the upper and lower jaw. So, if restoration of the upper molar is necessary, the order will be as follows:
medial palatine tubercle and oblique ridge,
Vetsibular-distal tubercle,
Vetsibular-medial tubercle,
distal palatal.
Sequence of modeling the lower molar:
middle vestibular tubercle,
distal lingual tubercle,
lingual medial,
buccal medial,
buccal distal.
First, the tubercles are modeled in the thickness of the dentin in the specified sequence, each element is polymerized separately, then the enamel layer is modeled in the same order.
Strategy and principles of modeling according to Radlinsky
Radlinsky's strategy schematically looks like this: MOD → O, i.e. If the patient has two class II cavities, it is first necessary to model the proximal parts, since their polymerization with the central part not filled with composite material will be of higher quality. At the very end, the central space is modeled according to the principle of class I restoration.
Radlinsky modeling principles:
separate tubercles,
number of floors for restoration of chewing teeth,
polymerization of contact surfaces,
wedging,
gluing thin walls.
The principle of restoration with individual cusps
The chewing surface of the lateral teeth is represented by tubercles, which outwardly resemble tetrahedral pyramids, where each face is a triangle. The formation of a tooth begins from the tops of the cusps; gradually they merge, forming fissures at their base. This is how the modeling takes place, first they work on individual tubercles, as the main structural elements, and the fissures are formed by themselves, as befits secondary elements.
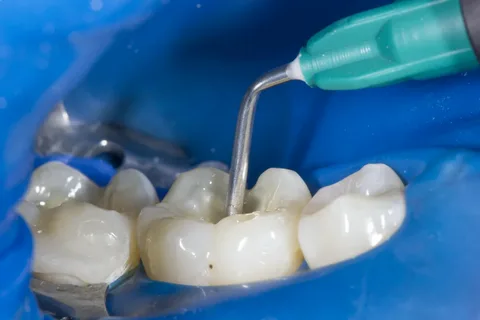
Rice. 2. Preparation for restoration of the chewing tooth.
When using this modeling technique, the chewing surface looks as natural as possible, minor finishing is required, and is performed with fine-grained burs.
Principle of floor modeling
The aesthetic result of filling is achieved thanks to the biomimetic principle of restoration, when different layers of material are used to recreate different tooth tissues: dentin, base enamel and surface enamel.
The composite layer has limitations in thickness, which is associated with the quality of polymerization and minimizing shrinkage. It is logical to divide the entire restoration into layers, or floors, each of which will be made from its own shade of restoration material. Each floor includes several components, their number will depend on the size and shape of the cavity, the anatomy of the tooth, but their number cannot be less than the number of tubercles on the chewing surface.
When modeling floors, there is no need to carefully polymerize each fragment for 40 seconds. To begin with, a 10-second initial polymerization of each fragment located within the floor is sufficient. When the modeling of one floor is completed, a 40-second polymerization is carried out and modeling of the next layer begins.
Wedging of lateral teeth
The application of this modeling principle is relevant for the restoration of chewing teeth with cavities on the contact surfaces. For wedging, interdental wedges are used, which are made of specially impregnated wood or durable plastic. Their shape is selected relative to the shape of the contact surfaces.
Wedging helps to fix the contouring device, the matrix, form a good marginal fit, and achieve optimal contact between the teeth. The main task of wedges is to prevent the penetration of composite material into the interdental space.
Rice. 3. Teeth wedging.
At the first stage, a contouring device is installed: a ring, a contour matrix, a Mylar matrix, and only then wedging is performed.
When inserting a wedge, use a diving motion, the tip of the wedge should be directed towards the gum, avoid tilting it in any direction. When removing the wedge from the interdental space, its tip must be raised above the gum.
When wedging teeth, it is important to consider the following factors:
final contact point density,
thickness of the selected contour matrix,
a polymerized surface layer that is removed during the finishing process.
Checking the quality of wedging:
the contacting teeth moved apart,
the contour matrix is tightly pressed to the proximal surface of the tooth,
the wedge is located below the edge of the cavity.
Polymerization of the contact surface
During the polymerization of the composite material in the area of the contact point of the chewing teeth, it is important to consider:
compliance with the direction of polymerization,
prevention of delamination in the cavity bottom area,
polymerization of the composite to its full depth.
To reduce the likelihood of polymerization separation, the bottom of the cavity should be pre-glued. When modeling the contact wall, a small portion of the flowable composite is added, then a transparent enamel shade is applied to the uncured layer of the flowable composite. Only after this is directional polymerization carried out, and the LED is placed on the opposite side from the contact side.
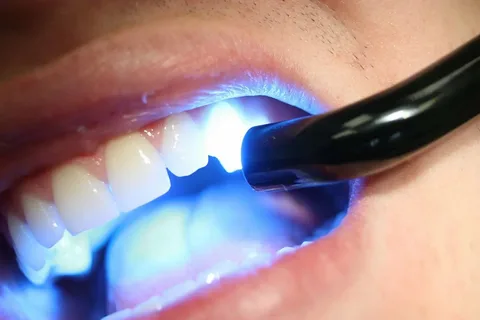
Rice. 4. Polymerization of the composite.
Do not forget about the decrease in luminous flux power when the lamp moves away from the surface of the material.
The principle of gluing thin walls
The spread of the carious process occurs faster in dentin. At the same time, the surrounding enamel remains predominantly intact (transparent and strong); it surrounds softened demineralized dentin.
The adhesive technique, in contrast to Black preparation, involves maximum preservation of enamel over demineralized dentin. In the process of internal preparation, the main problem is the weak strength of the enamel, which lacks dentin support. This can be solved by gluing the enamel layer with a restoration material with directional polymerization shrinkage.
In the classical technique, the filling rests on the walls of the cavity and is thus held in the tooth, but the adhesive technique works on a different principle: the filling creates support for the walls of the cavity. The LED of the polymerization lamp must be located immediately behind the enamel wall to be glued. The composite material will strengthen the enamel, and its shrinkage directed towards the cavity will be compensated by the application and polymerization of subsequent layers of restoration material.

Rice. 5. Application of celluloid matrix.
Advantages of a strengthened enamel wall:
strength, it provides support without restrictions when wedging,
preservation of the natural anatomical shape of the enamel surface,
ensuring a smooth enamel-dentin transition in the area of the tooth neck, which is difficult to achieve when using restorative material.
Learn more about the strategy for modeling severely damaged teeth in the webinar Biomimetic Restoration of Structurally Weakened Posterior Teeth.