Facial Analysis for the Digital Planning of a Full-Mouth Implant Rehabilitation
Abstract
As dental implant treatment has evolved over the years, greater emphasis has been placed on the dentofacial aspect of restorations, with strong consideration given to incisal edge position and preoperative lip dynamics. In this case report, a male patient desired a fixed implant prosthesis to replace his failing dentition and tooth-supported fixed and removable appliances. Utilizing a dentofacial analyzer, facial reference glasses, intraoral scans, and CBCT scans, the clinician was able to plan and complete the implant case in a digital workflow. The case illustrates a method of systematically diagnosing, planning, and staging treatment for a full-mouth implant rehabilitation with immediate function and dramatically improved esthetics.
There are additional details that you can discover in our course Kois principles for digital planning of prosthetic and orthodontic treatment by Dr. Tak On Tse Ryan.
Historically, implant rehabilitation was driven largely by bone location. Eventually, prosthetic design began to play a greater role. More recently, the trend has been toward a dentofacially driven approach based on incisal edge position and preoperative lip dynamics. The use of the patient’s natural head position, facial reference glasses, a dentofacial analyzer, and digital photography facilitates an acceptable preoperative analysis. This case report discusses the case of an elderly gentleman who desired a fixed implant prosthesis to replace his failing dentition and tooth-supported fixed and removable appliances. The combined use of a Kois dentofacial analyzer, Kois facial reference glasses, intraoral scans, and cone-beam computed tomography (CBCT) scans enabled the clinician to plan and complete the implant case digitally and fulfill the patient’s desired outcome.
Clinical Case Overview
A 65-year-old man presented with concerns about quality of life with regard to his oral condition. Due to deterioration of his maxillary and mandibular fixed and removable appliances and remaining supporting teeth (Nos. 6, 8, 12, 27 through 29, and 31) he was unable to eat adequately (Figure 1 and Figure 2). His chief desire was to have a fixed prosthesis. Medically, the patient reported a history of hypertension, elevated cholesterol, and type II diabetes. His hypertension and elevated cholesterol were controlled with blood pressure medication and statins, and his diabetes was well controlled, with his Hb1Ac below 7.
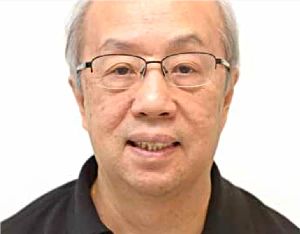 Fig 1. Preoperative view of the patient, who wanted to replace his dentures.
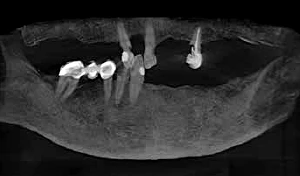 Fig 2. Preoperative radiograph. The patient’s remaining teeth were Nos. 6, 8, 12, 27, 28, 29, and 31. Caries was present on teeth Nos. 6M, 8M, 12M, and 27. Tooth No. 12 had root canal treatment.
Diagnosis and Risk Assessment
Periodontal: Radiographic evaluation revealed attachment loss or bone loss in the remaining dentition. Bleeding on probing was evident on the lingual side of the mandibular teeth. Several teeth had 1 mm to 3 mm recession, and tooth No. 31 had a 5 mm mesiolingual pocket.
The patient reported that his missing teeth were lost more than 10 years prior due to severe caries. Considering the numerous extractions surrounding his surviving dentition and the lack of severe periodontal pocketing, the clinician surmised that periodontal disease likely was not the main factor in the failure of the dentition. This was encouraging news to the clinician, as previous tooth loss from periodontal disease is a significant risk for implant success. The patient was diagnosed as American Academy of Periodontology (AAP) stage II, grade B.
Risk: Low to moderate
Prognosis: Moderate
Biomechanical: The patient presented with multiple carious lesions. His missing teeth were lost because of caries.
Risk: High
Prognosis: Poor
Functional: The patient did not have adequate natural dentition for mastication, and because of the failing restorative appliances his chewing was gradually becoming compromised. There were no detectable neuromuscular or joint pathologies or complaints at the time of examination.
Although his function was diagnosed as acceptable, the potential for loss of function due to his dentition and restorative treatment failing over time was notable.
Risk: Moderate
Prognosis: Poor
Dentofacial: When smiling, the maxillary gingival margins were not visible. However, the patient’s mandibular teeth Nos. 27 through 31 (No. 30 being a pontic) were supererupted and fully visible in the patient’s smile (Figure 3).
Risk: High
Prognosis: Poor
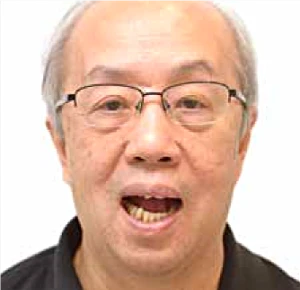 Fig 3. The patient’s maxillary teeth did not show when smiling; in the mandibular dentition, teeth Nos. 27 through 31 (No. 30 being a pontic) were overerupted.
Treatment Plan
Because of the patient’s high biomechanical risk on his few remaining teeth, it was determined that the existing dentition would be a hindrance to ideal treatment. The clinician, therefore, recommended the removal of the remaining teeth and the utilization of maxillary and mandibular implants for a full-mouth implant rehabilitation.
Phase 1: Dentofacial Analysis
Five extraoral photographs were taken to establish the dentofacial midline, proper incisal edge position, smile curve, and smile design.
These photographs, some of which were taken with the patient wearing a pair of facial reference glasses (Kois Facial Reference Glasses, Kois Center, koiscenter.com) comprised a retracted view (Figure 4), smile view, lips in repose view, Duchenne smile view (Figure 5), and overhead, or 12 o’clock, view.
As established in the literature, the natural head position is a critical factor in locating the esthetic plane. Utilizing the patient’s natural head position, facial reference glasses provide visual reference points on facial photographs of the same focal length distance from the camera. Photographs can then be superimposed for diagnostic and treatment planning measurements. In addition, the facial reference glasses are used to locate the dental midline and natural head position, which are recorded by the Kois Dento-Facial Analyzer™ (Panadent, panadent.com). The dentofacial analyzer was used to record and then communicate the essential functional and esthetic parameters for mounting the maxillary cast. The clinician used a calibrated digital ruler utilizing digital smile design technology to determine maxillary incisal edge position.
Normally, the canine cusp tip should be approximately at the same level as, or have up to 1 mm showing below, the upper lip line in repose. In this case, the canine was shown to be 2 mm above the upper lip line. By superimposing the smile image and the repose image, the desired canine position was determined; adding 3 mm to the canine would provide an appropriate esthetic result (Figure 6).
Upper lip mobility was measured by superimposing the repose and Duchenne smile photographs and was found to be 6 mm (Figure 7), which is within normal limits.
The clinician used a video recording of the patient speaking and captured a screenshot with maximum gingival display. Lower lip mobility was measured at 8 mm (Figure 8). The mandibular incisors showed 4 mm in repose, therefore the clinician determined the mandibular incisor position should be reduced in height by 3 mm, leaving a normal 1 mm reveal of the incisal edges in repose.
With the steps above completed, the position of the maxillary and mandibular incisors was established and the upper and lower lip mobility was documented. These measurements allowed the clinician to determine where the gingival tissue-to-restoration interface would be; this is labeled the “transition zone” in the photographs.
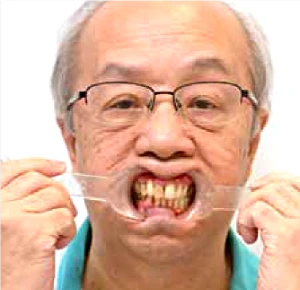 Fig 4. Standard digital smile design retracted view with the patient wearing his denture.
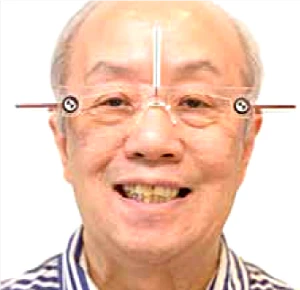 Fig 5. Photograph of the patient wearing facial reference glasses, Duchenne smile view.
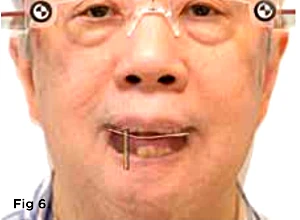 Fig 6. The overlapping of the smile view and lips in repose view photographs along with the use of a calibrated ruler to measure the canine position with the lips in repose revealed the canine to be -2 mm.
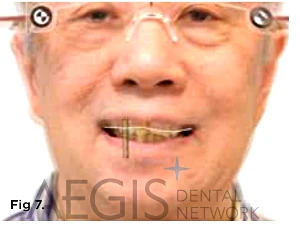 Fig 7. The overlapping of the lips in repose view and Duchenne smile view photographs revealed the upper lip mobility to be 6 mm.
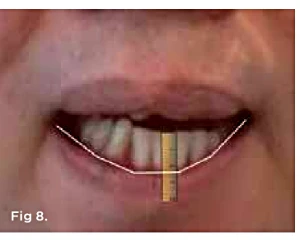 Fig 8. Using a screenshot of the video of the patient speaking, the lower lip movement was shown to be 8 mm.
Phase 2: Data Gathering and Digital Planning
For the digital treatment plan, four image layers were superimposed (ie, merged). The DSD Planning Center (dsdplanningcenter.com) provided the digital merging of the layers. The first image layer included the digital smile design photograph smile view (Figure 1), retracted view (Figure 4), lateral view, and 12 o’clock view. The lateral view was used to assess the “E line” (ie, the tip of the nose to soft-tissue pogonion) and nasolabial angle.
The second image layer was the intraoral scan (STL file) of the maxilla and mandible. The third image layer comprised the scan of the entire denture with a radiographic marker, and, finally, the fourth image layer consisted of the CBCT scan with the radiographically marked denture placed intraorally.
After all the layers were merged by the planning center, the clinician could perform bone contouring and implant planning. For the maxilla, to hide the transition zone, bone needed to be reduced in height. As depicted in Figure 9 through Figure 11, reduction of bone height in the area of tooth No. 8 would enhance implant placement as this would also increase bone width. The blue line in Figure 11 indicates bone level was around 13 mm from the incisal edge of tooth No. 8. For the mandible, to hide the transition zone, the bone needed to be reduced to approximately 18 mm from the incisal edge of tooth No. 27 (Figure 12 through Figure 14). The maxillary and mandibular All-on-4® implant rehabilitation was enabled via adequate restorative space in this patient (Figure 12 through Figure 14) and would replace the missing hard and soft tissues and hide the transition zone behind the lips
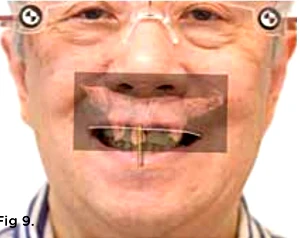
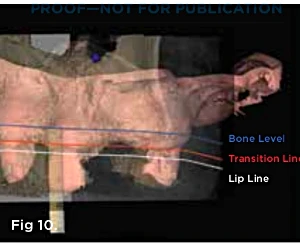
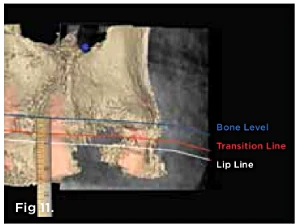 Fig 9 through Fig 11. By merging the Duchenne smile photograph, intraoral scan, and CBCT scan of the maxilla, the planning of implant placement in the maxilla was started in a facially driven approach.
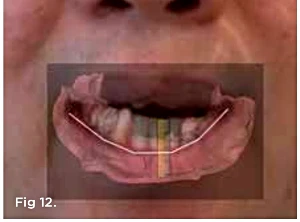
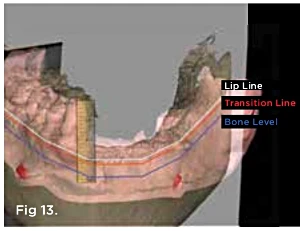
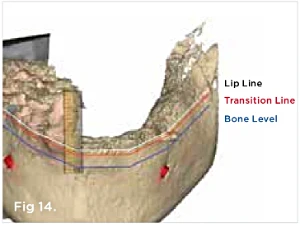 Fig 12 through Fig 14. By merging the photograph showing the patient speaking, intraoral scan, and CBCT scan of the mandible, the planning of implant placement in the mandible was started.
Phase 3: Guided Implant Surgery and Immediate Prostheses
Clinical guides were manufactured by the DSD Planning Center according to the digital plan and consisted of four parts: the base guide (Figure 15), pin guide, implant guide (Figure 16), and hybrid provisional guide (Figure 17). The clinician positioned the base guides for both the maxillary and mandibular prostheses intraorally.
The base guides were stabilized over the remaining teeth and pins were used to anchor the base guides to the maxillary and mandibular bones. The remaining teeth were then extracted, and the base guide was used as a bone reduction guide to remove the prescribed amount of bone. The implant guide was placed over the base guide and pin guide for accurate placement of four implants in each the maxilla and mandible. Astra Tech® EV implants (Dentsply Sirona, dentsplysirona.com) were placed in the anterior, while Astra Tech® Profile implants (Dentsply Sirona) were chosen for the posterior to avoid having to trim extra bone and to minimize bone resorption (Figure 18). Finally, SmartFix® abutments (Dentsply Sirona) and temporary abutments were placed, and light-cured acrylic was used to attach the hybrid provisional. The patient was instructed to wear a provided soft nightguard and have a soft diet for 8 weeks.
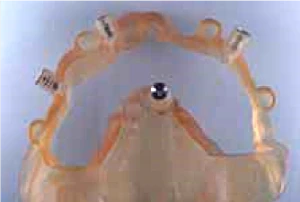 Fig 15. The base guide would be fixed in the bone.
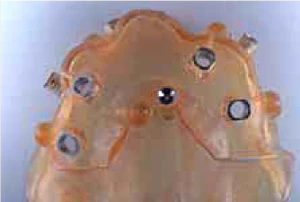 Fig 16. The implant guide would be placed over the base guide.
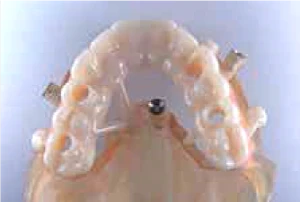 Fig 17. The hybrid provisional guide would be placed over the base guide after implant placement and bonded to the temporary abutment.
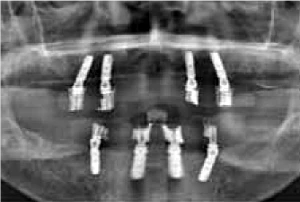 Fig 18. Postoperative radiograph after maxillary and mandibular All-on-4 implant placement.
Phase 4: Provisional Prostheses
After 6 months of osseointegration, the patient was satisfied with the appearance and function of the provisional restoration (Figure 19).
A Kois deprogrammer platform (Kois Center) was made directly in the mouth on the palatal surfaces of teeth Nos. 8 and 9 (Figure 20). The patient was deprogrammed for 1 hour and a bite record (Harvard Bite, Harvard Dental International, harvard-dental-international.de) was taken for the laboratory to mount the final prosthesis (Figure 21). An open-tray polyvinyl siloxane impression (PVS) (Imprint™, 3M Oral Care, 3m.com) was taken with splinted impression copings. The functional pathways were adjusted by positioning the patient in an upright seated position.18 He was asked to bite on 200-µm-thick articulating paper (Bausch, bausch.com) and bring the posterior teeth together to maximum intercuspation. The lingual contours of the maxillary incisors were adjusted until the marking ink no longer showed surface streaks during biting. The laboratory would utilize the lingual surfaces of the provisional restoration as an aid in the design of the final restoration.
 Fig 19. Postoperative photograph of patient with provisional hybrid bridge.
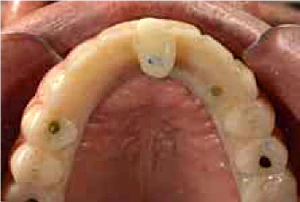 Fig 20. A Kois deprogrammer plaftorm was built up in the palatal aspect of teeth Nos. 8 and 9.
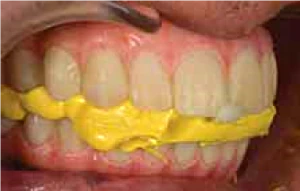 Fig 21. A PVS bite record was taken after deprogramming.
Phase 5: Final Prostheses
The framework chosen for the base of the final prostheses was made of Pekkton® (Anaxdent North America, anaxdentusa.com), which is a high-performance polymer with elastic modulus similar to natural teeth and bone and is designed to provide stress distribution and shock absorption.19 Individual crowns were made to fit over the framework. Full-contour zirconia crowns (Katana™, Kuraray Noritake Dental, kuraraynoritake.com) were used in the posterior, and layered e.max® crowns (Ivoclar Vivadent, ivoclarvivadent.com) were used for the anterior teeth (Figure 22 through Figure 24).
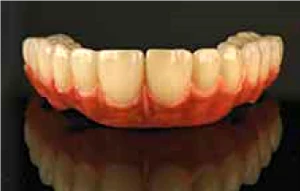 Fig 22. The high-performance polymer (HPP) bridgework for the final maxillary prosthesis.
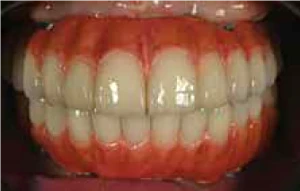 Fig 23. Intraoral view of the HPP bridgework for the final prostheses.
 Fig 24. Extraoral view of the full-mouth implant rehabilitation.
Conclusion
This case illustrates a method to systematically diagnose, plan, and stage treatment for a full-mouth implant rehabilitation. The use of facial analysis with reference glasses and digital smile design imaging and measurements allowed the clinician to preoperatively plan the incisal edge, lip mobility, and transition zone. The All-on-4 implant treatment offered immediate function and an esthetic appearance without grafting, which helped to minimize pain and swelling. The patient was satisfied with the excellent esthetics as well as the function.
Acknowledgement
The author thanks DSD Planning Center (dsdplanningcenter.com) for contributing the surgical guide and Vanguard Computer Assisted Laboratory (vanguardcal.com) for the beautiful lab work in this case.
About the author
Ryan Tak On Tse, BDS, MFGDP, MClinDent (Prost), MSc (Implant Dent) (HK), MGD Private Practice, Hong Kong
References
Morton D, Phasuk K, Polido WD, Lin WS. Consideration for contemporary implant surgery. Dent Clin North Am. 2019:63(2):309-329.
Orphanos ES. Facial esthetic considerations with all-on-4: a report on two cases. Int J Periodontics Restorative Dent. 2019;39(1):57-64.
Spear F. The maxillary central incisor edge: a key to esthetic and functional treatment planning. Compend Contin Educ Dent. 1999;20(6):512-516.
Kois JC. Diagnostically driven interdisciplinary treatment planning. Seattle Study Club J. 2002;6(4):28-34.
Roe P, Rungcharassaeng K, Kan JYK, et al. The influence of upper lip length and lip mobility on maxillary incisal exposure. Am J Esthet Dent. 2012;2(2):116-125.
Tak TO, Kois JC. Digital smile design meets the dento-facial analyzer: optimizing esthetics while preserving tooth structure. Compend Contin Educ Dent. 2016;37(1):46-50.
Levin L, Ofec R, Grossmann Y, Anner R. Periodontal disease as a risk for dental implant failure over time: a long-term historical cohort study. J Clin Periodontol. 2011;38(8):732-737.
Solow B, Tallgren A. Natural head position in standing subjects. Acta Odontol Scand. 1971;29(5):591-607.
Lundström F, Lundström A. Natural head position as a basis for cephalometric analysis. Am J Orthod Dentofacial Orthop. 1992;101(3):244-247.
Lundström A, Lundström F, Lebret LM, Moorrees CF. Natural head position and natural head orientation: basic considerations in cephalometric analysis and research. Eur J Orthod. 1995;17(2):111-120.
Misch CE. Guidelines for maxillary incisal edge position – a pilot study: the key is the canine. J Prosthodont. 2008:17(2):130-134.
Roe P, Rungcharassaeng K, Kan JYK, Patel RD. The influence of upper lip length and lip mobility on maxillary incisal exposure. Am J Esthet Dent. 2012; 2:116-125.
Coachman C, Van Dooren E, Gürel G, et al. Smile design: from digital treatment planning to clinical reality. In: Cohen M, ed. Interdisciplinary Treatment Planning, Vol. II, Comprehensive Case Studies. Chicago, IL: Quintessence Publishing; 2012:119-174.
Ricketts RM. Esthetics, environment, and the law of lip relation. Am J Orthod. 1968;54(4):272-289.
Maló P, de Araújo Nobre M, Lopes A, et al. The All-on-4 concept for full-arch rehabilitation of the edentulous maxillae: a longitudinal study with 5-13 years of follow-up. Clin Implant Dent Relat Res. 2019;21(4):538-549.
Maló P, de Araújo Nobre M, Lopes A, et al. The All-on-4 treatment concept for the rehabilitation of the completely edentulous mandible: a longitudinal study with 10 to 18 years of follow-up. Clin Implant Dent Relat Res. 2019;21(4):565-577.
Di P, Lin Y, Li JH, et al. The All-on-Four implant therapy protocol in the management of edentulous Chinese patients. Int J Prosthodontists. 2013;26(6):509-516.
Bakeman EM, Kois JC. The myth of anterior guidance: 10 steps in designing proper clearance for functional pathways. J Cosmetic Dent. 2012;28(3):56-62.
Han KH, Lee JY, Shin SW. Implant- and tooth-supported fixed prostheses using a high-performance polymer (Pekkton) framework. Int J Prosthodont. 2016;29(5):451-454.
