Digital Smile Design Meets the Dento-Facial Analyzer: Optimizing Esthetics While Preserving Tooth Structure
Abstract
This case of an adult male patient with missing maxillary lateral incisors who was unhappy with his smile focuses on implementation of the digital smile design (DSD) concept. Combined with the use of a dento-facial analyzer, DSD, which employs a series of extraoral photographs, allowed the clinician to preoperatively plan diferent approaches to the treatment and visualize the outcome of each one, as well as to efectively communicate critical tooth position references to the laboratory technician and the patient. The additive approach used in this case minimized tooth preparation while creating an esthetic smile.
Further details are accessible for you to learn in Tak On Tse Ryan course.
Digital smile design (DSD) is a growing trend in esthetic dentistry. This concept is an efective tool to communicate esthetic possibilities to patients prior to treatment initiation, as well as to communicate the desired outcomes to other clinical and laboratory team members. The patient and dentist can view the proposed treatment outcome and modify it as they see fit. The creation of a diagnostic wax-up, silicone index, and surgical stent are all facilitated with the use of DSD.
Clinical Case Overview
A 32-year-old man presented with concerns about esthetics associated with missing lateral incisors (Figure 1). He had received orthodontic treatment as a teenager, which had relapsed. His chief concern was his unpleasing smile. He desired a treatment plan that did not involve more orthodontics and that could be completed in a short period of time and would preserve as much tooth structure as possible.
His medical history was non-contributory. A review of his dental history revealed congenitally missing maxillary lateral incisors, as well as mesially tilted teeth Nos. 8 and 11. It was also noted that teeth Nos. 8 and 9 had drifted distally, resulting in excessive spacing between the anterior teeth (Figure 2).
Two treatment plans were presented to the patient. The first required orthodontics to create adequate space to replace the missing teeth Nos. 7 and 10 with implants. This option would ofer a highly esthetic and stable result, and would provide ideal space distribution and maxillary anterior tooth proportions. The patient was also informed of the long-term success rate for dental implants of 90%. This option, however, also required 1 to 1.5 years of treatment and included surgery.
The second treatment plan did not include orthodontics and relied on porcelain veneers to close the anterior spaces. The advantages of this plan were that it fulfilled the patient’s desire to have no further orthodontic treatment and could be completed in a shorter period of time. This approach, however, also had some disadvantages. The poor space distribution would not be corrected, and this could result in unesthetic tooth sizes and compromise the esthetic result. Ceramic veneers do, however, have well-documented favorable success rates.
The patient opted for the second treatment plan. Because this approach carried the risk of a compromised esthetic result, DSD was used during the data-gathering phase to determine if the veneers could fulfill the patient’s desire for a pleasing smile.
Phase 1: Diagnosis and Treatment Plan
The standard DSD protocol requires the following four extraoral photographs to be taken: retracted view, smile view, lateral view, and 12 o’clock view.1 The retracted and smile views are used to establish the dental-facial midline, proper incisal edge position, smile curve, and smile design. The 12 o’clock view provides a reference for the incisal edge position in relation to the wet-dry border of the lower lip. The lateral view provides a reference for the incisor position and angulation.
The first step in this case was to superimpose the facial midline and interpupillary lines on the photographs of the full-face smile (Figure 3) and then on the retracted close-up smile (Figure 4). In reviewing the treatment plan at this step, it became evident that tooth No. 8 was on the facial midline, and tooth No. 9 was slightly longer than No. 8.
The interdental ruler was calibrated by measuring the actual size of the central incisor on the stone cast and then used to design the smile according to the facial midline. These steps revealed that the desired esthetic outcome could not be achieved with the teeth in their current position. To create harmonious tooth widths and keep the dental midline coincident with the facial midline, aggressive tooth preparation involving endodontics and a post/core restoration would be required. The digital treatment plan allowed the patient to visualize and understand the compromises that a restorative-only approach would induce. He could see that the midline of the final restoration would be positioned about 2 mm ofset from the facial midline, and he agreed to the placement of the midline slightly to the left of the facial midline in order to avoid orthodontic treatment (Figure 5).
Smile design begins with determining the upper incisal edge position, as proposed by Spear and Kois.9,10 Tooth size, tooth proportion, and gingival contours are then designed in sequential steps once the digital ruler is calibrated (Figure 6 and Figure 7). This digital information is transferred to the master cast with the calibrated digital ruler. The width determined for this patient’s central incisor was 9.5 mm, which is within the norm for central incisor dimensions.
The next step was to determine the upper incisor position in relation to the lower lip, using the lateral smile view and 12 o’clock view (Figure 8) photographs. The upper incisor position is recommended to be at the vermillion border of the lower lip.12 In this case, it was decided that the new incisor edge would be positioned 1.5 mm facially from the preoperative position.
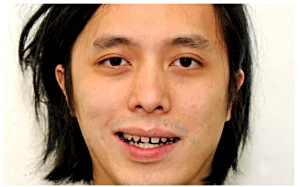 Fig 1. Preoperative view of the patient as he presented with concerns about an unattractive smile.
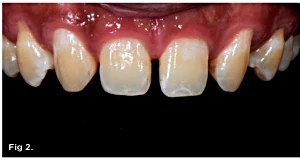 Fig 2. Preoperative close-up view showing excess spacing in the maxillary anterior region.
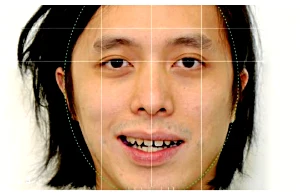 Fig 3. The facial midline marked using DSD.
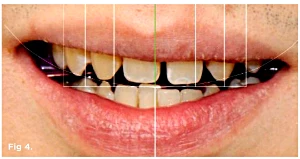 Fig 4. Close-up view with the interdental ruler in place showing the position of tooth No. 8 in the facial midline.
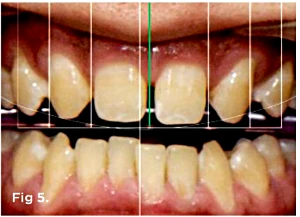 Fig 5. The existing tooth positions could be accommodated with minimally invasive preparations if the dental midline was shifted 2 mm to the left (as indicated by green line).
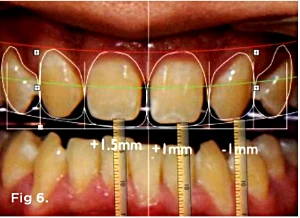 Fig 6. Photograph showing the changes proposed to the length of tooth No. 8 (lengthen 1.5 mm), No. 9 (lengthen 1 mm), and No. 10 (shorten 1 mm).
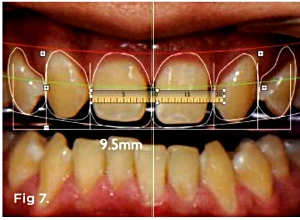 Fig 7. Photograph showing that the new width of the central incisors will be 9.5 mm.
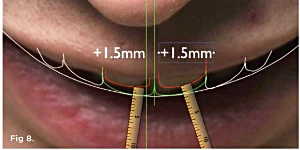 Fig 8. The 12 o’clock view photograph, taken from the top of the face, provided a view of the upper incisor position, which is recommended to be at the wet border of the lower lip. In this case the central incisor edge will be moved labially 1.5 mm.
Phase 2: Transfer of Digital Wax-Up to Master Cast
A dento-facial analyzer (Kois Dento-Facial Analyzer System™, Panadent, www.panadent.com) was used to record and then communicate the essential functional and esthetic parameters for mounting the maxillary cast (Figure 9). The combination of the DSD and the dento-facial analyzer system enabled the clinician to efectively communicate the proposed midline and maxillary occlusal plane—critical tooth position references to the laboratory technician. When placed on the articulator, the platform ensured the symmetry of the incisal edges, as well as the horizontal and vertical tooth positions (Figure 10). The platform can be lowered or raised as needed to allow for more or less incisal length. In this case, the platform did not need to be adjusted because tooth No. 11, the longest tooth in the arch, was the correct length and tooth No. 9 needed to be lengthened by 1 mm.
The use of an index tray provided an easy reference for the wax-up fabrication (Figure 11 and Figure 12). The reference platform on the articulator was used to determine the width, length, and facial position of the maxillary central incisor. A 9.5-mm index tray was used, which allowed the technician to wax all of the front teeth using the proportion guide on the tray. A custom incisal guide table can be used to establish the labial contour as determined previously by the DSD.
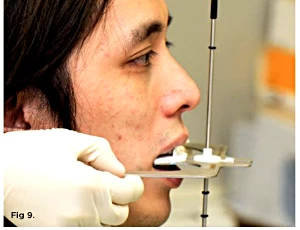 Fig 9. Placement of the dento-facial analyzer to record the occlusal plane orientation.
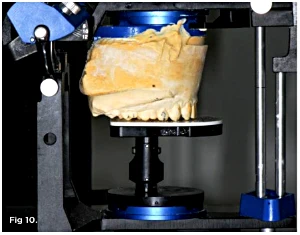 Fig 10. The maxillary cast mounted against the platform.
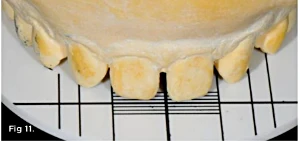 Fig 11. The 9.5-mm incisor width index tray was selected.
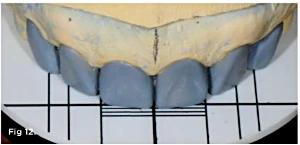 Fig 12. The technician was able to efciently fabricate the wax-up by using the proportion guide.
Phase 3: Intraoral Evaluation
Temporization material (Protemp™, 3M ESPE, www.3MESPE.com) was injected into the silicone index and applied intraorally without any tooth preparation. The esthetics, phonetics, functional outcome, lip support, and facial harmony were evaluated at this time. The final treatment plan was initiated after the patient’s approval of the intraoral mock-up (Figure 13).
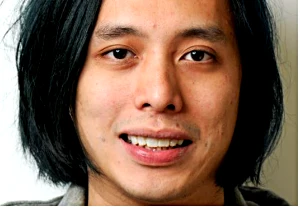 Fig 13. The trial smile in place.
Phase 4: Surgical Treatment
A stent was fabricated from the wax-up and placed intraorally to provide guidance for both the periodontal surgery and tooth preparation. Clinical crown lengthening was performed on teeth Nos. 8 and 9. Bone sounding17,18 was done, and Er:Cr:YSGG laser therapy (WaterLase™, Biolase, www.waterlase.com) was used to recontour the gingiva (Figure 14).
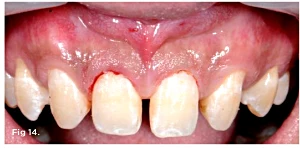 Fig 14. Periodontal surgery completed via laser treatment.
Phase 5: Definitive Restorations
Two months after the periodontal surgery, the patient returned for the final restorations. The silicone index of the diagnostic wax-up was now used as a guide to minimize the amount of tooth reduction. Based on the silicone index, the central incisors were planned to have 1 mm of facial volume added and a 0.3-mm chamfer.
For the lateral incisors, tooth preparation followed the preoperative preparation guide and required more tooth removal on the mesial surfaces to provide adequate width for the veneers on the central incisors. The incisal edge was reduced by 1 mm and the proximal surfaces were reduced by 0.5 mm. The margins were smoothed with soft discs (SONICflex®, KaVo Dental, www.kavousa.com). Using a two-cord retraction technique, a polyvinyl siloxane impression was taken (Imprint™, 3M ESPE) and acrylic temporaries (Protemp) were fabricated. An alveolar model with gingival cast and interchangeable dies was fabricated. Feldspathic ceramic (Creation, Jensen Dental, www.jensendental.com) was layered. In order to create the illusion of smaller central and lateral incisors, the ceramist moved the distal line angle of the lateral incisors mesially. The veneers were cemented with a light-cured nanofilled composite resin (shade CT, Filtek™ Supreme Ultra, 3M ESPE). The composite was preheated in a composite warmer prior to cementation.
Conclusion
This case illustrates a method to systematically diagnose, plan, and stage treatment for a smile makeover. The use of the DSD allowed the clinician to preoperatively plan various approaches to the treatment and visualize the outcome of each approach. The use of the Kois Dento-Facial Analyzer simplified the wax-up and improved accuracy. The new veneers harmonize with the face and lower lip, and the spaces were perfectly closed (Figure 15 and Figure 16). The additive approach minimized tooth preparation and also made the teeth more prominent in the patient’s smile. The tissue is expected to mature with interdental papillary rebound. The patient was satisfied with not only the excellent esthetics but also the minimal tooth structure removal.
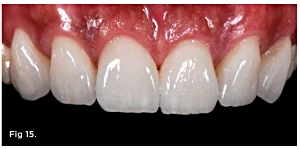 Fig 15. Postoperative close-up view of the maxillary anterior teeth.
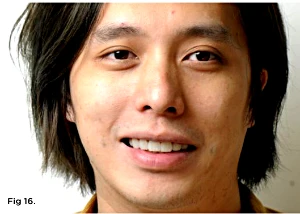 Fig 16. Full view of the successful new smile.
ABOUT THE AUTHORS
Tse Tak On, BDS, MFGDP, MClinDent, MSc, MGD
Private Practice, Hong Kong
John C. Kois, DMD, MSD
Director, Kois Center, Seattle, Washington
References
Coachman C, Van Dooren E, Gürel G, et al. Smile design: from digital treatment planning to clinical reality. In: Cohen M, ed. Interdisciplinary Treatment Planning, Vol II, Comprehensive Case Studies. Chicago, IL: Quintessence Publishing; 2012:119-174.
Pjetursson BE, Lang NP. Prosthetic treatment planning on the basis of scientific evidence. J Oral Rehabil. 2008;35(suppl 1):72-79.
Dumfahrt H, Schafer H. Porcelain laminate veneers. A retrospective evaluation after 1 to 10 years of service: part II—clinical results. Int J Prosthodont. 2000;13(1):9-18.
Fradeani M. Six-year follow-up with Empress veneers. Int J Periodontics Restorative Dent. 1998;18(3):216-225.
Fradeani M, Redemagni M, Corrado M. Porcelain laminate veneers: 6- to 12-year clinical evaluation—a retrospective study. Int J Periodontics Restorative Dent. 2005:25(1):9-17.
Burke FJ, Lucarotti PS. Ten-year outcome of porcelain veneers placed within the general dental services in England and Wales. J Dent. 2009;37(1):31-38.
Beier US, Kapferer I, Burtscher D, Dumfahrt H. Clinical performance of porcelain laminate veneers for up to 20 years. Int J Prosthdont. 2012;25:79-85.
Kokich VO, Kiyak HA, Shapiro, PA. Comparing the perception of dentists and lay people to altered dental aesthetic. J Esthet Dent. 1999;11(6):311-324.
Spear FM. The maxillary central incisor edge: a key to esthetic and functional treatment planning. Compend Contin Educ Dent. 1999;20(6):512-516.
Kois JC. Diagnostically driven interdisciplinary treatment planning. Seattle Study Club J. 2002;6(4):28-34.
Chu SJ. Range and mean distribution frequency of individual tooth width of the maxillary anterior dentition. Pract Proced Aesthet Dent. 2007;19(4):209-215.
Small BW. Location of incisal edge position for esthetic restorative dentistry. Gen Dent. 2000;48(4):396-397.
Gürel G, Bichacho N. Permanent diagnostic provisional restorations for predictable results when redesigning the smile. Pract Proced Aesthet Dent. 2006;18(5):281-286; quiz 288, 316-317.
Reshad M, Cascione D, Kim T. Anterior provisional restorations used to determine form, function, and aesthetics for complex restorative situations, using all-ceramic restorative systems. J Esthet Restorative Dent. 2010:22(1):7-16.
Mizrahi B. Visualization before finalization: A predictable procedure for porcelain laminate veneers. Pract Proced Aesthet Dent. 2005:17(8):513-518; quiz 520, 566.
Magne P, Belser U. Bonded Porcelain Restorations in Anterior Dentition: A Biomimetic Approach. Chicago, IL: Quintessence Publishing; 2002.
Gargiulo AW, Wentz FM, Orban B. Dimensions and relations of the dento-gingival junction in humans. J Periodontol. 1961;32(3):261-267.
Kois JC. Altering gingival levels: The restorative connection. Part I: biologic variables. J Esthet Dent. 1994;6(1):3-9.
Lowe RA. Clinical use of the Er,Cr: YSGG laser for osseous crown lengthening: redefining the standard of care. Pract Proced Aesthetic Dent. 2006;18(4):S2-S9.
