
Application of mobile 3D technologies in dentistry
Machine translation
Original article is written in RU language (link to read it) .
Advances in technology can have a positive impact on dentistry for both patients and practitioners, especially in the quality of dental care and the simplification of procedures. Technological advances are particularly noticeable in digital radiology and intraoral digital imaging.
Learn more about this topic in the online course The Complete Guide to Digital Dentistry .
Treatment planning has also benefited from advances in technology. In aesthetic dentistry clinical cases, treatment was planned by cutting 2-dimensional (2D) intraoral photographs and placing them in an ideal position. This method later evolved into the use of digital templates to position and size abutment teeth, which were overlaid on 2D digital photographs on a computer screen.
Extraoral facial scanning using a mobile phone has become a feasible and cost-effective option for some cases that do not require high accuracy. These technological developments are particularly promising for general practitioners (GPs) who may not be able to invest in an expensive suite of digital devices. This article describes and demonstrates a relatively simple and accessible workflow that takes advantage of 3D digital facial modeling for GPs.
Using facial scanners
Extraoral facial scanners have been used since 1939. In the 1980s, basic computer graphics software tools were developed to allow practitioners to visualize and plan treatment outcomes before they begin, especially for complex cases. The facial scanners and techniques used at the time were complex and expensive, so their use was extremely limited. More compact systems have been developed over the last decade, but they have generally been too expensive for everyday use.
More recently, scanners for mobile phones have appeared, both in the form of software solutions and in the form of small additional equipment. This technological development is very promising, especially for general dentists who are unable to invest the money or time required to purchase and learn more complex devices and procedures.
The purpose of this article is to explain a simple and accessible workflow that takes advantage of three-dimensional (3D) facial scanning for general practitioners.
Extraoral scanning
Extraoral scanning of the patient's face was performed using photogrammetry and an object tracking application (3D Creator, Sony Corporation, sonymobile.com) on a mobile phone (Sony XZ1, Sony Corporation) in three different positions (Figure 1). A face and smile scan was performed to determine lip position for subsequent smile design, while a lip retracted smile was required for the alignment (centering) process using intraoral models using the anterior teeth as general landmarks. High-resolution digital intraoral color 3D images of the upper and lower teeth were taken using an intraoral scanner (Figure 2) (Condor, Condor Systems, condorscan.com).
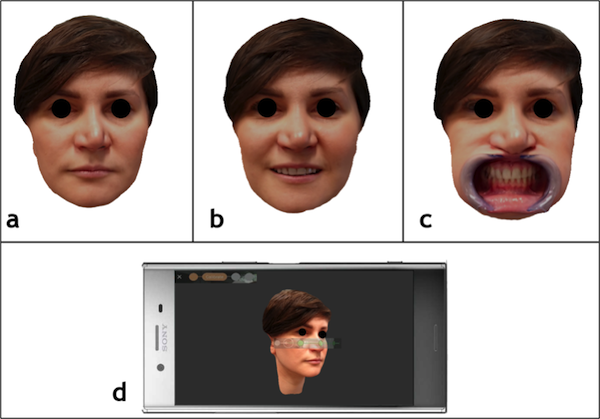
Photo 1. 3D scan of the face in three positions: (a) relaxed neutral position, (b) smiling position, (c) cheeks tucked away. (d) Image of a mobile phone used for facial scanning.
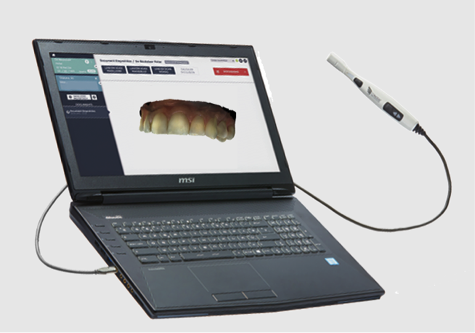
Figure 2: An intraoral scanner was used to create digital impressions of the teeth.
Facial models were exported as .OBJ files (object files) and .MTL files (material library files), while intraoral models were exported as .PLY files (geometry file format). What makes these file formats special is that, in addition to 3D shape information, they can store surface color information along with aesthetically important data such as texture and shading. An open source 3D object creation kit (Blender, blender.org) was then added to combine the extraoral and intraoral models using a point-to-point alignment method (Figure 3). In the scanned patient's smiling face, the teeth were hidden. The midline and interpupillary line were then drawn. The custom maxillary teeth were imported, positioned and sized to the required values (Figure 4).
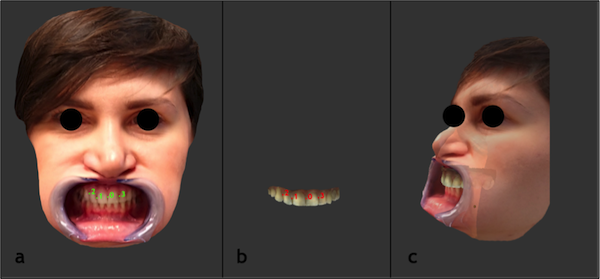
Photo 3. Image showing the centering procedure using facial (a) and intraoral (b) 3D models. The same landmarks were marked in each model and then aligned in pairs from 0 to 3 in this case. The result of the merger of the two models can be seen from the side view (c);
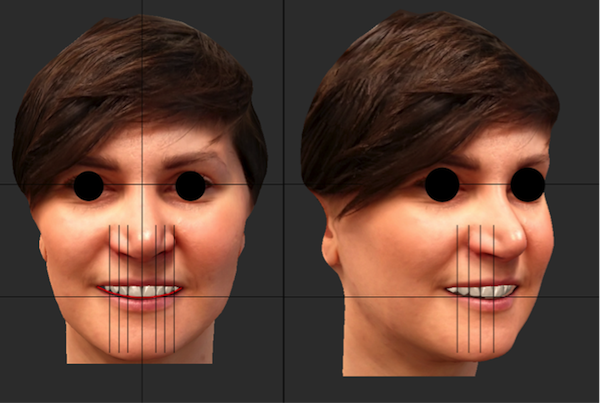
Photo 4: Image showing a face scan and a smile with virtual teeth. The teeth are adjusted to their size and position in relation to the midline, interpupillary line, and desired width to length ratio.
Three-dimensional designs of different smile options were created by changing the shapes and positions of the teeth (photo 5).
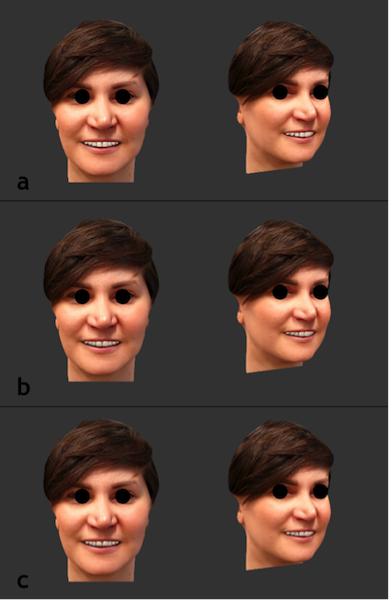
Photo 5: Image showing three different 3D digital smile designs of anterior teeth. Anterior and lateral views at 30 degrees: (a) narrow central incisors with a 70% width to length ratio, (b) central incisors with a 78% width to length ratio, (c) short central incisors with a 90% width to length ratio.
Discussion
The proposed workflow provides a simple and cost-effective procedure for integrating the benefits of facial scanning into daily practice for treatment planning and patient imaging. 2D photography was a powerful tool for documenting cases and discussing treatment options with patients and other colleagues. This tool has become available to almost every dentist with the advent of digital cameras and mobile phones. While mobile phones cannot provide the same image quality as digital single-lens reflex (DSLR) cameras, many dentists use them due to their lower cost and acceptable image quality. Additionally, although the facial scanning accuracy and alignment method proposed in this workflow are not as good as dedicated 3D facial scanners, the process may be sufficient to simulate different treatment methods and discuss them with patients, since high accuracy for this method is not is key.
The current smile design protocol is to prepare a two-dimensional digital photograph of the patient's smiling face and draw the ideal shape of the front teeth or superimpose an existing mock-up of the teeth onto the patient's smile. Despite the lack of high precision, the limitations of this 2D method, and the subjectivity inherent in the process of positioning and sizing dental designs, the ability to involve patients in the design process and the ability to show them simulated different perspectives can increase acceptance rates and help avoid post-treatment conflicts.
Adding to this the benefit of 3D, which allows aesthetic results to be displayed from all possible viewing angles, will undoubtedly further enhance the realism of digital smile modeling. The next step could be the ability to print the developed virtual models in 3D format, and then create silicone keys and actual mock-ups for aesthetic work. The next step beyond this would be to use 3D data to determine the color of the ideal smile and to automatically print esthetic composite or ceramic restorations in 3D.
3D scanning
Mobile phone 3D scanning can be a cost-effective and fast tool for certain applications that do not require high precision, such as patient education and 3D smile design. This convenient method will allow more general dentists to develop treatment options in 3D on virtual patients and benefit from the ever-increasing benefits of digital dentistry.
More relevant information at the webinar Integration of digital technologies in aesthetic and restorative dentistry .
http://www.aegisdentalnetwork.com/