
Direct Composite Veneers: A Clinical Guide to Selecting the Correct Layering Technique
Abstract
Due to advances in adhesive procedures, composite resins have become the principal restorative materials in modern dentistry. Resins restorations have a high capacity for reproducing anatomic shape, color, dentin and enamel opacity levels, opalescence effects, and characterizations (e.g., stains and cracks), as well as good mechanical resistance. This article provides a classification of the different approaches for direct composite veneers. Via case presentations of various clinical scenarios, it demonstrates the recommended layering sequences to correct each situation in order to achieve optimally esthetic, natural-looking results.
Further details about composite restorations are accessible for you to learn in our course "Brazilian School of Aesthetic Restorations".
Introduction
Veneers are extremely versatile. Designed to overlay a tooth’s labial surface, they can be employed to correct a variety of issues ranging from minor shape imperfections to more complex challenges (e.g., extremely dark teeth or major coronal destruction). Color, shape, dentin and enamel opacity levels, as well as opalescence and tooth-specific characteristics (e.g., stains and cracks), can all be replicated with composite resins.
This article provides a classification of the various approaches for resin composite veneers and, through case presentations of various clinical conditions requiring modification, describes the recommended layering sequences to correct each situation to achieve optimally esthetic, natural-looking results.
Material Selection
First, it is essential to discuss the criteria for selecting the most appropriate material based on particle shape, size, and structural characteristics. A thorough understanding of the principles related to color and translucency of the resin layers is also critical. Material selection considerations are discussed below.
Resin Resistance and Optics
In the past, fracture problems were frequently associated with previous resins.1
However, thanks to advances in resins, compression and wear resistance are no longer critical concerns.2 The fracture toughness measurement is a practical and widely used method for determining a material's fracture resistance; it is related to the material’s ability to inhibit crack propagation, which is an essential attribute, especially for enamel resins. The modulus of rupture represents a material’s maximum resistance to bending before it ruptures, a crucial property for the restoration’s enamel and dentin (“body”). The particles’ volume and weight, as well as their size and arrangement, are key determinants of their tenacity and flexural strength.3
In stress-bearing areas, microhybrid and some nanohybrid (i.e., those comprising nano, micro, and medium size particles) resins are the best options.
These materials offer a robust ability to prevent crack propagation, reducing the incidence of chipping and fractures.4
Based on findings in the literature and their own clinical experience, the authors suggest that these fracture-resistant resins be used as palatal enamel and at the incisal edge:
- Estelite Posterior PCE (Tokuyama America; Encinitas, CA)
- Filtek Z250 XT Incisal (3M; St. Paul, MN)
- Forma WE (Ultradent; South Jordan, UT)
- GrandioSO Incisal (VOCO; Cuxhaven, Germany)
- Herculite Ultra LTI (Kerr; Orange, CA)
- Herculite XRV IL
- HRi Bio Function BF2 (Micerium; Avegno, Italy)
- Vit-l-escence PF (Ultradent).
To create the dentin layer, the authors recommend materials whose particle characteristics also ensure good flexural strength, which is key in replicating the restoration dentin (body). These materials are as follows:
- Empress Direct (Ivoclar Vivadent; Amherst, NY)
- Essentia (GC Europe; Leuven, Belgium)
- Herculite Ultra
- Mosaic (Ultradent)
- Vit-l-escence.
There are other factors to consider besides resistance when it comes to enamel masses. Regarding rheology and surface polishing, resins with smaller particles and more regular surface characteristics perform better.4
Esthetically, these materials must have proper translucency to reproduce the enamel’s optical features, particularly regarding value.5
To create more natural-looking esthetic restorations, clinicians should select composite resin brands with a refraction index that matches the patient’s natural enamel and opalescence for proper light diffusion. Unfortunately, most product literature offers little information in these areas and thus is not very helpful. To better guide clinicians in their selection process, the authors, relying on research data and their own clinical experience, recommend the following materials for labial enamel6:
- Empress Direct
- Estelite Omega
- Estelite Sigma Quick
- Harmonize (Kerr)
- Renamel Microfill (Cosmedent; Chicago, IL)
- Vit-l-escence.
Proper photoactivation of all composite resins to their highest conversion grade will help achieve the best resistance, color stability, and polishing quality.7,8
Translucency and Color
Categorized by type of material, the indications for translucency levels can be classified as follows:
- enamel materials for conventional or body translucency
- body materials used in intermediate translucency between enamel and dentin; in certain situations, they can be used as either
- dentin materials to produce medium or high opacity
- incisal translucency effect resins to reproduce incisal opalescence
- opacifying resins to hide unfavorable color substrates (e.g., very dark teeth)
- pigments to replicate effects, stains, and cracks to enhance restorations’ lifelike appearance.5,9,10
Enamel translucency: In order for an artificial material like composite resin to optically behave like tooth enamel, it is critical that, in addition to the previously mentioned attributes, the material has a translucency level that is consistent with the natural tissue. If the enamel composite is highly translucent, there will be too much light absorption and poor reflection, resulting in a loss of light and value and, therefore, a grayish restoration. Less translucent enamel resins reflect more light and produce clearer characteristics.5,6,9,10
In Vita-based systems, enamel colors close to A1 are considered “neutrals” (medium value), and the darkest-colored enamels (e.g., A2 or A3) lower the final value and saturate the restoration. In non-Vita-based resin systems, enamels classified as “white” or “bleach” refer to the milkiest enamels (high value). For such non-Vita-based restoratives, each brand has its own terminology, but these also typically refer to the lower, medium, and higher value characteristics.11,12
Some specific situations require the use of the highest value enamel. These materials typically have a low translucency, significantly increasing the restoration’s final luminosity while also making it opaque. Because the natural enamel to be replicated rarely has such a high degree of translucence, highest-value enamels should be used judiciously, in thin increments, and in cases involving multiple teeth. These types of enamels are categorized as “extra-milky” (very high value).6
They typically exhibit body translucency, are white in color, and, if employed in thick increments, can result in restorations that are so opaque that they look artificial.
Examples of very high-value enamels include the following:
- Empress Direct BL-XL Enamel
- Estelite Omega BL2
- Filtek Universal XW
- Mosaic EW
- Palfique LX5 BW (Tokuyama).
When comparing the same color across different commercial brands, clinicians may notice significant differences between their corresponding characteristics. For example, a medium-value enamel from one brand may look like a different brand’s high-value enamel.
Therefore, to effectively use composite resin systems in specific scenarios, clinicians must be well-versed in the particular properties of the system they employ in their practice.
Dentin opacity: The opacity grade of the resin selected for the dentin also impacts the final light reflection and, consequently, may result in dentins of lighter or darker colors.Opacity is determined by the amount of light passing through a material. When most of the light is blocked, the substance is considered opaque (i.e., less translucid). Low-opacity dentins have a grayish appearance because their ability to reflect light is lower than that of high-opacity dentins. Using very opaque dentins may result in a restoration with an opaque and clearer, milky appearance that looks artificial. Clinicians will be more likely to duplicate this layer satisfactorily if they choose brands with balanced-opacity dentins.9,10
A few resin systems have dentin shades of such a high degree of opacity (e.g., Filtek Supreme and Forma) that their use will usually require them to be combined with a lower opacity body shade for optimal opacity levels. The dentin opacity level is also directly influenced by its thickness. Increased thickness of the dentin resin layer leads to more effective masking of the underlying natural tooth color.
Thus, it is crucial to plan for the correct amount of room for this layer within the restoration. Furthermore, because it is less affected by the tooth substrate, the thicker the dentin resin, the more evident its chroma will be.5
In systems using the “body-dentin” concept, the proportionate amount planned for each material will affect the final opacity. For example, if a thicker body and thinner dentin are planned, the result will be less opaque; on the other hand, if a thinner body and thicker dentin are planned, the result will be of higher opacity.
Incisal opalescence and other effects: An incisal opalescent resin layer can be applied between the dentin mamelons to replicate the incisal opalescence. Pigments can also be used to reproduce cracks and stains. However, these are optional procedures, especially in cases involving multiple veneers.5,6,11,12
Veneer Layering Techniques for Various Clinical Situations
This article categorizes the various types of restorative approaches for direct veneer treatments based on their suitability to correct specific clinical situations. The authors recommend either the Natural Layering Concept (Scheme 1), developed by Dietschi,13,14 or the Polychromatic Layering Technique (Scheme 2), developed by Fahl.15,16 The natural technique is the focus here, illustrated by clinical case examples.
Additive Veneers for Teeth Without Wear
In these clinical situations, composite resin layers are applied to modify tooth shape and/or color. Included in this classification are cases of veneers to change the tooth color, strategic additions to re-anatomize small teeth and/or unesthetic shapes, and linguoverted teeth.
There are several composite resin options that can be applied as enamel. They are typically used in cases involving multiple teeth where the patient wants a brighter smile. The high-value (“milkiest”) enamels are well suited for this. When the patient wants an even brighter effect, very high-value enamels with extremely light (“extra-milky”) features allow, in small thicknesses, a significant change in the color pattern. This procedure may be applied in cases that are unresponsive to dental bleaching. When selecting the shade, the mandibular teeth should also be used to avoid a difference of more than two shades between the arches.
Additional veneers to change tooth color without incisal increase: In this situation, very high-value resins are typically applied at a thickness of approximately 0.5 mm. Because of the greater thickness, these materials, which have the characteristics of a body resin, generally become luminous and opaque. The restorative protocol for this type of case is shown in Schemes 3 and 4; the layering strategy is detailed in Clinical Case 1.
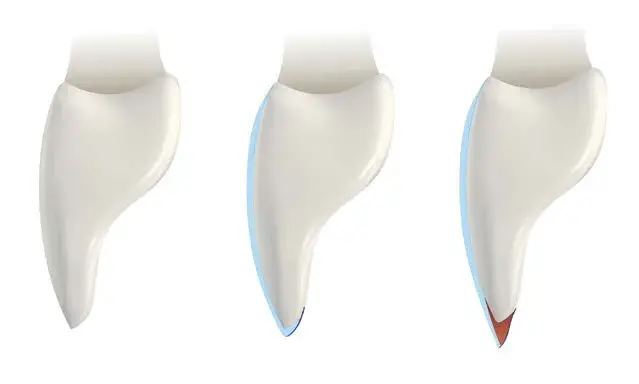
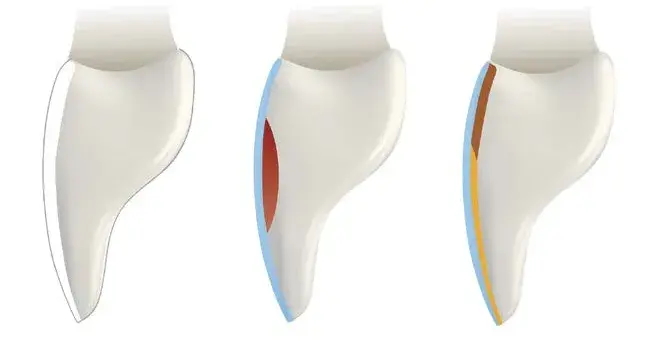
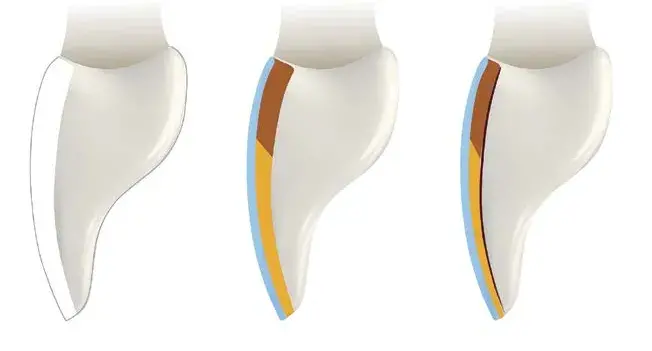
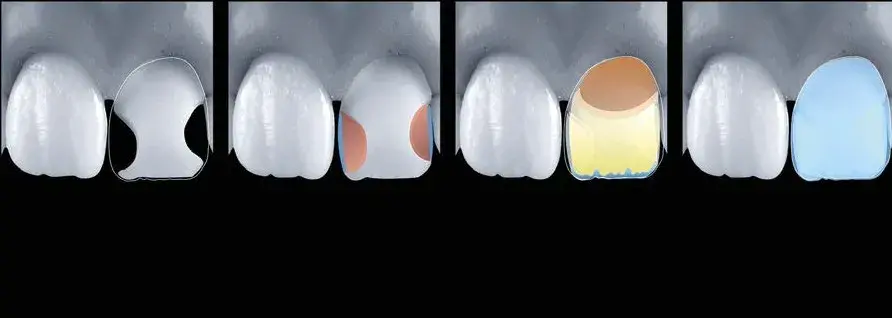
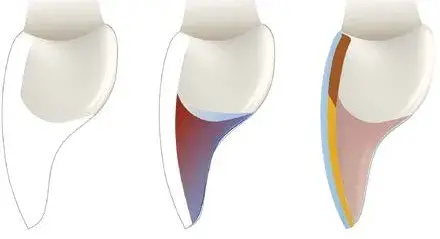
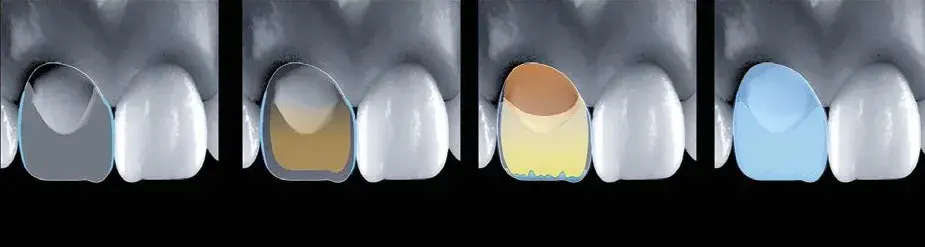
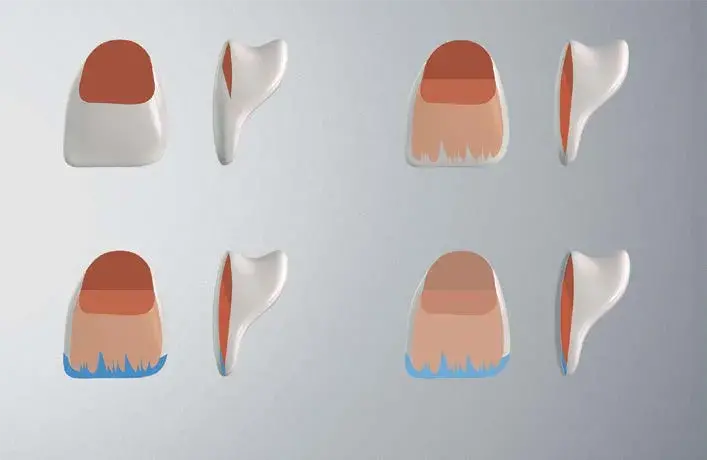 Scheme 1: Depiction of the Natural Layering Concept. Step 1. Cervical dentin: more chromatic (red). Step 2. Middle incisal: less chromatic (orange). Step 3. Incisal effects (blue). Step 4. Buccal enamel (gray).
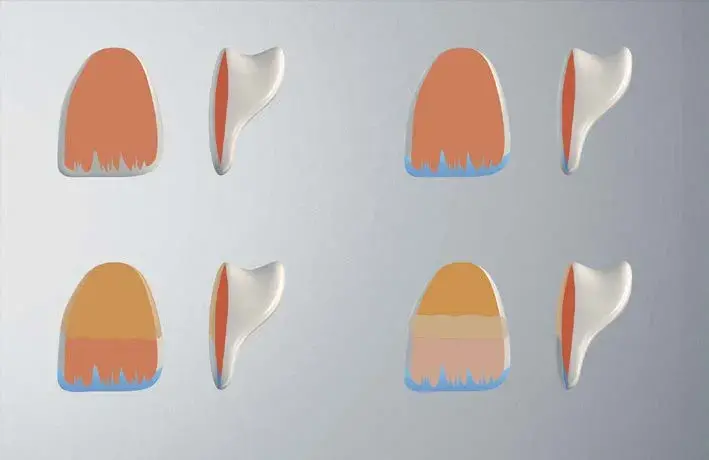 Scheme 2: Depiction of the Polychromatic Layering Technique. Step 1. Dentin (orange). Step 2. Incisal effects (blue). Step 3. Chromatic enamel, cervical and middle third (light orange). Step 4. Achromatic enamel, incisal third (light pink).
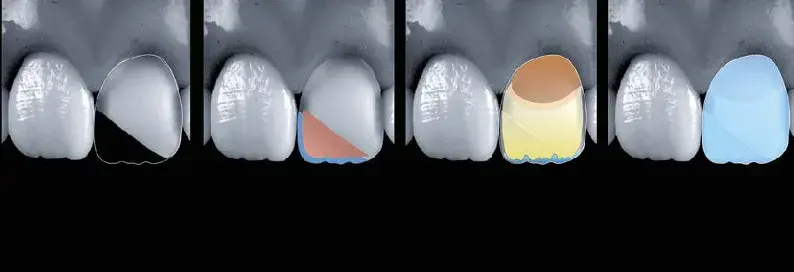
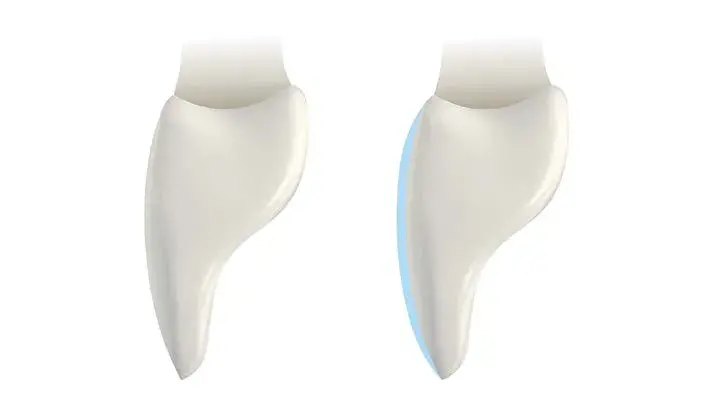 Scheme 3: Restorative protocol for additive veneer without increasing the incisal edge. Light Blue: Vestibular enamel (conventional or body).
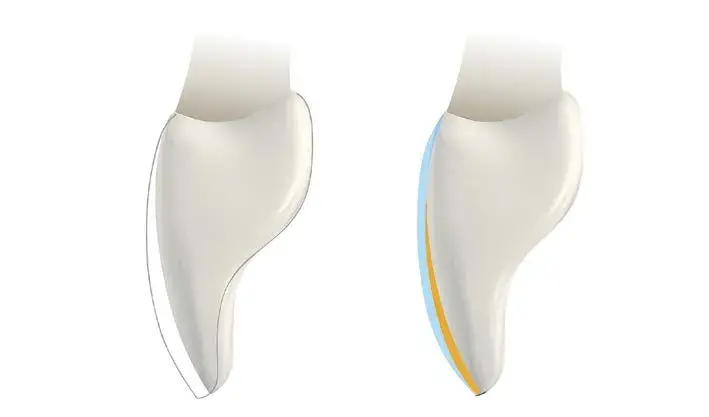 Scheme 4: Restorative protocol for additive veneer without increasing the incisal edge on palatinized teeth. Dark Blue: Palatal and incisal enamel. Yellow: Dentin (conventional or body). Light Blue: Vestibular enamel.
Clinical Case 1
This patient presented with an issue that was an indication for orthodontic therapy (Fig 1). However, because he declined that option, resin veneers were recommended to improve his smile’s esthetics. Furthermore, #7 exhibited a palatal inclination and a more apically positioned incisal edge than #10. Because of this, it was recommended that #9’s Class IV restoration be replaced. (Note: Details on how to perform a Class IV restoration are provided later in this article.)
Before applying the enamel, the labial volume of the teeth to be restored must be balanced; failure to do so may result in uneven thicknesses and a significant difference in the final value. Accordingly, a body resin (Filtek Universal shade A1) more closely matching the color of the adjacent tooth was applied to #7, which was then leveled to be even with #8. The application of body resins or medium-low opacity dentins is recommended for these procedures to level veneers by addition (Fig 2). To complete the final restorations in this case (Fig 3), a bleach shade enamel (Filtek Supreme WE) was applied from #6 to #11, which resulted in the final smile (Fig 4).
Additional veneers with incisal increase: Medium- or high-value enamels can be employed, as well as very high-value resins with a thickness of up to 0.5 mm. In cases involving an incisal edge increase of more than 1.0 mm, the authors recommend applying some dentin (body) resin after the palatal enamel in order to invisibly transition the existing incisal edge to the new incisal edge position. Scheme 5 and Clinical Cases 2, 3, and 4 describe dentin reproduction and avoidance of an extensive incisal translucid area.
 Figure 1: Clinical Case 1, initial condition.
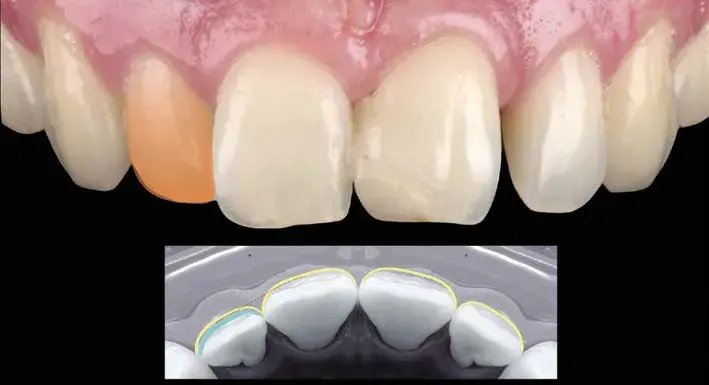 Figure 2: Body resin was applied to #7.
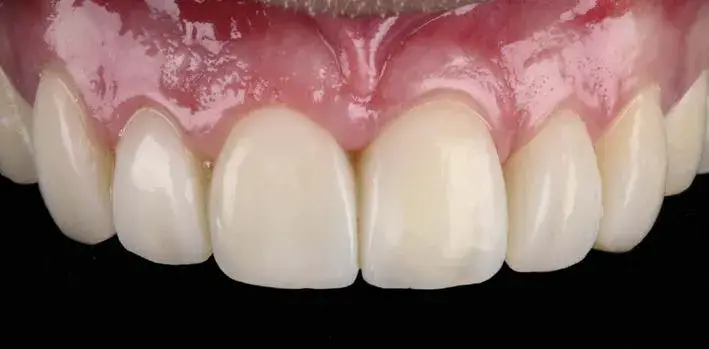 Figure 3: Bleach shade enamel was applied from #6 through #11 to craft the final restorations.
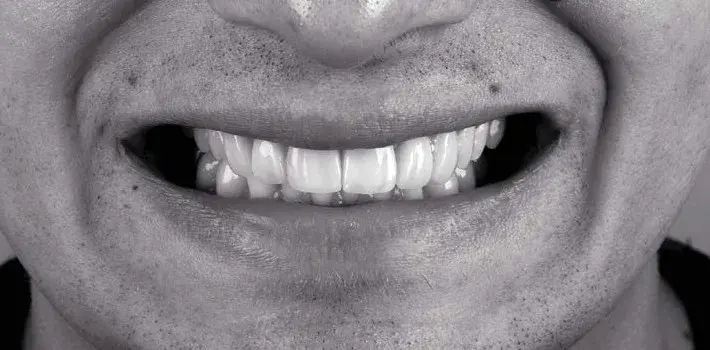 Figure 4: Clinical Case 1, final smile.
 Scheme 5: Restorative protocol for additive veneer with incisal edge increase. Dark Blue: Palatal enamel. Light Red: Dentin (conventional or body). Light Blue: Vestibular enamel.
Clinical Case 2
This patient wanted lighter teeth and a slight increase in the size of the incisal edges (Fig 5). After modifying the silicone matrix to accommodate the patient's wishes, a more robust and wear-resistant palatal enamel (Forma WE) was applied from #6 through #11 (Fig 6). (Note that only a slight increase in length [< 1.0 mm] was made and that, in this instance, it was not necessary to apply dentin/body resin onto the palatal enamel at the incisal edge before applying the final facial enamel layer. However, in other cases where higher incisal translucency might be desired, incisal effect resins may be applied at this stage.) Next, a very high-value (i.e., “super-milky”) enamel (Filtek Universal XW) was applied; this shade was selected to significantly modify (i.e., bleach) the teeth’s color (Fig 7). The restorations were finished and polished (Fig 8). Teeth #5 and #12 also received veneers at another appointment; the final smile is shown in Figure 9.
 Figure 5: Clinical Case 2, initial condition.
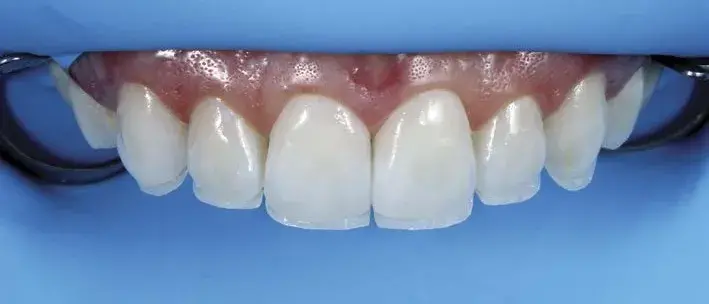 Figure 6: Palatal enamel was applied from #6 through #11.
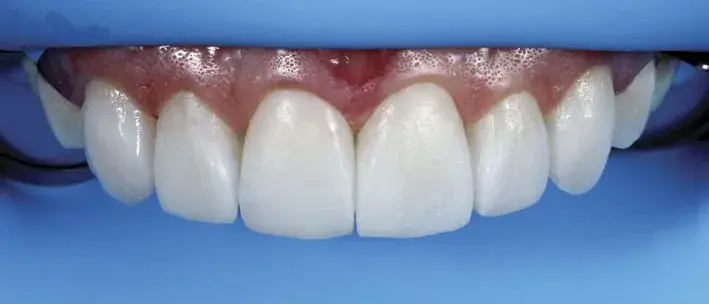 Figure 7: Very high-value (super-milky) enamel was applied next.
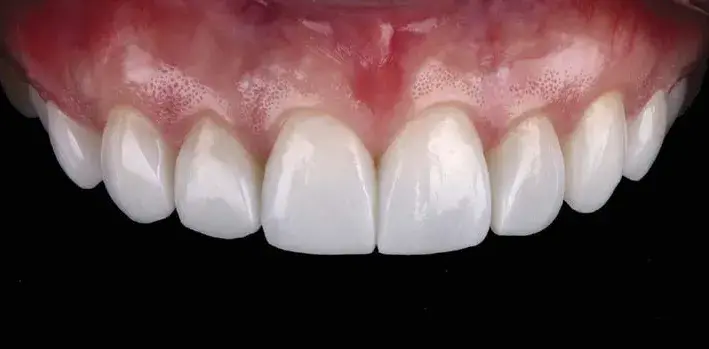 Figure 8: Restorations after finishing and polishing.
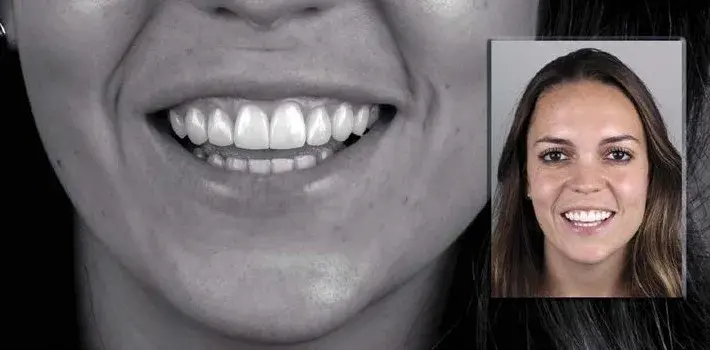 Figure 9: Clinical Case 2, final smile.
Clinical Case 3
Here, an increase in teeth length was planned, which required the application of a resin to the labial aspect to increase volume and improve color (Fig 10). After isolation with a rubber dam (Fig 11), palatal enamel (Estelite Posterior PCE) was applied to #7 through #10. (Note that the incisal increase, especially to the laterals, is slightly greater than 1.0 mm [Fig 12]. In cases involving more significant increases, it is worth applying a body or a medium-low opacity resin to avoid excess enamel volume in this region.) A body resin (Estelite Sigma Quick OA1) was applied at the incisal third, feathering out the resin and blending it into the transition to the beginning of the middle third, on #7 through #10 (Fig 13).
Labial enamel (Estelite Sigma Quick BW) was then applied to the same four teeth (Fig 14). Teeth #5, #6, #11, and #12 underwent the same layering process. The restorations were finished and polished (Figs 15); the final smile is shown in Figure 16.
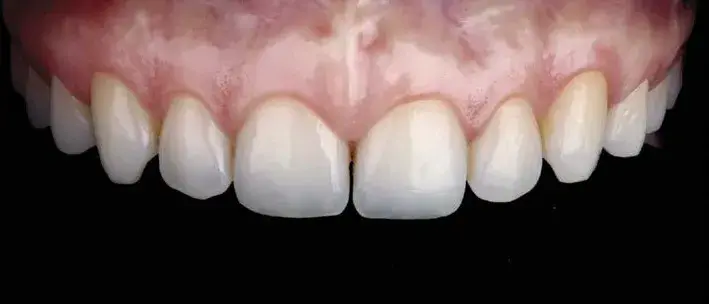 Figure 10: Clinical Case 3, initial condition.
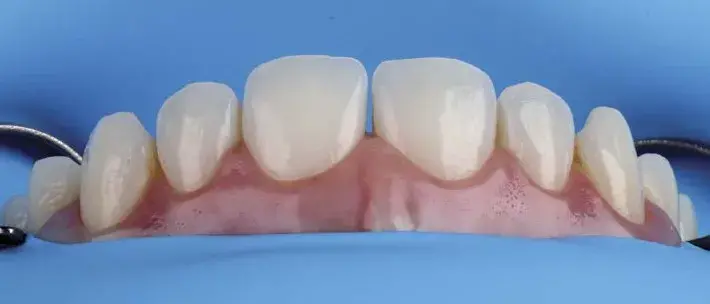 Figure 11: Rubber dam isolation.
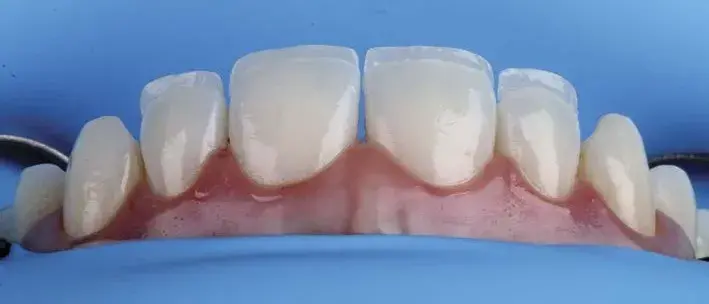 Figure 12: Palatal enamel was applied to #7 through #10.
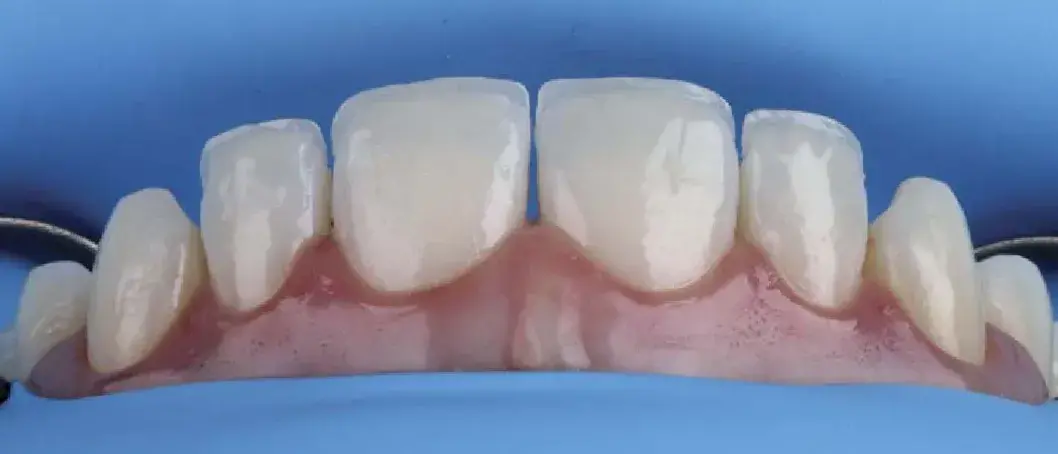 Figure 13: Body resin was applied at the incisal third, feathering out the resin and blending it into the transition to the beginning of the middle third, on #7 through #10.
 Figure 14: Labial enamel was applied to #7 through #10; #5, #6, #11, and #12 underwent the same layering process.
 Figure 15: After finishing and polishing.
 Figure 16: Clinical Case 3, final smile.
Clinical Case 4
This patient presented with a condition following orthodontic treatment exhibiting incisal edge wear of the central incisors and canine tips. Restoration of #6, #8, #9, and #10 was planned to offer the correct height-width proportion and relationship to the lateral incisors (Fig 17). Figure 18 shows incisal increase with composite resin (Herculite Ultra, LTI) used for the palatal enamel. The next step was to apply dentin resin (Empress Direct shade A1) and labial and proximal enamel resin (Empress Direct¸ BL-L Enamel) close to the incisal edge, and then follow with preliminary finishing. The final result restored harmony to the anterior teeth; occlusal function balance was achieved after reestablishment of canine guidance (i.e., canine tips) (Fig 19).
 Figure 17: Clinical Case 4, initial condition after orthodontic treatment showing incisal edge wear of the central incisors and canine tips.
 Figure 18: Composite layering.
 Figure 19: Clinical Case 4, final result.
Veneers for Teeth with Superficial Wear (up to 1.0 mm)
This category of clinical cases includes teeth with small old restorations (veneers), teeth with minor superficial stains, white stains, and/or minor discoloration.
Conservative veneers with slight wear: This group includes old veneers that need to be replaced. Enamel resins are typically utilized in these situations (Scheme 6); or, if the working space for the resin is greater than 0.5 mm, dentin (body) resin will be added. Clinical Case 5 describes this type of re-anatomization.
 Scheme 6: Restorative protocol for veneers with conservative preparations. Light Red: Dentin (conventional or body). Light Brown: More saturated dentin. Yellow: Less saturated dentin. Light Blue: Vestibular enamel.
Clinical Case 5
This patient presented with a discolored restoration at #8 (Figs 20 & 21). Figure 22 shows resin removal and conservative preparation for the veneer (< 1.0 mm). Layering began with the application of a higher-saturation cervical dentin shade (Filtek Supreme XT A2B), which was feathered to a 45-degree angle at the beginning of the middle third (Fig 23). Figure 24 shows the application of the principal dentin (Filtek Supreme XT WB) at the middle and incisal thirds. This dentin should end just before the edge to create translucent effects and should not be applied up to the proximal boundaries.
After completing this layer, it is important to leave a minimal amount of space (i.e., approximately 0.5 mm) for the enamel.
A white pigment (Empress Direct Color) was applied here to reproduce horizontal white lines (Fig 25). The final veneer layer was achieved with a high-value milky enamel (Empress Direct BL-L) (Fig 26). After finishing and polishing (Figs 27-29), the patient’s final smile is shown in Figure 30.
Conservative veneers with irregular preparations: Cases with more severe white stains may require evening out the preparation via additional layers, as demonstrated in Clinical Case 6.
 Figure 20: Clinical Case 5, initial smile.
 Figure 21: Clinical case 5’s initial condition showing a discolored restoration at #8.
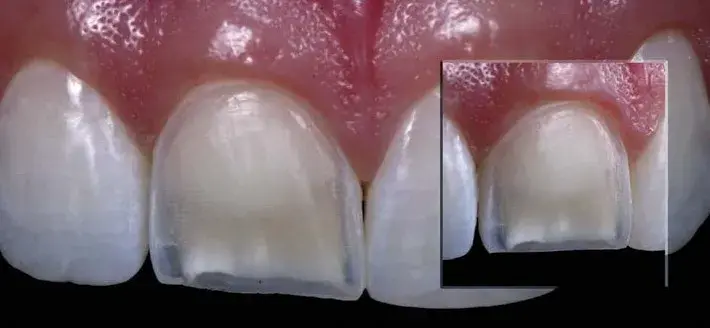 Figure 22: Resin removal and conservative veneer preparation (< 1.0 mm).
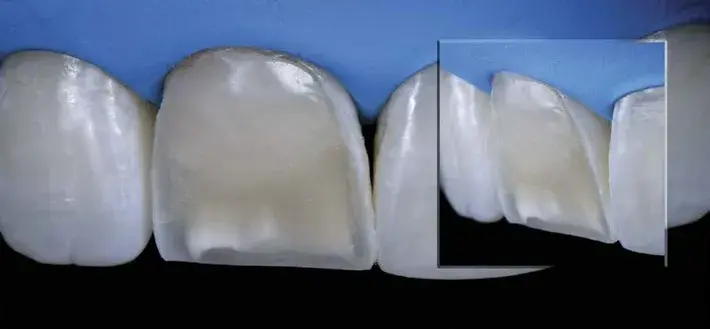 Figure 23: Application of the most saturated cervical dentin, which was feathered to a 45-degree angle at the beginning of the middle third.
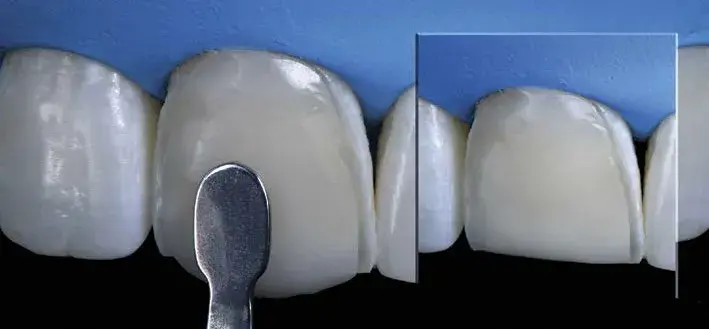 Figure 24: Principal dentin was applied at the medium-incisal third.
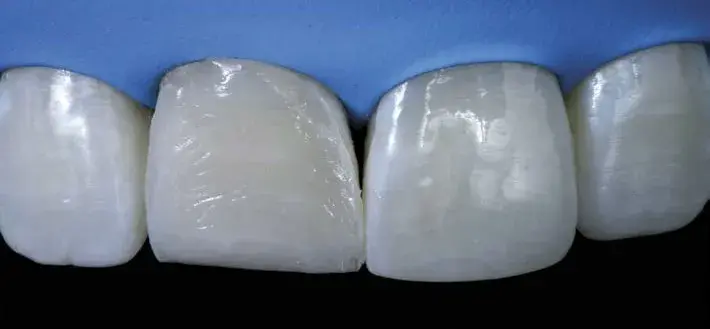 Figure 25: White pigment was applied to reproduce horizontal white lines.
 Figure 26: Application of a high-value enamel layer.
 Figures 27-29: Clinical Case 5, final result.
 Figure 30: Clinical Case 5, final smile.
Clinical Case 6
The initial condition of this case, an intense white stain with a slight darkening at the cervical of #9, is shown in Figure 31. The plan called for a superficial veneer preparation (0.5 mm) and further deepening the white stain area (Fig 32). Accordingly, to regularize the preparation, a medium-low opacity dentin (Estelite Omega A2D) was applied as the first layer (Fig 33), and then the restoration was completed with the application of a layer of medium-value enamel (Estelite Omega MW). Note the different optical effects and colors (Fig 34).
 Figure 31: Clinical Case 6, initial condition.
 Figure 32: The plan called for a superficial Veneer preparation (0.5 mm) and a slight deepening of the white stain area preparation.
 Figure 33: A medium-low opacity dentin was used to regularize the preparation.
 Figure 34: A medium-value enamel was applied. Note the different optical effects.
Veneers for Teeth with Intense Wear/Dark Teeth (> 1.0 mm)
For cases with old, thick veneers and/or substrates with color changes, more aggressive dental preparation is required (i.e., either removing the old resin or creating enough room). In highly darkened substrates, using high-opacity materials is recommended; this allows minimum light transmission, depending on the characteristics and thickness. (Although dentin resins are called “opaque,” they present a certain degree of translucency, allowing light to pass through evenly.) These high-opacity materials are called opaquers and may have a regular (i.e., the same as conventional resins) or more fluid viscosity.
Veneers over dark teeth: It is essential to evaluate the degree of discoloration to apply these highly opaque materials effectively. In the authors’ opinion, if the darkness is up to an A4 on the Vita scale, higher opacity dentins (e.g., Filtek Supreme D) should be used. For cases presenting intense discoloration (i.e., gray, brown, or black), opaquers are indispensable. Layering over substrates with varying degrees of discoloration becomes more predictable when a lighter shade (close to an A2 or A3) is first applied; from this point, layering is performed following the same protocol for veneering a tooth with no color change. In other words, the substrate should be changed to a brighter, lifelike shade to enable conventional veneer layering. This masking strategy is discussed in Clinical Case 7 and shown in Scheme 7.
 Scheme 7: Restorative protocol for deep veneer preparations and veneers with dark substrates. Dark Red: Opaquer. Light Brown: More saturated dentin.
Clinical Case 7
The patient presented with a restoration on #8 that exhibited a dark substrate (Fig 35). Following preparation, a resin for palatal enamel (Forma WE) was applied to restore tooth length (Fig 36). A 0.4-mm thick layer of opacifying resin (Forma Opaquer) was then applied to the dyschromic substrate to lighten the color to an A2 or A3 (Fig 37). The modified substrate had a more natural color (Fig 38). At this point, standard layering commenced. Forma A3B and A2B were used to restore the dentin (Fig 39), while the enamel was restored with Forma XWE (Fig 40). The final restoration, after finishing and polishing, is shown in Figure 41.
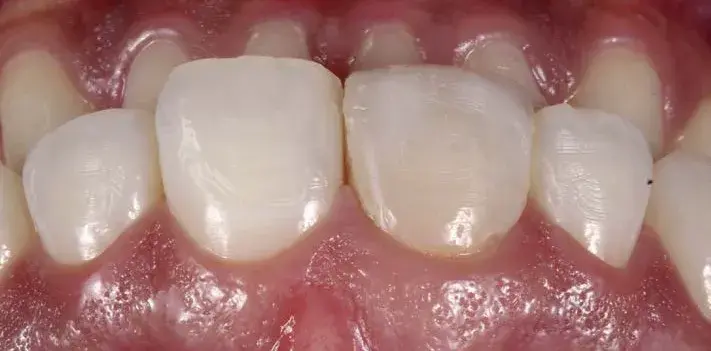 Figure 35: Clinical Case 7, initial situation.
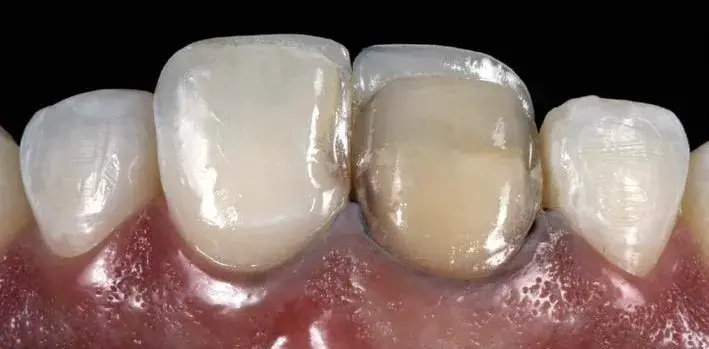 Figure 36: Preparation and resin application for palatal enamel layer.
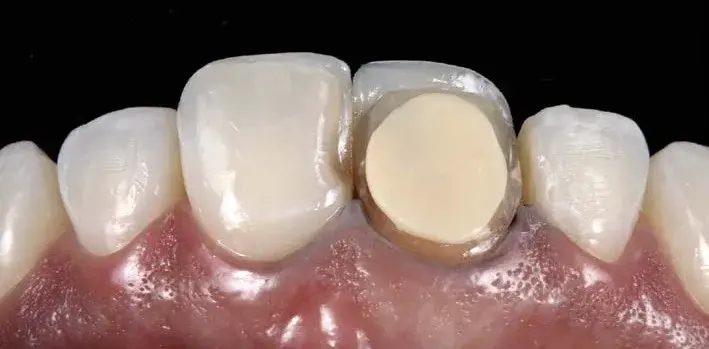 Figure 37: A 0.4-mm thick layer of opacifier resin was applied.
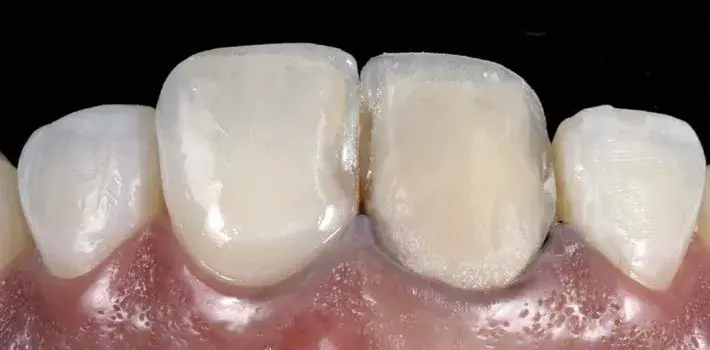 Figure 38: The modified substrate.
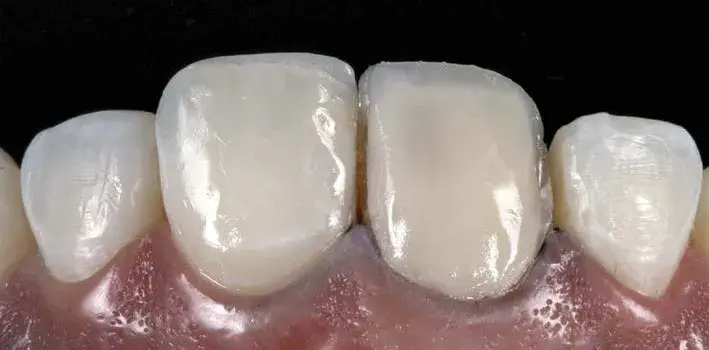 Figure 39: The dentin layer.
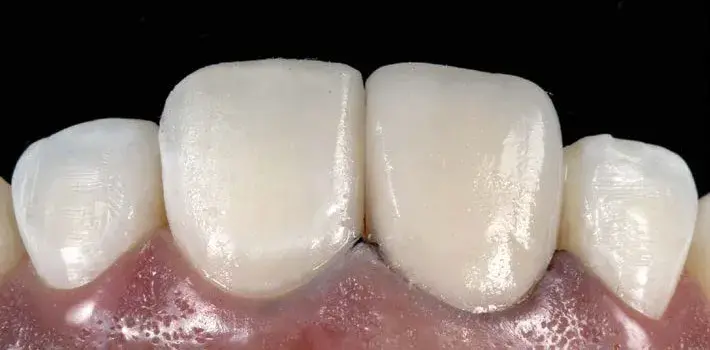 Figure 40: The enamel layer.
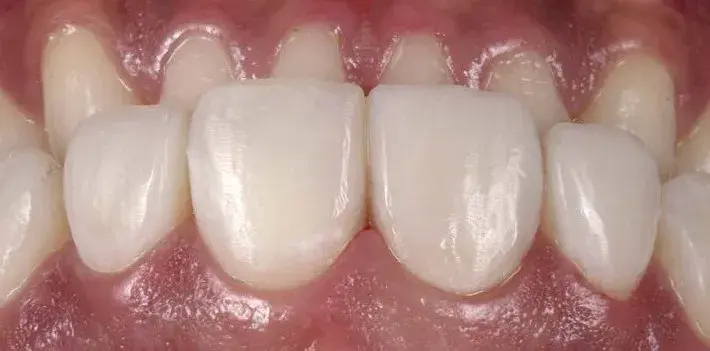 Figure 41: Clinical Case 7, final restoration.
Veneer for Teeth with Class III and/or IV Cavities or Restorations
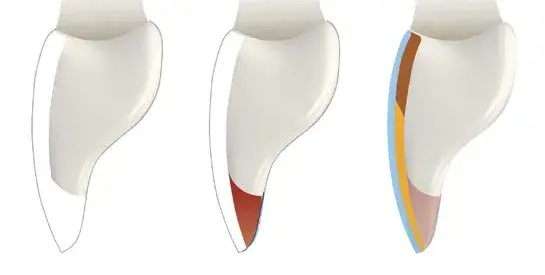
In these scenarios, establishing a logical sequence of layers is vital. The authors recommend restoring Class IIIs and IVs to a buccal contour, replicating the design of a veneer preparation.
Thus, the first step would be to apply an enamel resin as a palatal shell, followed by a dentin layer with a shade closer to the substrate, leaving it flush with the preparation. The proximal enamel can be recreated shortly after the palatal enamel or at the end of the layering process.
Class III restorations: The protocol for Class III restorations is shown in Scheme 8 and Scheme 9 and described in Clinical Case 8.
 Scheme 8: Class III restorative protocol for veneers. Light Red/Pink: Opaque dentin. Light Brown: More saturated dentin. Yellow: Less saturated dentin. Light Blue: Vestibular enamel.
 Scheme 9: Step-by-step protocol for a veneer with Class III restorations. Light Red/Pink: Opaque dentin. Dark Blue: Proximal enamel/incisal effect. Light Brown: More saturated dentin. Yellow: Less saturated dentin. Light Blue: Vestibular enamel.
Clinical Case 8
The initial condition exhibited a diastema between #8 and #9 and unesthetic Class III restorations on #7 through #10 (Fig 42). Figure 43 shows restoration removal and creation of a 1.5-mm wide enamel bevel. Palatal enamel (Herculite Ultra, LTI) was sculpted with the aid of a silicone guide (Fig 44). Proximal enamel (Aura E2, SDI; Itasca, IL) was applied with the help of a metal matrix (Unica, Polydentia SA; Mezzovico-Vira, Switzerland) (Fig 45). For #7 and #8, the Class III restorations (Aura DC3 and DC2) were turned into veneer preparations before applying the subsequent layers (Fig 46).
Due to the reduced space, only the enamel (Aura E2) was applied to the entire buccal aspect. After finishing and polishing, the final result can be seen in Figure 47.
 Figure 42: Clinical Case 8, initial condition.
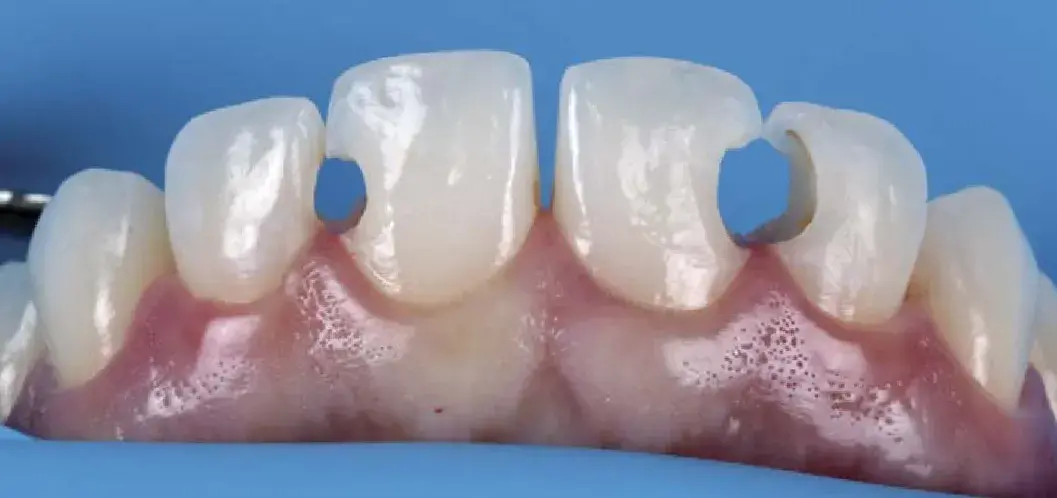 Figure 43: Restoration removal and creation of 1.5-mm wide enamel bevel.
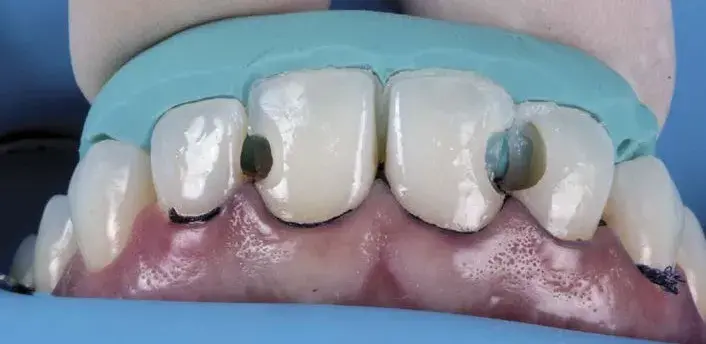 Figure 44: Palatal enamel sculpted with the help of a silicone guide.
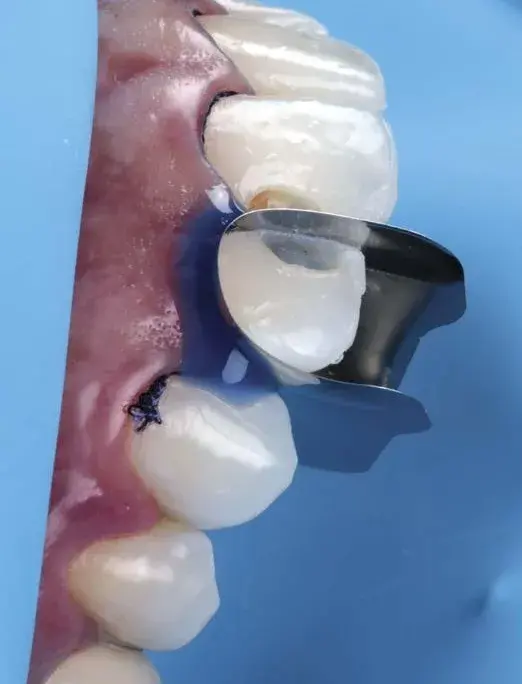 Figure 45: Proximal enamel applied with the help of a metal matrix.
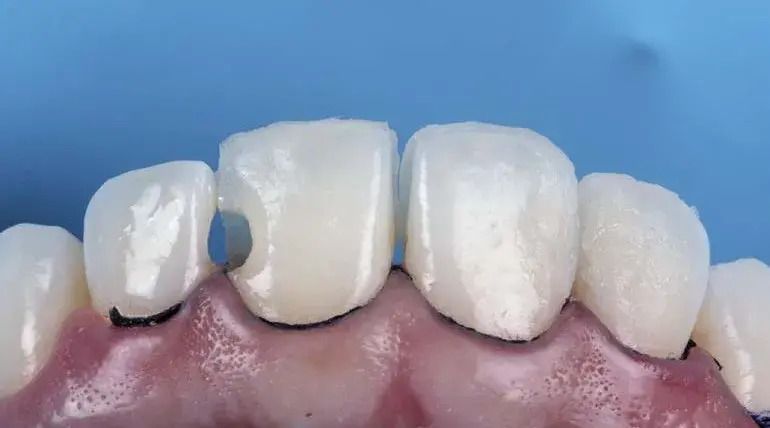 Figure 46: Class III restorations on #7 and #8.
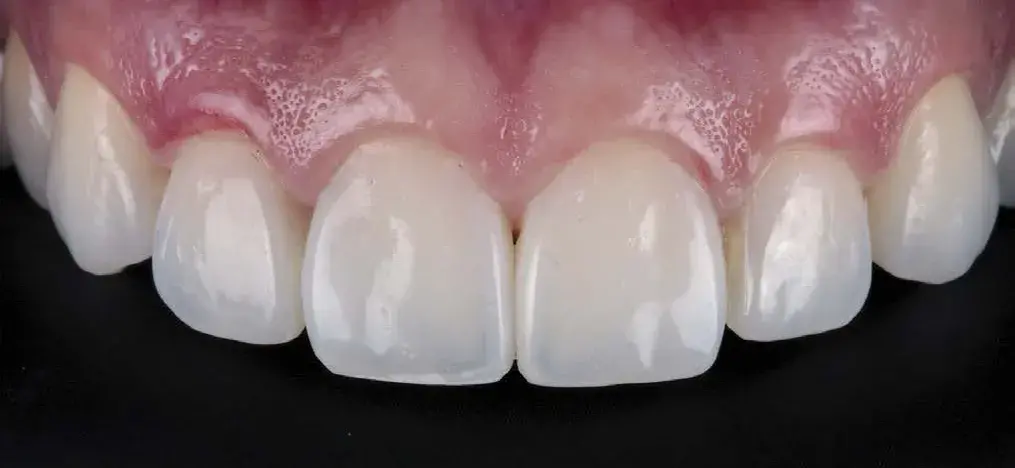 Figure 47: Clinical Case 8, final result after application of enamel layer and finishing and polishing.
Class IV restorations: Scheme 10 and Scheme 11 illustrate the layering method for Class IV restoration; Clinical Case 9 describes the step-by-step process.
 Scheme 10: Restorative protocol for veneer preparation with Class IV restorations. Dark Blue: Palatal enamel. Light Red/Pink: Deep opaque dentin. Light Brown: More saturated dentin. Yellow: Less saturated dentin. Light Blue: Vestibular enamel.
 Scheme 11: Restorative protocol for a veneer with Class IV restorations. Dark Blue: Palatal enamel. Light Red/Pink: Deep opaque dentin. Light Brown: More saturated dentin. Yellow: Less saturated dentin. Light Blue: Vestibular enamel.
Clinical Case 9
The patient’s initial condition exhibited a discolored #9 with an unesthetic restoration (Fig 48). Once the defective composite was removed, Veneer and Class IV preparations (Fig 49) could be observed. The best approach for such cases is to restore the palatal enamel, followed by a dentin layer flush with the veneer preparation, and then employ the chosen veneering technique (in this case, the direct technique).
Estelite Omega was the sole restorative system used in the case.
Following rubber dam placement, a palatal enamel composite was applied using a silicone guide created (and adjusted) from the preexisting restoration (MW). Next, a dentin layer with a shade close to the substrate dentin (A3D) was applied, starting at the mamelons and ending at the preparation level, thus turning it into a veneer (Fig 50). Figure 51 shows the result after “veneer preparation” modification.
The polychromatic layering technique was used in this case.
After applying a bleach shade as a dentin layer (BL1), a translucent effect enamel (Trans) was used in between the mamelons at the incisal third. Then, a chromatic enamel (A2) was applied to the cervical half and an achromatic medium value (MW) was applied to the incisal half. Following finishing and polishing (Fig 52), the final result was achieved (Fig 53).
 Figure 48: Clinical Case 9, initial condition showing a darkened tooth with an unesthetic restoration.
 Figure 49: Once the defective composite was removed, veneer and Class IV preparations could be observed
 Figure 50: Application of the palatal enamel and a resin for the dentin.
 Figure 51: After “Veneer preparation” modification.
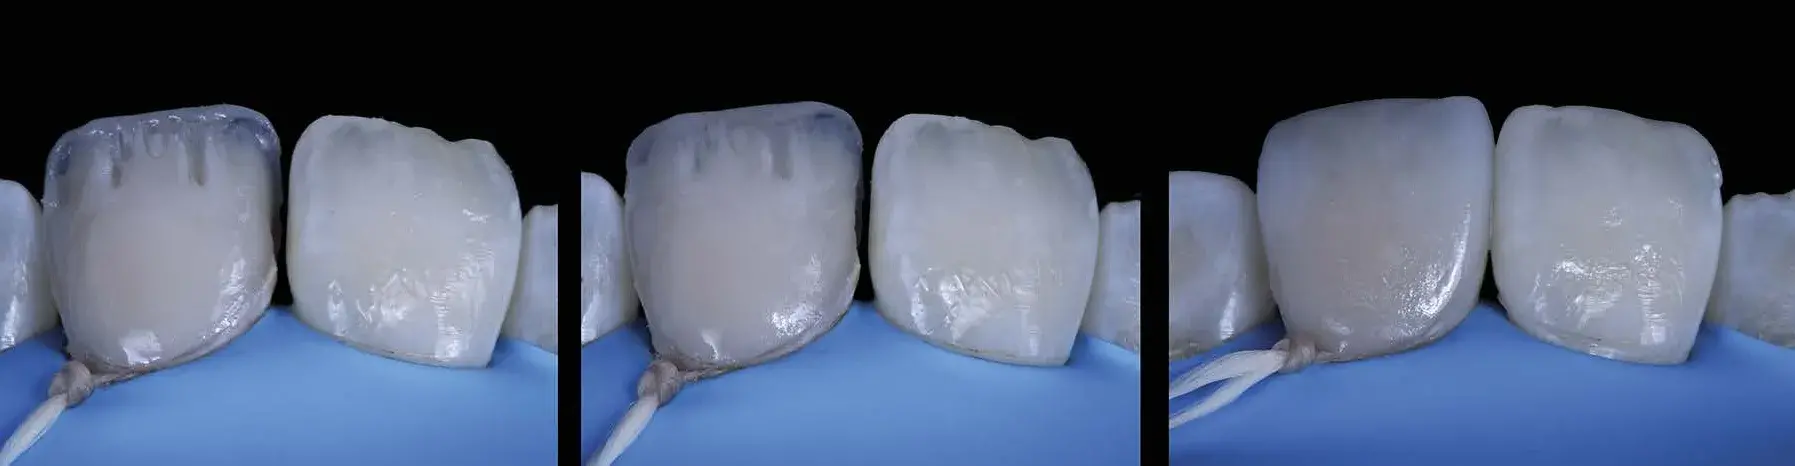 Figure 52: Layering with application of BL1 dentin, translucent effect, enamel A2 at the cervical half, and MW on the incisal half.
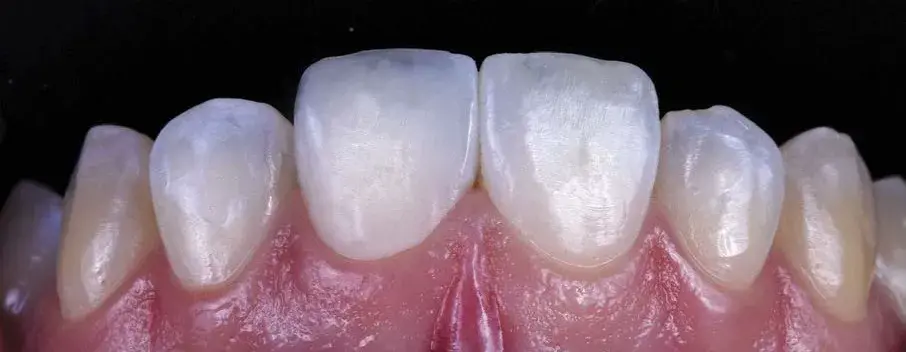 Figure 53: Clinical Case 9, final result.
Veneers for Teeth with Major Coronal Destruction
The severely broken-down dentition usually requires ceramic restorations. However, direct composite resin restorations have proven successful and long-lasting alternatives. The success and durability of direct composite restorations are predicated on the following:
- Diagnostic waxing for planning, occlusal balance predictability, and correct construction of the palatal shell.
- Selection of composite resins with high mechanical properties.
- Proper polymerization of each layer to ensure optimal polymer conversion.
- Occlusal adjustment to restore protrusive and lateral guidance.
For the layering sequence, represented by Scheme 8 and Scheme 9, the authors recommend starting by replicating the palatal enamel with a high flexural strength resin aided by a silicone guide made from a wax-up. The next step is replicating the proximal enamel, which can be contoured with the help of metal matrices (e.g., Unica; or Palodent, Dentsply Sirona; Charlotte, NC) or mylar strips. Next, a high-strength, medium-opacity dentin resin is applied to the deepest area, turning the defect into a veneer preparation. Following this step, the most suitable veneering technique is selected for the case at hand. Schemes 12 and 13 and Clinical Cases 10 and 11 demonstrate and discuss this type of reconstruction.
 Scheme 12: Restorative protocol for a veneer on severely damaged teeth. Dark Blue: Palatal enamel. Light Red/Pink: Deep opaque dentin. Light Brown: More saturated dentin. Yellow: Less saturated dentin. Light Blue: Vestibular enamel.
 Scheme 13: Step-by-step protocol for a veneer on severely damaged teeth. Dark Blue: Palatal enamel. Brown: Deep opaque dentin. Light Brown: More saturated dentin. Yellow: Less saturated dentin. Light Blue: Vestibular enamel.
Clinical Case 10
The initial condition showed several unsatisfactory and discolored restorations (Fig 54). After preparation and field control, the teeth’s damage level could be observed (Fig 55). A palatal enamel shell (Estelite Omega PCE) was applied with the help of a silicone guide. The material was applied to the palatal aspects, keeping within each tooth’s contour limits (note the borders’ alignment from the incisal view).
In the authors’ opinion, complex cases such as this should first be addressed at the restorative appointment stage (i.e., in this case, first apply the adhesive and restore just the four incisors, then treat the other teeth) (Fig 56).
The next step was to recreate the proximal enamels (Estelite Omega BL2) (Fig 57). The authors usually utilize the same color applied on the buccal aspect (interproximal strips may facilitate this step). It is crucial to always begin at the buccal middle third and then proceed toward the palatal aspect. A higher chroma resin (Essentia MD) was applied onto the palatal shell and made flush with the remnant tooth structure, which appeared brighter than the resin, likely due to dehydration. After turning the defects into a veneer-like preparation scenario, layering could ensue according to the selected technique (i.e., polychromatic or natural layering) (Fig 58).
In this case, A2 dentin and A2 and BL2 enamels (Estelite Omega) were applied using the polychromatic layering technique (Fig 59). The final restorations are shown in Figures 60 through 62 (note that #6 and #11 received only a single layer of BL2 enamel).
 Figure 54: Clinical case 10, initial condition.
 Figure 55: After preparation and complete isolation.
 Figure 56: Application of palatal enamel.
 Figure 57: Creation of the proximal enamels.
 Figure 58: A higher chroma resin was applied onto the palatal shell and made flush with the remnant tooth structure.
 Figure 59: A2 dentin and A2 and BL2 enamels were applied using the polychromatic layering technique for veneers.
 Figures 60-62: Clinical Case 10, final result.
Clinical Case 11
The initial condition of this case, with highly worn restorations (Fig 63), indicated the need for replacement. Once the restorations were removed, preparation and adhesive (Clearfil SE Bond, Kuraray; New York, NY) procedures were performed (Fig 64). The final condition after composite resin layering can be seen in Figure 65.
Layers were applied according to the polychromatic layering technique using the following Harmonize shades: Incisal Super Clear for palatal enamel; A3D for dentin; A2E for buccal enamel and the cervical and medium thirds; and Incisal Gray for enamel at the incisal third.
 Figure 63: Clinical Case 11, initial condition.
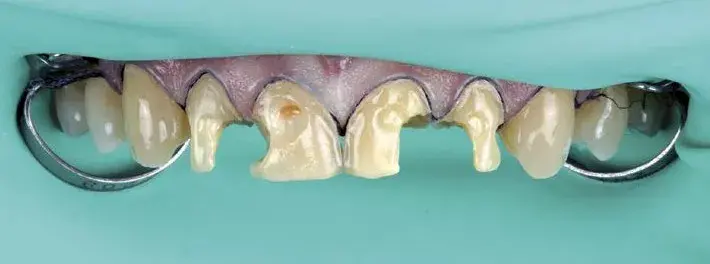 Figure 64: After removal of fillings, and preparation and adhesive procedures.
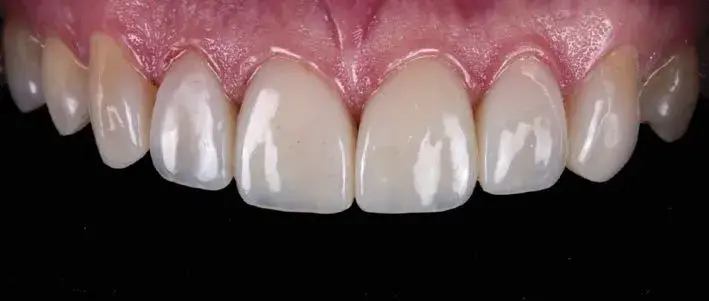 Figure 65: Clinical case 11, final result after layering with composite resins.
Summary
As a result of advances in adhesive techniques, composite resins have become the primary restorative materials in modern dentistry. Resin restorations have a strong ability to replicate anatomical shape, color, dentin and enamel opacity levels, opalescence effects, and characterizations (e.g., stains and cracks), as well as good mechanical resistance. However, their use is not without challenges. Clinicians must consider various factors, including material selection, application methodologies, accurate color matching, and layering techniques. In addition, they must thoroughly understand the various materials’ characteristics and how they influence final esthetics to select the most appropriate materials for case-specific direct composite veneer restorations.
Another crucial aspect is properly planning the layering technique for each clinical situation, which necessitates knowledge of the available working room, the desired change, the substrate level that needs to be equalized, and when and how to apply each layer. Finally, clinicians must be familiar with and skilled in the various restorative approaches for direct veneer treatments and their applicability in various clinical scenarios.
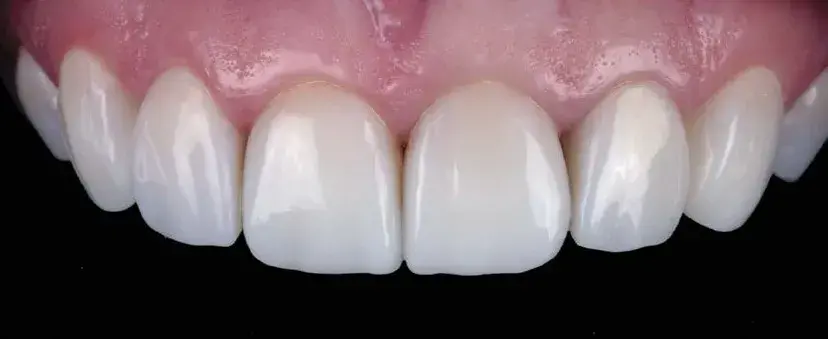
This article has classified the different approaches for resin composite veneers to help practitioners ensure the best clinical outcomes. Then, through case presentations of various clinical conditions requiring modification, lthe authors described the appropriate layering sequences to resolve each clinical situation to achieve natural-looking results that provide patients with brighter, more harmonious, and more confident smiles.
If you enjoyed reading this article and would like to explore the composite veneers topic further, we encourage you to enroll to our course "Ceramic and composite veneers: all techniques".
Authors:
Rafael Calixto, Jorge Eustáquio
References
- Dietschi D, Shahidi C, Krejci I. Clinical performance of direct anterior composite restorations: a systematic literature review and critical appraisal. Int J Esthet Dent. Jan;2019;14(3):252-70.
- Ferracane JL. Resin composite-state of the art. Dent Mater. 2011 Jan;27(1):29-38.
- Heintze SD, Rousson V, Hickel R. Clinical effectiveness of direct anterior restorations: a meta-analysis. Dent Mater. 2015 May;31(5):481-95.
- Turssi CP, De Moraes Purquerio B, Serra MC. Wear of dental resin composites: insights into underlying processes and assessment methods—a review. J Biomed Mater Res B Appl Biomater. 2003 May 15;65(2):280-5.
- Villarroel M, Fahl N, De Sousa AM, De Oliveira Jr OB. Direct esthetic restorations based on translucency and opacity of composite resins. J Esthet Restor Dent. 2011 Apr;23(2):73-87.
- Calixto R, Eustáquio J. Cor e translucidez [Veneers in composite resins]. In: Calixto R, Eustáquio J. Direct–facetas em resinas compostas [Direct–veneers in composite resins]. São Paulo: Santos; 2021. p. 99-153. Portuguese.
- Price RBT. Light curing in dentistry. Dent Clin North Am. 2017 Oct; 61(4):751-78.
- Rueggeberg, Giannini M, Arrais CAG, Price RBT. Light curing in dentistry and clinical implications: a literature review. Braz. Oral Res. 2017 Aug 28;(suppl 1):e61.
- Vanini L. Light and color in anterior composite restorations. Pract Periodontics Aesthet Dent. 1996 Sep;8(7):673-82.
- Duarte Jr. S, Martins de Oliveira ALB, Phark J. Influence of enamel layering thickness on chroma, value, and VITA shade for esthetic composite resin restorations. Am J Esthet Dent. 2011 Winter;1(2):158-68.
- Duarte Jr S, Satori N, Phark J. Achieving the ultimate optical properties of composite resin. 2013 QDT. Hanover Park (IL): Quintessence Pub.; p. 36.
- Dietschi D. Layering concepts in anterior composite restorations. J Adhes Dent. 2001 Spring;3(1):71-80.
- Dietschi D. Free-hand composite resin restorations: a key to anterior aesthetics. Pract Periodontics Aesthet Dent. 1995 Sep;7(7):15-25.
- Dietschi D, Ardu S, Krejci I. A new shading concept based on natural tooth color applied to direct composite restorations. Quintessence Int. 2006 Feb;37(2):91-102.
- Fahl Jr N, Denehy GE, Jackson RD. Protocol for predictable restoration of anterior teeth with composite resins. Pract Periodontics Aesthet Dent. 1995 Oct;7(8):13-21.
- Fahl Jr. N. A polychromatic composite layering approach for solving a complex Class IV/direct veneer-diastema combination: part I. Pract Proced Aesthet Dent. 2006 Nov-Dec;8(10):641-5.