
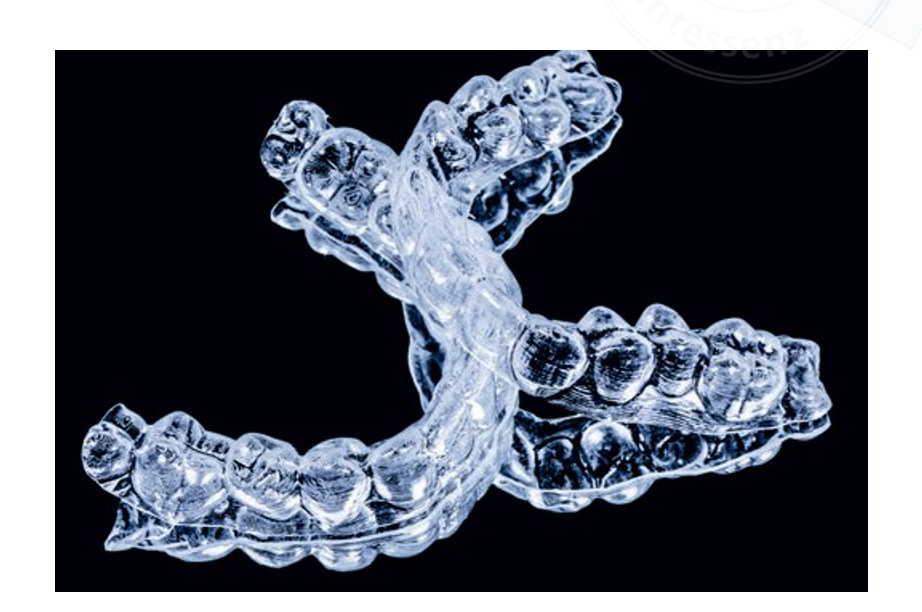
In-office thermoplastic aligner workflow
Clear aligners are, without doubt, the most popular option in current clinical orthodontic practice. As knowledge relating to the latter has increased, different treatment modalities have been proposed. The digital workflow plays a significant role in the treatment of malocclusion, giving a precise indication of how much and at what point each tooth will move; thus, it can be considered to provide the most individualised prescription possible. Many brands offer clear aligners, and the decision of which one to use depends entirely on the clinician; nevertheless, the option to fabricate them in one’s own clinic is a cost-effective and predictable process of which all clinicians should be aware.
Introduction
In 1949, Orrin Remensnyder patented a removable orthodontic appliance to straighten teeth. In 1993, Dr John J Sheridan developed the Essix retainer, the first clear aligner system, and later Align Technology (San Jose, CA, USA) created Invisalign. Clear aligner therapy (CAT) has since increased in popularity, showing that with good orthodontic diagnosis, careful treatment planning and knowledge of biomechanics, the desired results can be achieved in patients.
The evolution of CAT is without doubt due to digital developments such as intraoral scanning, dental model scanning, software, 3D printing and thermoplastic materials. Although such equipment was initially extremely expensive, increased demand for technology and clear aligners has allowed clinicians to generate a cheaper in-office digital workflow.
The present article presents a full workflow for in-office aligners, outlining how to obtain good patient records and digitise them, generate and stage predictable movements in the software, print optimal resin models and use thermoplastic sheets to fabricate fully functional aligners.
Detailed description of the workflow
Patient records
First, the orthodontist needs to obtain accurate patient records. With the rapid advancement of technology and information surrounding it, the decision-making process may become more complex for the clinician, for example with regard to deciding whether to have the patient scanned or use a model. As several studies have shown, both methods offer advantages and disadvantages. Intraoral scanning reduces chair time and time spent processing the STL digital file so it is ready to work with; however, this method remains expensive, considering the cost of the scanner itself and, in some cases, the software updates required. The traditional impression method, whether using alginate or silicone, is significantly cheaper, but processing and chair time are increased. Greater patient comfort is achieved when an intraoral scanner is used. Regarding accuracy, both methods show no significant differences. It is important to take into account that the longer the scan range from a single tooth to a complete dental arch, the higher the likelihood of error.
Two simple protocols can be used to obtain good patient records:
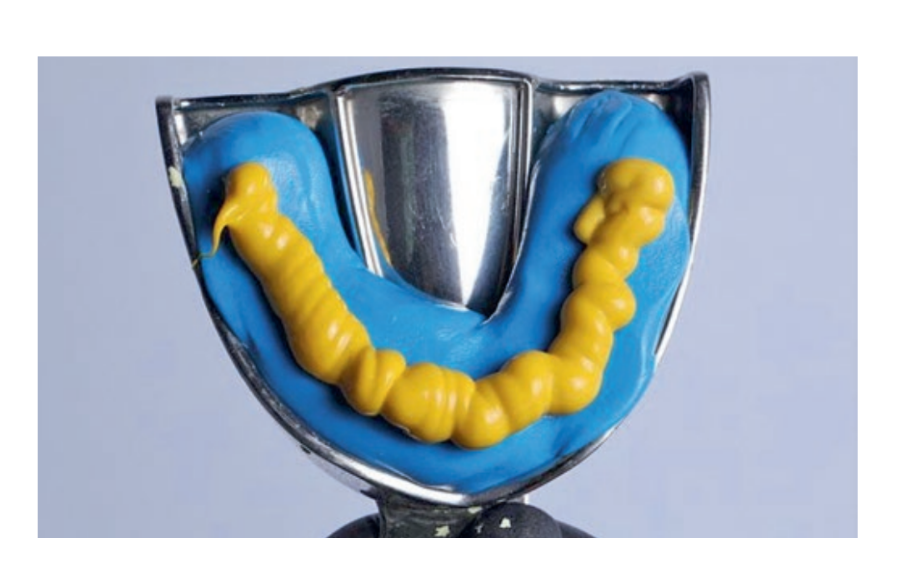
- Addition silicone impression material and desktop scanner: Putty addition silicone is placed on an impression tray, and over it, flowable addition silicone (Fig 1). The tray is then placed in the patient’s mouth. When the cast is obtained, it must be scanned, first with both arches separately and then with both in occlusion, to generate an STL file.
- Intraoral scanning: The Trios 3Shape scanner (Copenhagen, Denmark) is a high-speed scanner with good detail reproducibility. The clinician must ensure that the teeth are dry and that no light is directed into the patient’s mouth; otherwise, the scanner will not obtain a precise image.
STL file preparation
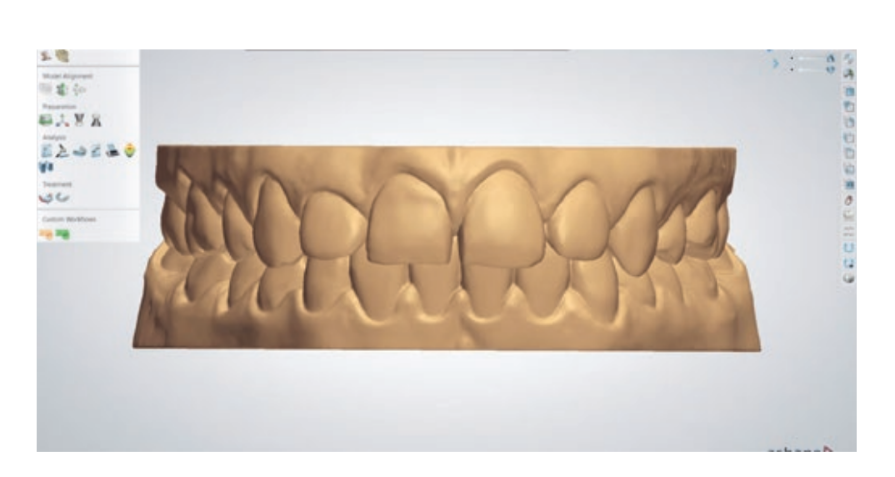
The STL file obtained from scanning the patient’s mouth is then loaded into the 3Shape Clear Aligner Studio software to start the segmentation process and make it ready to work with (Fig 2).
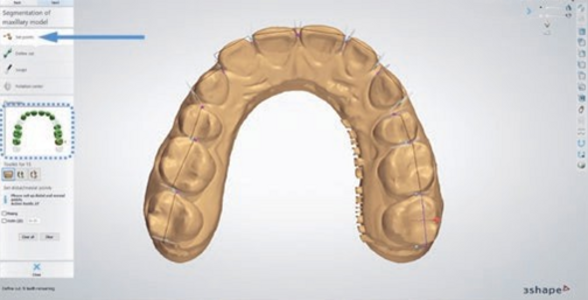
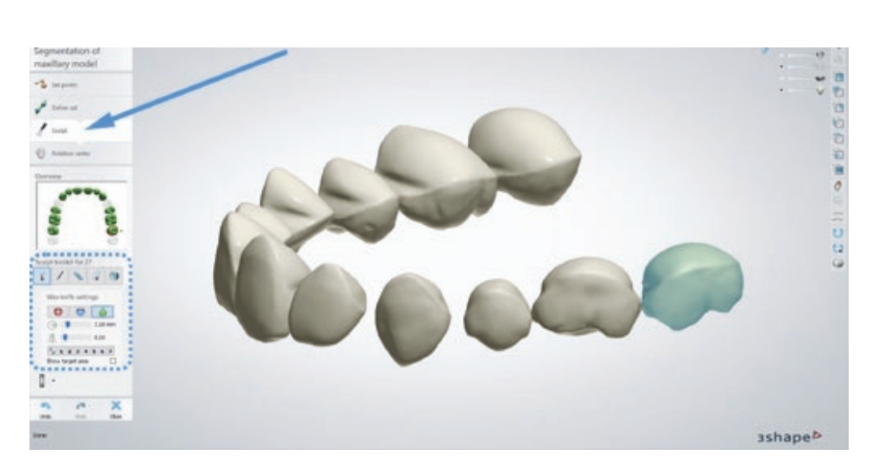
The first step involves segmentation of the model. On the left side of the screen is the control tab with a chart showing a dental arch, in which the tooth where the segmentation process will start must be selected. Any teeth that are not present must be eliminated from the chart before doing anything else, and the distal and mesial point for each tooth must then be selected (Fig 3). After this, the second tab must be selected to define the gingival margin cuts for each tooth; this needs to be done for both the buccal and palatal/lingual surfaces. The Sculpt tool must then be used to smooth the surfaces of each tooth, particularly the mesial and distal surfaces. This is important because it eliminates hard contact points that could interfere with the rotation movements of certain teeth (Fig 4).
Once the teeth have been partitioned, the long axis of each tooth must be defined. The 3Shape software gives the option of adding a CBCT scan to match root position with the STL model, making it possible to find the real long axis of each tooth in order to achieve better results for each type of movement that is programmed.
Programming: tooth movement, attachment placement and sub-setups
Once both arches have been set, the software offers the option to start moving each tooth to the desired position. This can be done by dragging each one and moving it along the axis, or by clicking on the movement chart on the right that shows angulation, inclination, rotation, etc. (Fig 5). It is also possible to choose to work on one or both arches at the same time.
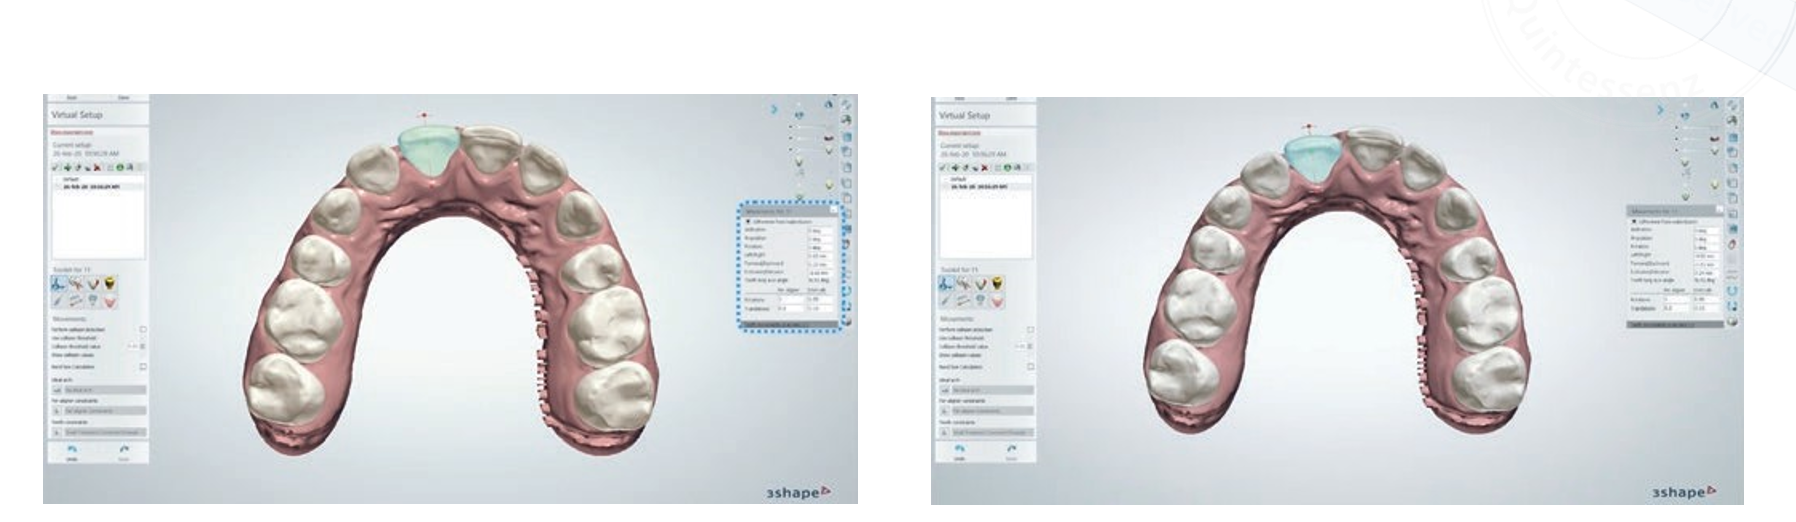
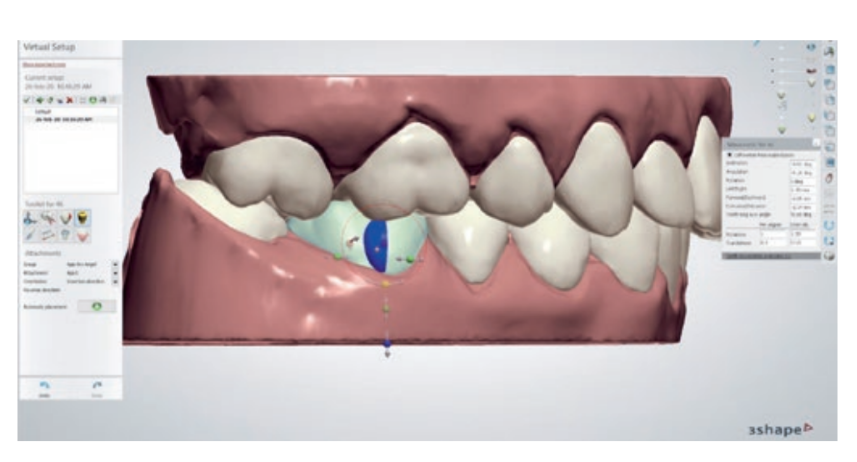
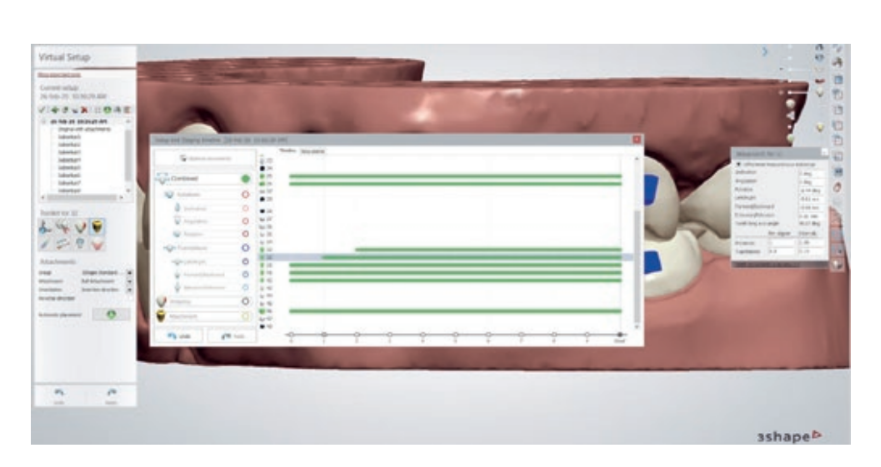
With regard to attachment placement, attachment size and position can be edited in the software. The orthodontist is of course wholly responsible for attachment selection and positioning and their effect on tooth movement (Fig 6). One of the most important and defining parts of the process is sub-setup programming. Sub-setups are the means of choosing the order in which the programmed teeth movements occur; for instance, for the mandibular left lateral incisor to start moving in aligner #1 and the mandibular left canine to start moving in aligner #3. This enables the clinician to fully understand what is happening during each stage of treatment (Fig 7).
Once the sub-setups have been programmed, the final step is to decide how many aligners the patient will wear. As a norm, 0.20 to 0.25 mm of tooth translation and 2 degrees of tooth rotation work well. Some movements, like transverse expansion, work better with a 0.18-mm buccal movement per aligner, which reduces buccal crown inclination and the relative extrusion of the palatal cusps that could create premature contacts.
3D printing and acrylic resin models
Prior to printing the 3D models, the final STL file must be uploaded to PreForm 3D Printing Software (Formlabs, Somerville, MA, USA) and the printing direction must be defined (Fig 8). If the models are placed horizontally, the molar cusps will not be reproduced perfectly, whereas if they are positioned vertically, the buccal surface of the incisors will lack detail. As such, the optimal position, which has been validated in a clinical setting by the present author, is at an 80-degree angle, so that the printer can reproduce the maximum amount of detail.
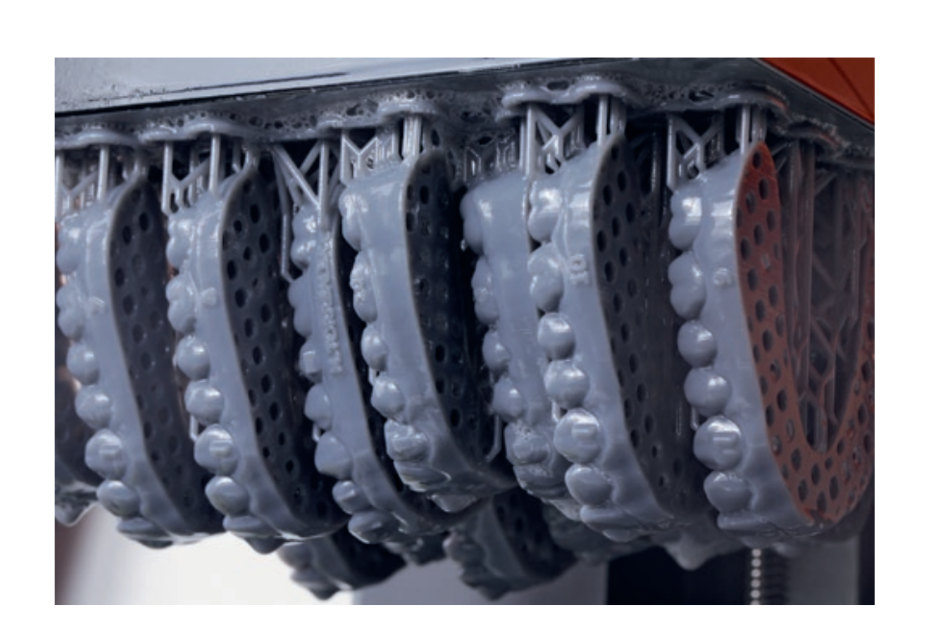
A large number of 3D printers are now available on the market. A Form 2 printer (Formlabs) was used in the present study; this is a stereolithography (SLA) printer that uses resin cartridges to print and reproduces details in very high quality. Printing times and protocols vary from one printer to another, but must be respected to obtain an optimal result. When the printing process is complete, the models will have an uncured acrylic resin layer that must be cleaned with 99% isopropyl alcohol, before placing them in a ultraviolet oven for 24 minutes to finish the curing process.
Vacuum forming process for thermoplastic sheets Fabrication of aligners involves thermoforming a plastic sheet on the acrylic resin model and then trimming and polishing the aligner. The vacuum forming machine should have 6 bars overpressure in order to minimise differences between the aligners that are fabricated.
Thermoplastic sheets vary in thickness from 0.50 to 0.75 mm; a thickness of 0.75 mm is recommended. Duran (Scheu-Dental, Iserlohn, Germany), Biolon (Dreve Dentamid, Unna, Germany) and Zendura (Bay Materials, Fremont, CA, USA) are three thermoplastic sheet brands that are considered safe for clinical use in terms of cytotoxicity. The first two are composed of polyethylene terephthalate glycol (PETG), whereas the third is a polyurethane resin. Another brand commonly used in the thermoplastic aligner fabrication process and that shows good mechanical properties is Essix (Dentsply Sirona, Charlotte, NC, USA), with Essix C+ recommended for bruxism patients and Essix ACE for others.
The physical and mechanical properties of the fabricated aligner will vary depending on the type of plastic used; some may exhibit a significant decrease in flexural forces after thermoforming and permanent deformation during treatment.
Aligner trimming and polishing
Practically any dental laboratory trimming bur is adequate to work with thermoplastic sheets. Careful use is advised as an increase in temperature could deform the plastic. For polishing, a three-step silicone polishing bur for acrylic (Kerr Dental, Orange, CA, USA) works well. The final product shows adequate aesthetic properties (Fig 9).
Clinical use of thermoplastic aligners
Patient selection and diagnosis are key factors in achieving optimal results with aligners, and indeed any type of orthodontic device. With this said, it is advisable to start in-office aligner therapy to treat malocclusions with up to 2.00 or 3.00 mm of space closure and with crowding of no more than −4.00 mm. Programming 2 degrees of rotation per aligner and 0.20 to 0.25 mm of translation will give the orthodontist greater control over the treatment, minimising undesired angulations and improving root control. Although some authors recommend changing aligners every 2 weeks, if the deformation of the thermoplastic sheet is considered, a 10-day change frequency would be optimal.
Attachment placement
Placement of attachments on the different teeth is carried out by preparing the tooth surface with 37% orthophosphoric acid and a bonding agent. Composite resin must be placed in the hollow parts of the aligners that will correspond to the attachments. The template used for this is the same as template #0. In the 3Shape Clear Aligner Studio software, aligner #0 already has movement, so in order to place the attachments precisely, all green bars on the subsetup process must be placed to start on aligner #1.
Fabrication errors
Common mistakes made during the fabrication process include poor trimming and polishing of the aligner edges, which could damage the soft tissues, and lack of adaptation of the aligner to the tooth, especially on arch ends, for example second molars.
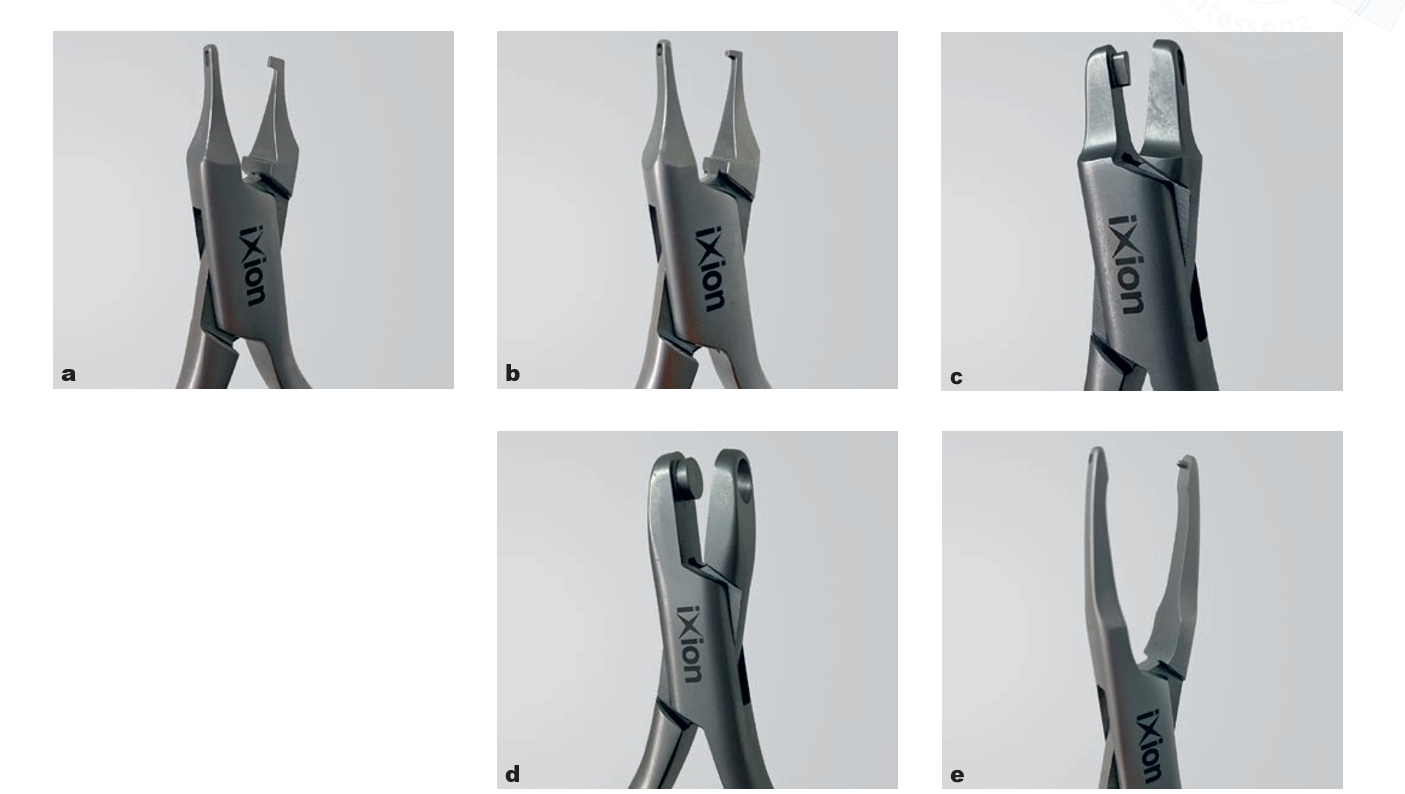
Aligner pliers
Pliers are useful for finishing details and correcting ongoing treatment when teeth are not tracking with the aligner as they should. Rotation pliers (IX888, Ixion Aligner Pliers, DB Orthodontics, Silsden, UK) (Fig 10a) and torque pliers (IX887, Ixion Aligner Pliers, DB Orthodontics) (Fig 10b) help the aligner increase the pressure on determined tooth surfaces. Teardrop pliers (IX890, Ixion Aligner Pliers, DB Orthodontics) (Fig 10c) create a hook in the gingival margin for the use of elastomerics, and hole punch pliers (IX891, Ixion Aligner Pliers, DB Orthodontics) (Fig 10d) make it possible to bond buttons or attachments by creating a circular cut-out on the aligner. Retention pliers (IX889, Ixion Aligner Pliers, DB Orthodontics) (Fig 10e) increase retention to the teeth by creating a 1-mm circular indentation. This indentation can also be used if a tooth has not been able to follow an extrusion movement of up to 1 mm.
Clinical cases
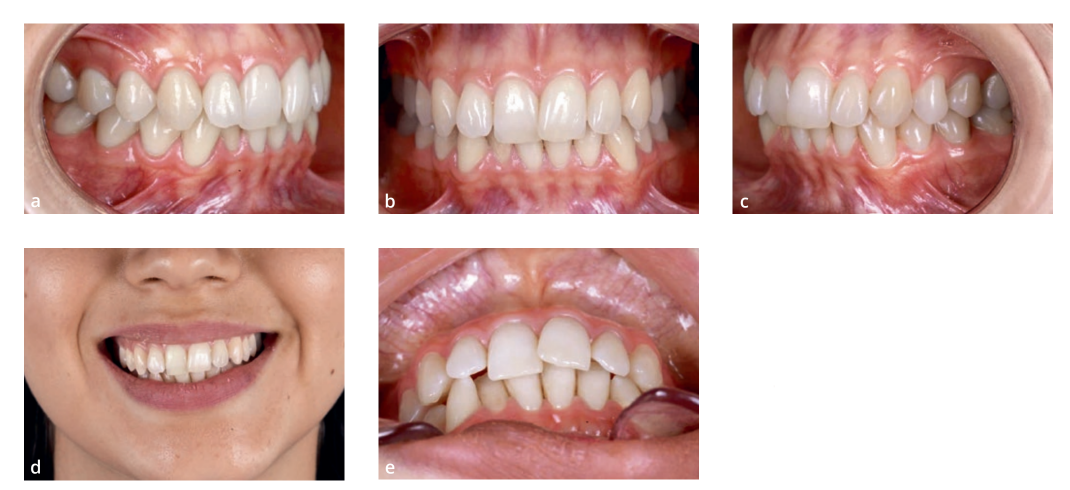
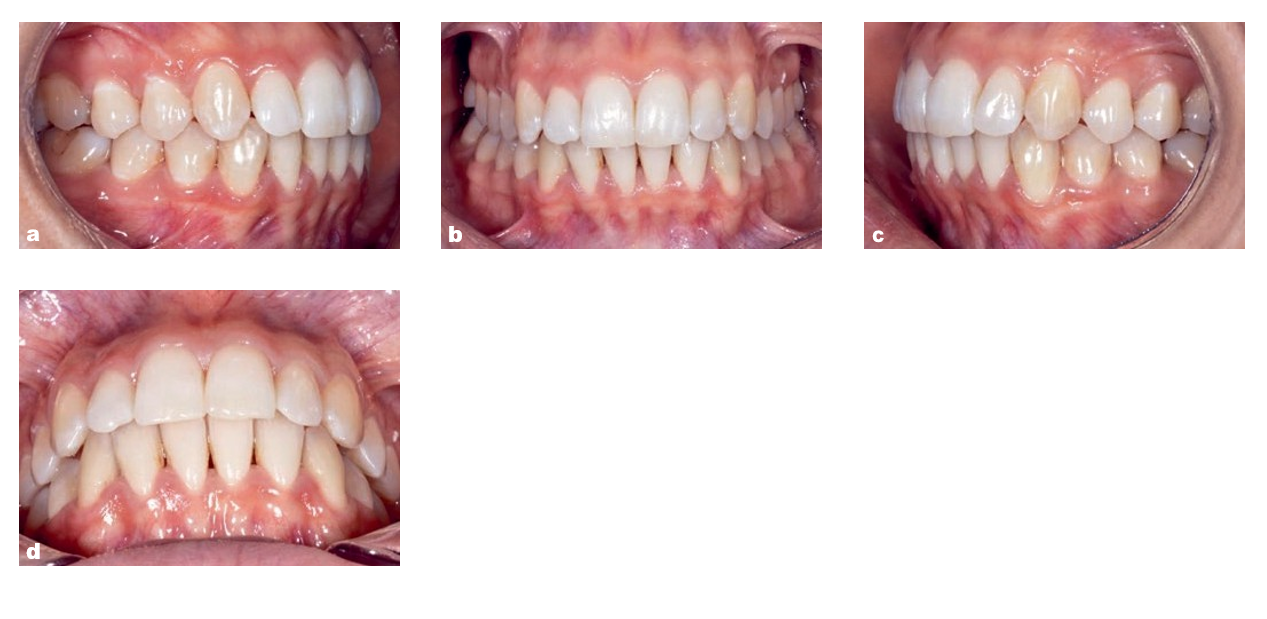
Case 1
A woman attended the clinic with the chief complaint of crowding. She presented with deep bite and anterior crowding (Fig 11) and received in-office aligner treatment with 14 aligners. The final result shows an improvement in the alignment of the teeth, as well in the final occlusion (Figs 12 and 13).
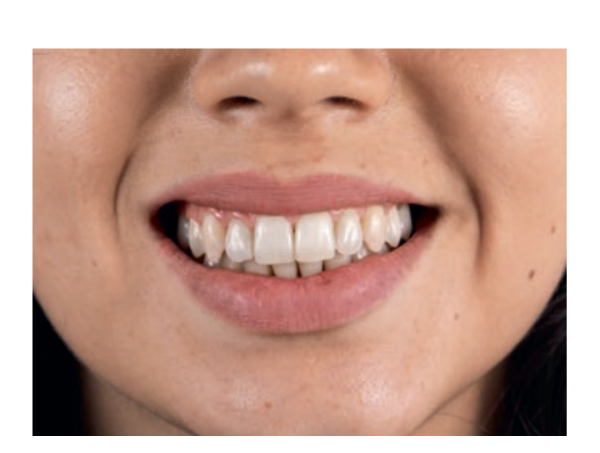
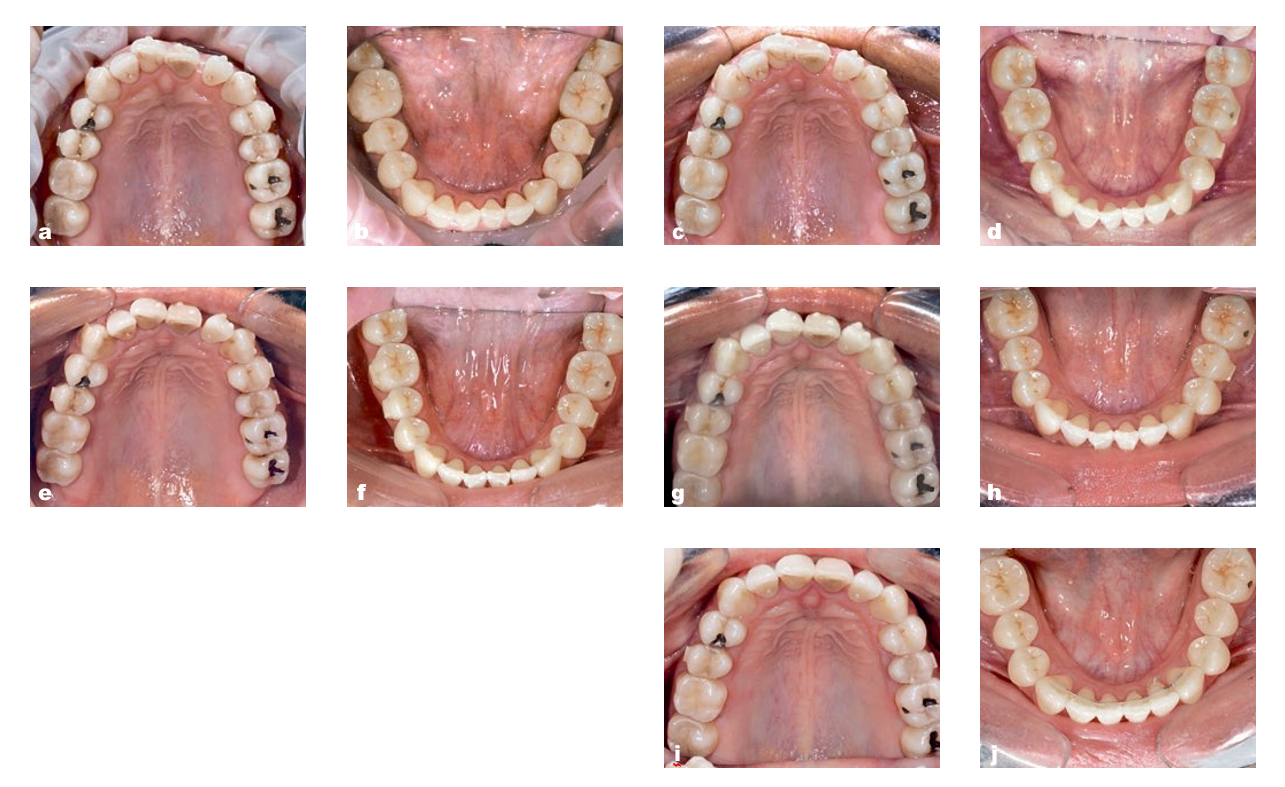
Case 2
A woman with a history of periodontitis and tooth migration presented with upper midline deviation, black triangles and diastemas as sequelae of periodontitis. A 4-month treatment period with 11 aligners led to a good occlusion, midline correction and an improvement in the appearance of black triangles (Figs 14 to 16).


Conclusion
In-office aligners are an excellent treatment modality that allows orthodontists to treat patients with an individualised prescription, incorporating a full digital workflow into the clinical practice.
References:
- Kesling HD. The philosophy of the tooth positioning appliance. Am J Orthod Oral Surg 1945;31:297–304.
- Rinchuse DJ, Rinchuse DJ. Active tooth movement with Essix-based appliances. J Clin Orthod 1997;31:109–112.
- Tamer İ, Öztaş E, Marşan G. Orthodontic treatment with clear aligners and the scientific reality behind their marketing: A literature review. Turk J Orthod 2019;32:241–246.
- Rossini G, Parrini S, Castroflorio T, Deregibus A, Debernardi CL. Efficacy of clear aligners in controlling orthodontic tooth movement: A systematic review. Angle Orthod 2015;85:881–889.
- Kihara H, Hatakeyama W, Komine F, et al. Accuracy and practicality of intraoral scanner in dentistry: A literature review. J Prosthodont Res 2020;64:109–113.
- Rungrojwittayakul O, Kan JY, Shiozaki K, et al. Accuracy of 3D printed models created by two technologies of printers with different designs of model base. J Prosthodont 2020;29:124–128.
- Ryu JH, Kwon JS, Jiang HB, Cha JY, Kim KM. Effects of thermoforming on the physical and mechanical properties of thermoplastic materials for transparent orthodontic aligners. Korean J Orthod 2018;48:316–325.
- Hou D, Capote R, Bayirli B, Chan DCN, Huang G. The effect of digital diagnostic setups on orthodontic treatment planning. Am J Orthod Dentofacial Orthop 2020;157:542–549.
- Sfondrini MF, Gandini P, Malfatto M, Di Corato F, Trovati F, Scribante A. Computerized casts for orthodontic purpose using powder-free intraoral scanners: Accuracy, execution time, and patient feedback. Biomed Res Int 2018;2018:4103232.
- Goracci C, Franchi L, Vichi A, Ferrari M. Accuracy, reliability, and efficiency of intraoral scanners for full-arch impressions: A systematic review of the clinical evidence. Eur J Orthod 2016;38:422–428.
- Giachetti L, Sarti C, Cinelli F, Russo DS. Accuracy of digital impressions in fixed prosthodontics: A systematic review of clinical studies. Int J Prosthodont 2020;33:192–201.
- Michelinakis G, Apostolakis D, Tsagarakis A, Kourakis G, Pavlakis E. A comparison of accuracy of 3 intraoral scanners: A single-blinded in vitro study. J Prosthet Dent 2020;124:581–588.
- Leite WDO, Campos Rubio JC, Mata Cabrera F, Carrasco A, Hanafi I. Vacuum thermoforming process: An approach to modeling and optimization using artificial neural networks. Polymers (Basel) 2018;10:143.
- Martina S, Rongo R, Bucci R, Razionale AV, Valletta R, D’Antò V. In vitro cytotoxicity of different thermoplastic materials for clear aligners. Angle Orthod 2019;89:942–945.
- Inoue S, Yamaguchi S, Uyama H, Yamashiro T, Imazato S. Influence of constant strain on the elasticity of thermoplastic orthodontic materials. Dent Mater J 2020;39:415–421.
- Clements KM, Bollen AM, Huang G, King G, Hujoel P, Ma T. Activation time and material stiffness of sequential removable orthodontic appliances. Part 2: Dental improvements. Am J Orthod Dentofacial Orthop 2003;124:502–508.
- Bollen AM, Huang G, King G, Hujoel P, Ma T. Activation time and material stiffness of sequential removable orthodontic appliances. Part 1: Ability to complete treatment. Am J Orthod Dentofacial Orthop 2003;124:496–501.
- Jindal P, Juneja M, Siena FL, Bajaj D, Breedon P. Mechanical and geometric properties of thermoformed and 3D printed clear dental aligners. Am J Orthod Dentofacial Orthop 2019;156:694–701.