Class 2 Composite Restoration: Techniques for Proximal Contacts
The Role of the Proximal Contact Point
The contact point, or proximal (interdental) contact, is the area where the proximal surfaces of two adjacent teeth meet. Restoring contact points is vital because they ensure:
- Proper distribution of food particles on either side of the tooth.
- Protection of the gingival papilla from trauma.
- Stability of teeth in the arch by maintaining their relative positions.
- Uniform distribution of chewing pressure across neighboring teeth.
Disruptions in contact points not only irritate the interdental papilla but can also trigger pathological changes in the alveolar walls of individual teeth. This underscores the importance of restoring contact points during the treatment of carious lesions on proximal surfaces.
The development of dental materials has inspired innovative designs for replicating missing proximal walls. However, in the past, many dentists found traditional matrices impractical, particularly when using conventional cement. Metal or celluloid matrices often complicated the process as they had to be removed lingually and buccally before the cement set. This required additional steps, such as manually pressing the material against the tooth with a spatula and forming the contact point using vertical pressure with a cotton pellet. For some clinicians, it was faster and easier to shape restorations without matrices.
Restoring proximal walls, especially at the gingival margin of Class II cavities, presents challenges such as:
- Adhesion difficulties due to enamel cracks or dentin exposure.
- Increased moisture from the close proximity to the gingiva, compromising adhesion.
- Polymerization issues with metal matrices or suboptimal curing light access.
- Material handling and adaptation challenges in tight spaces.
- Difficulty reconstructing the original contour of the crown and achieving an optimal contact point due to the absence of proximal walls.
In this lesson, Prof. Junji Tagami explains how to approach posterior direct restorations more predictably — from selective caries removal and adhesive application to matrix use, light-curing strategy, and incremental composite placement in Class II cases. This fragment works especially well here because it connects proximal restoration with bonding quality, polymerization, and long-term repairability.
Want to go deeper into biomimetic composite protocols? Explore The Biomimetic Concept: Composite Restoration Protocols to learn adhesive principles, minimally invasive restoration strategies, and stress-reduced direct composite techniques for long-lasting posterior and anterior restorations.
Types of Contact Points
- Point Contact: Found in teeth with spherical proximal surfaces, where contact occurs at a single point. Common in younger patients.
- Plane Contact: Occurs when the curvature of proximal walls is less pronounced, creating a broader, linear contact. Often observed in older patients due to wear, gingival atrophy, or reduced alveolar height.
Matrix Selection Guidelines
Matrix selection depends on cavity size and location. For subgingival Class II cavities, matrices with a subgingival extension are preferred. Additionally, placing a retraction cord soaked in a hemostatic solution in the gingival sulcus can improve outcomes. The wedge, chosen based on the interdental space, secures sectional matrices and ensures proper adaptation in the cervical area.
Wedges serve multiple purposes, including:
- Fixing the matrix securely.
- Adapting the matrix to the cervical surface.
- Preventing composite overflow in the gingival area.
- Protecting the gingiva and adjacent teeth during preparation.
Here, Maciel Júnior focuses on one of the most critical parts of Class II restoration — building a reliable proximal contact. He shows how matrix shape, wedge design, ring stabilization, condensation, and marginal ridge positioning directly affect the final interproximal result.
Master the details of posterior composite work with International Schools Working with Composite Restorations — a course that brings together adhesive protocols, biomimetic concepts, stress-reduced direct restorations, deep margin elevation, and practical posterior composite techniques from leading restorative schools.
Wedges
- Wooden Wedges: Made from maple wood, they absorb moisture, expand, and provide a tight fit. Some are impregnated with hemostatic agents for additional benefits.
- Plastic Wedges: Flexible, non-absorbent, and glide smoothly along the tooth surface. These are ideal for separating tightly spaced teeth and for stabilizing matrix systems during preparation.
Wedges also protect the gingiva and adjacent teeth during preparation while increasing the interproximal space for easier matrix placement. Dentists should avoid skipping the wedge step, as gaps between the matrix and tooth can allow adhesive or composite to seep into the periodontal tissue, leading to inflammation or gingival atrophy.
Matrix selection heavily influences the morphology of the proximal wall. Anatomically shaped and well-adapted matrices are preferred, but concave deformations can occur if insufficient pre-distancing is provided. Similarly, the height of the marginal ridge must align with adjacent teeth, often requiring specialized instruments.
Contact Point Restoration Techniques
Saddle Matrix Technique
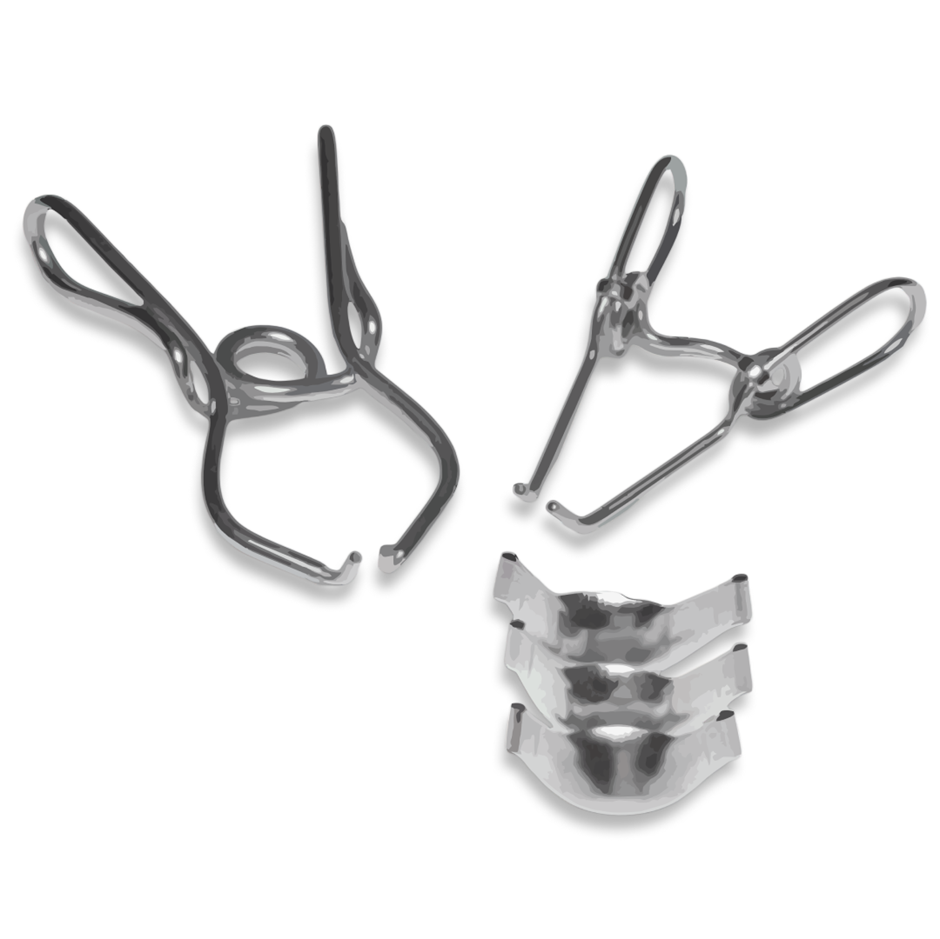
The saddle matrix bridges the gap between sectional and circular matrices, offering flexibility across a wide range of clinical cases. It comes in various sizes and shapes, featuring convexities to fit diverse cavity designs. It's ideal for:
- Class II cavities with medium to large openings.
- Cavity restoration when no adjacent tooth exists.
- Extensive destruction where sectional matrices can't be used.
Choose the matrix size and shape based on the tooth and clinical needs. It can be mounted using wedges and rings or with a metal applicator clamp. Secure it in place before insertion, then adapt it to the mesial and distal walls.
Circular Matrix Technique
Circular matrices provide a full circumferential seal, making them perfect for situations where sectional matrices fall short, especially with extensive crown destruction or edentulous spaces. These matrices come in various designs, with some systems providing easier tightening. To ensure a tight fit, pre-wedging with a full wedge or matrix ring may be necessary. Adjustments for cases with distal cavities on the last molar can be challenging but manageable.
Single-Matrix Technique for Mirror Cavities
In mirror-symmetric caries (kissing cavities), the single-matrix technique allows for efficient restoration of both teeth in one session. Key benefits include:
- Faster procedure due to using the same instruments.
- Simplified cavity preparation without the risk of disturbing the adjacent tooth.
- Improved overall workflow.
Position a matrix on one tooth, restore it, then proceed to the other. This method ensures that the proximal contact remains intact without invading adjacent space.
Two-Matrix Technique for Mirror Cavities
This approach involves using two matrices simultaneously to maintain proper interdental spacing, ensuring an optimal fit for each restoration. After cavity preparation, mount two sectional matrices with wedges and rings. Restore one tooth, then remove the matrix and restore the second. This method ensures precise contact points between the teeth.
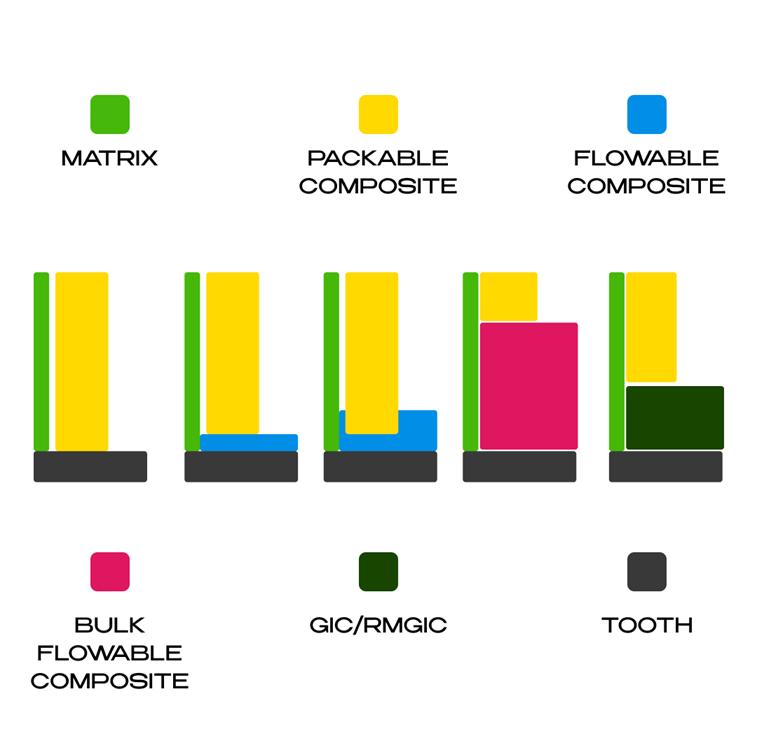
Centripetal Technique with Oblique and Split-Layered Packable Composite
In Class II or MOD cavities, restoring the proximal wall with packable composite is done by layering in an oblique (zigzag) pattern. The matrix must fit perfectly around the cavity, with optional tools like Teflon tape. The oblique technique uses three layers: the first fills the gingival margin to one vertical wall, the second covers the other vertical wall, and the third shapes the marginal ridge. This method minimizes the C-factor by avoiding wall linkage. Alternatively, the split layering technique builds from the cavity's vertical walls.
Flowable Composite on Gingival Margin
Applying flowable composite to the gingival margin seals the interface and reduces microinfiltration, a common cause of secondary caries. This technique compensates for polymerization shrinkage and improves marginal sealing. After cavity preparation and matrix placement, the flowable composite is gently applied to the gingival margin and polymerized. Oblique layering then completes the restoration.
Snowplow Technique: Simultaneous Polymerization
In this technique, flowable composite is applied to the gingival margin and polymerized simultaneously with the packable composite layered over it. This method improves marginal sealing by eliminating voids. However, some studies suggest separate polymerization may yield better results, as the contraction of the packable composite can affect adhesion. A thin layer of flowable composite seals the gingival margin, and the first layer of packable composite is added, ensuring tightness. The process continues with additional layers until the proximal wall is restored.
Flowable Bulk and Packable Conventional Composite
This method fills the class II cavity with bulk composite (flowable or packable) up to 1.5 mm from the occlusal surface. After polymerization, the marginal ridge is restored, resulting in a class I cavity with a 1.5 mm depth. Bulk composites are light-cured in 4-5 mm layers and offer advantages like reduced shrinkage and quick application. First, apply sectional matrix, adhesive, and pulp protection if needed. Fill with bulk composite, polymerize. Then restore the marginal ridge with conventional packable composite to form a class I cavity. Apply the final layer to restore occlusal morphology. In MOD cavities, both marginal ridges are restored individually. For mirror cavities, the same approach is followed, using matrices and bulk composite for a perfect occlusion.
Open Sandwich Technique
This technique involves placing a layer of glass ionomer cement (GIc) in subgingival cavities, with composite resin filling the rest. GIc is exposed to the tooth's external environment, promoting better marginal sealing and fluoride release. It’s ideal for cavities near the cementoenamel junction where adhesion to enamel is impossible. Resin-modified GIc (RMGIc) enhances mechanical and adhesive properties, improving long-term stability. After cavity cleaning, apply GIc or RMGIc, ensuring uniform distribution. Polymerize and apply adhesive, followed by composite restoration for optimal marginal ridge integrity.
Bulk-Fill Technique
A single layer or two fillings of bulk composite is applied to fill a cavity, eliminating the need for multiple layers and reducing polymerization stress. Bulk composites are ideal for fast, efficient restorations, maintaining marginal integrity and minimal temperature rise. Flowable bulk composites are used in cavities with varied shapes, while thicker composites are reserved for areas with high force. For packable bulk composites, apply in one or more layers, depending on cavity depth. A centripetal or marginal ridge technique is used for class II or MOD cavities, while flowable composites are layered for a class I or II cavity, followed by a packable composite to complete the restoration.
Injection Technique
In this video, Marco Maiolino demonstrates a modern posterior direct restoration workflow centered on injection molding, matrix adaptation, wedge selection, marginal sealing, and contact point formation.
Want a complete system for predictable Class II restorations? Study Contact Point: Effective Posterior Teeth Direct Restoration Technique and learn all key stages of managing interproximal defects in molars and premolars — from isolation and preparation to matrix selection, composite placement, finishing, and polishing.
The injection technique efficiently fills a prepared cavity by layering flowable composite with heated packable composite, using a transparent conformer (matrix or clear stent). This method enables fast, minimally invasive direct restorations with predictable aesthetic results. It offers maximum control over each step, ideal for class II cavities with transparent matrices, or more extensive frontal/lateral restorations using a transparent stent based on a wax-up. The flowable composite is injected into the mold and light-cured.
- Simplified cavity preparation, avoiding occlusal and proximal slots.
- Use of an anatomically shaped transparent matrix and thin applicator tips.
- Heating packable composite to ~68°C for optimal flow.
- A hydraulic injection process for precise composite placement.
Flowable composite fills the base of the cavity, followed by the injection of preheated packable composite. Both materials are simultaneously polymerized, with the flowable composite ensuring void-free filling and better marginal sealing. Proper matrix adaptation is essential for a successful restoration, and additional tools like Teflon tape may be used when necessary.
In conclusion, the restoration of contact points in Class II cavities is a critical aspect of ensuring not only functional integrity but also long-term oral health. By employing a variety of innovative restoration techniques, from the saddle matrix to the injection technique, clinicians are able to address the complexities of tooth structure, material handling, and proximal contact restoration with greater precision.