ZAGA, PAGA, NASA Concepts
Machine translation
Original article is written in RU language (link to read it) .
ZAGA Classification (Zygoma anatomy-guided approach)
Aparicio C. A proposed classification for zygomatic implant patient based on the zygoma anatomy guided approach (ZAGA): A cross-sectional survey. Eur J Oral Implantol
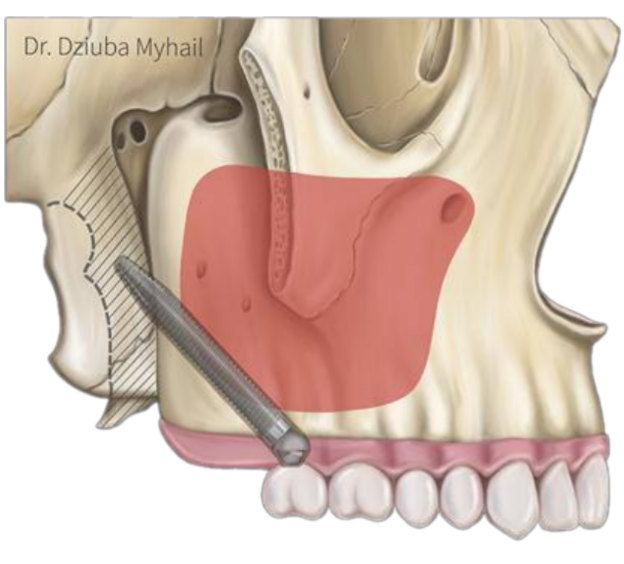
Zygomatic implants (first described by Branemark) are used for the orthopedic rehabilitation of severely resorbed maxilla. The initial technique involved exclusively the intra-sinus approach for the implant, and the preparation of a window in the anterior wall of the maxillary sinus to visualize the zygomatic bone during the implant placement.
To utilize an anatomically and orthopedically oriented approach, the initial technique was modified, also allowing for the extra-sinus approach for zygomatic implants. In this new approach, the initial window or gap is not created on the lateral wall of the maxillary sinus.
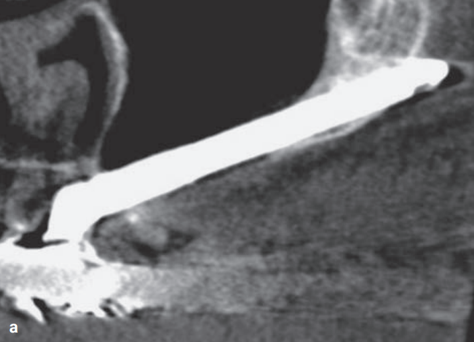
ZAGA 0
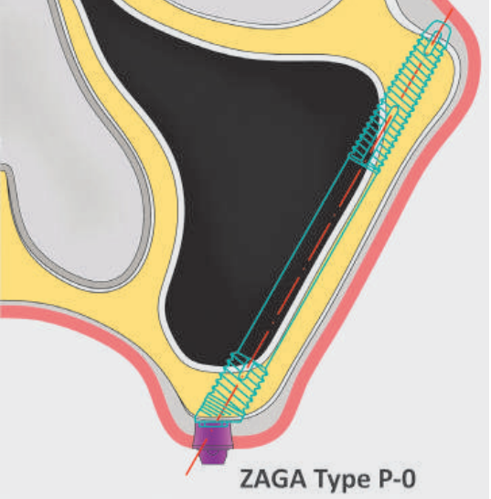
The anterior wall of the maxilla is very flat
The neck of the implant is located in the alveolar ridge
The body of the implant has a trans-sinus path
The implant contacts the bone at the level of the alveolar ridge and the zygomatic bone, and sometimes with the lateral wall of the sinus.
This group made up 15% of patients.

ZAGA 1
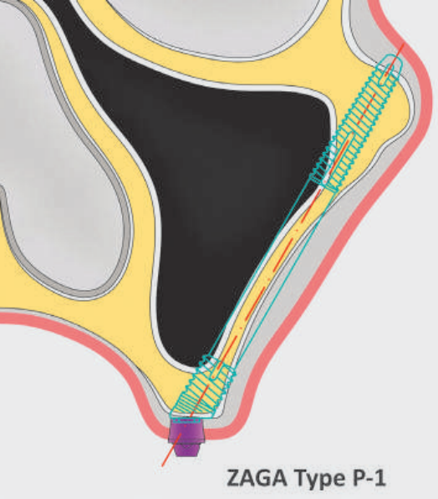
The anterior wall of the maxilla is slightly concave
The neck of the implant is located on the alveolar ridge
Although the implant can be seen through the lateral wall of the sinus, most of the body of the implant has a trans-sinus path
The implant contacts the bone on the alveolar ridge, the lateral wall of the sinus, and the zygomatic bone
This group of patients accounts for 49%.
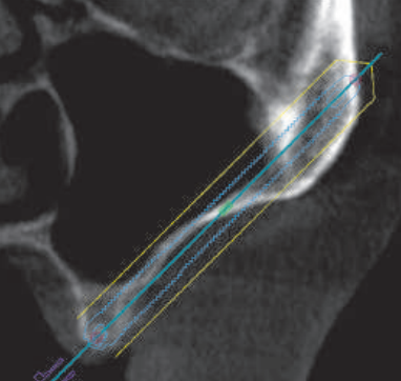
ZAGA 2
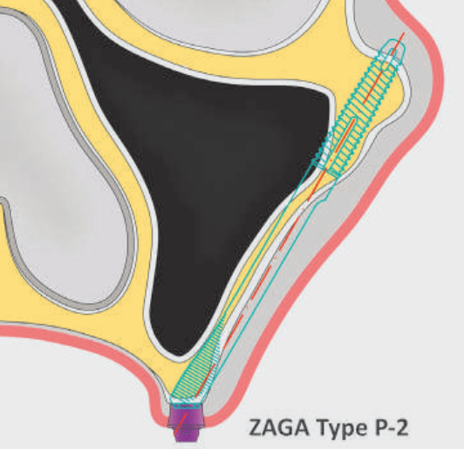
The anterior wall of the maxilla is concave
The neck of the implant is located on the alveolar ridge
The implant is visible through the wall, and a large part of the body has an extrasinus pathway
The implant contacts the bone on the alveolar ridge, the lateral wall of the sinus, and the zygomatic bone.
This group of patients accounts for 20.5%.
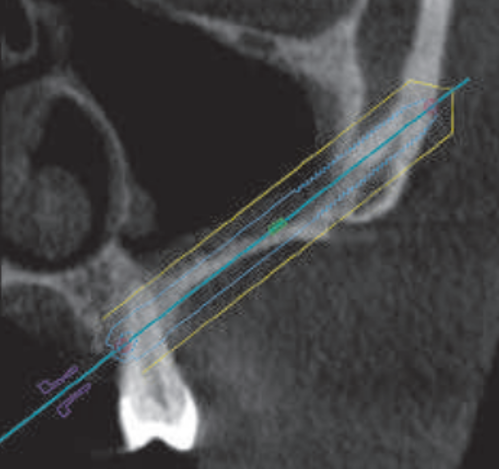
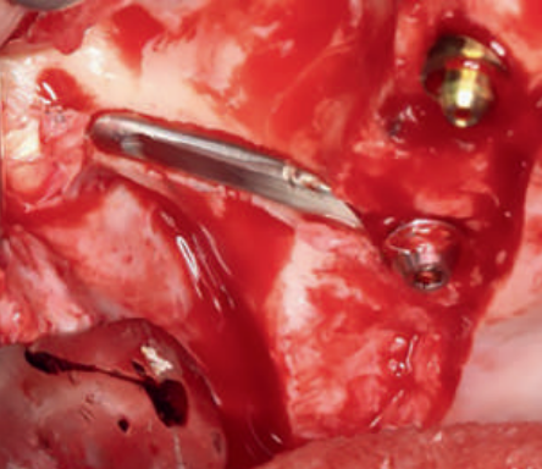
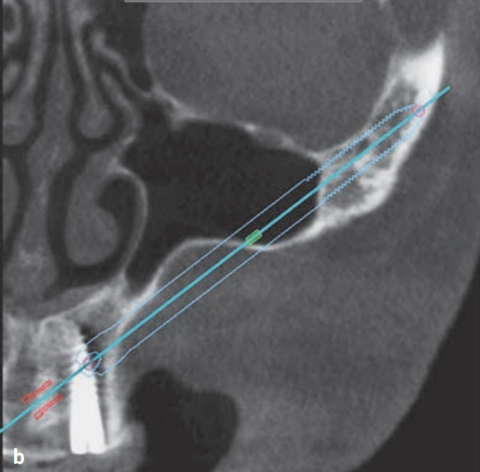
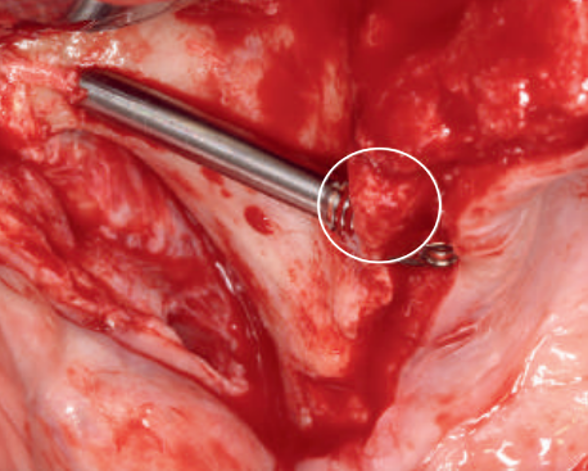
ZAGA 3
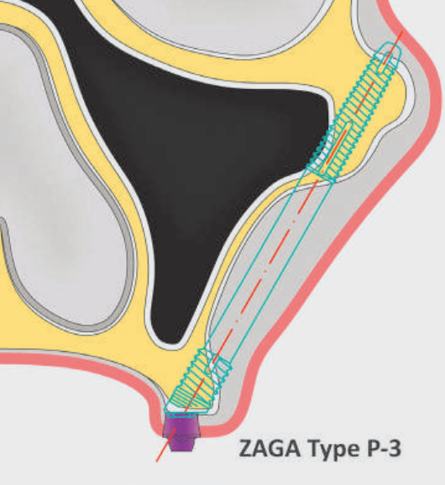
The anterior wall of the maxilla is very concave
The neck of the implant is located on the alveolar ridge
Most of the body of the implant has an anterior extrasinus pathway
The middle part of the body of the implant does not touch the most concave part of the wall
The implant contacts the bone in the coronal alveolar and apical zygomatic bone.
This group constituted 9% of patients.
ZAGA 4
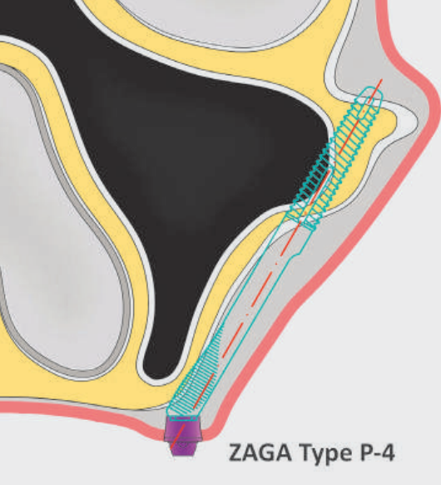
The maxilla and alveolar ridge demonstrate extreme vertical and horizontal atrophy
The neck of the implant is located buccally to the alveolar crest. At this level, there is no or minimal osteotomy
The majority of the implant body has an extrasinus/extramaxillary path. Only the apical part of the implant is surrounded by bone
The implant contacts the bone in the zygomatic bone and part of the lateral wall of the sinus.
This group constituted 6.5% of patients.
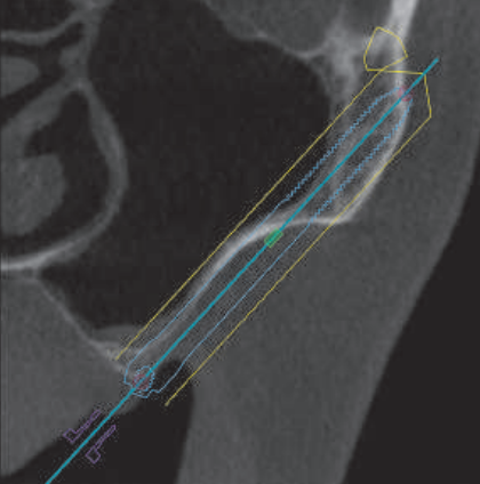
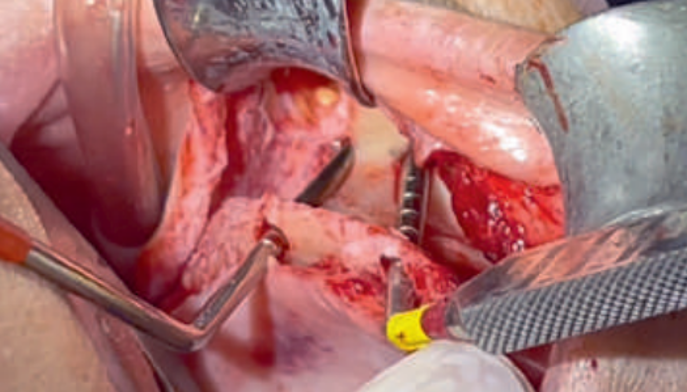
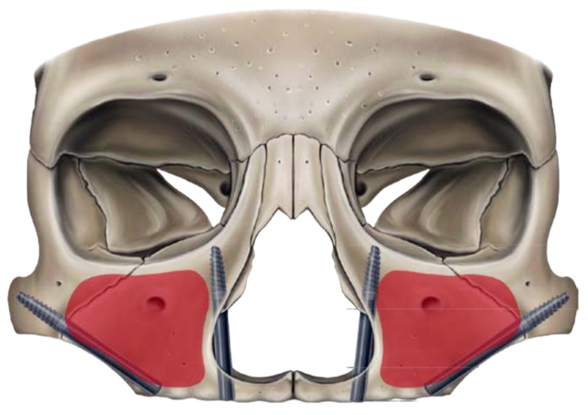
PAGA Classification (Pterygoid anatomy guided approach)
The method was developed by Mikhail Dzyuba
PAGA is an acronym that stands for "pterygoid anatomy guided approach".
This method represents a navigational approach for the placement of a pterygoid implant.
Often, due to anatomical features, the surgeon does not have enough bone volume to place the implant at a 45-degree angle in the pterygoid process without perforating into the maxillary sinus. In such cases, the implant is positioned transsinusally.
The unique anatomical characteristics of the Pterygoid process + maxillary tuberosity complex, which are in close proximity to the maxillary sinus, require adjustments to the placement protocols.
PAGA 1

intra alveolar position
Position: the implant is completely located in the alveolar process.
PAGA 2
extra alveolar position
Position: the implant fenestrates the distal wall of the maxillary sinus, in this situation the surgical protocol: working with a pterygoid osteotome (closed access).
PAGA 3

extra alveolar position
Position: the bay is pronounced and the mesial surface of the implant penetrates into the maxillary sinus, in this case we need to perform a crestal approach using the SLOT technique (slit access) and detach the Schneider membrane.
NASA Classification (Nasal Anatomic Systematic Approach)
Camargo V.B., Baptista D., Manfro R. Transnasal implant (Vanderlim technique) as an option to the second zygomatic implant. — In: Coppedê A. (ed.) Clinical solutions for total rehabilitations on implants without bone grafts. — São Paulo: Quintessence, 2019. — Pp. 198—214 (In Portuguese)
Depending on the anatomical features of the shell and residual alveolar ridge, various methods of placing transnasal implants can be distinguished.
To simplify the choice of implant locations in this area, V.B. Camargo created a classification of surgical accesses based on a systematic analysis of the anatomy of the nasal cavity and paranasal structures (Nasal Anatomic Systematic Approach, NASA), which includes 5 classes.
NASA 0
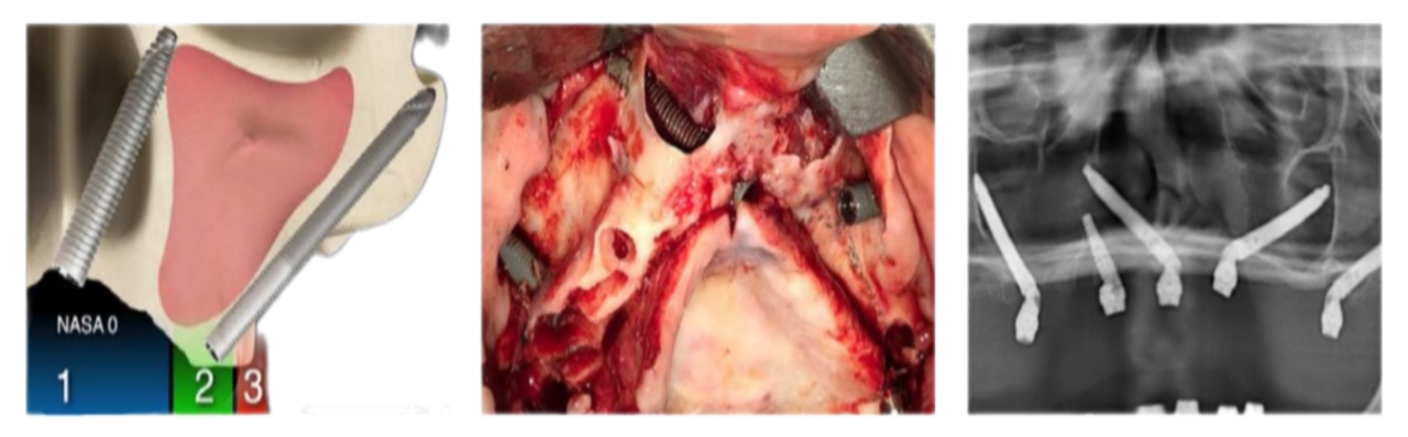
Access: through the incisal opening.
NASA 1
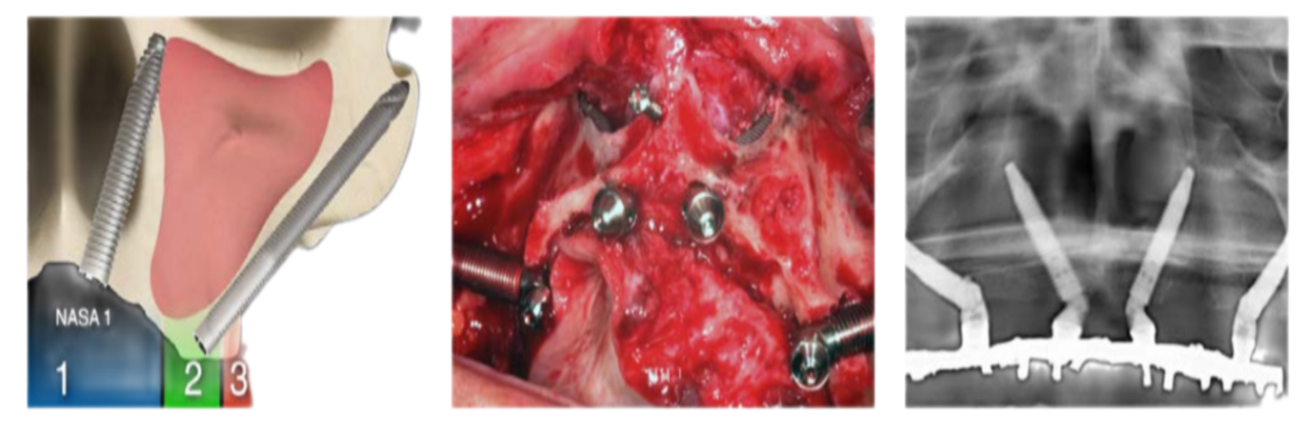
Access: through the central incisor.
NASA 2
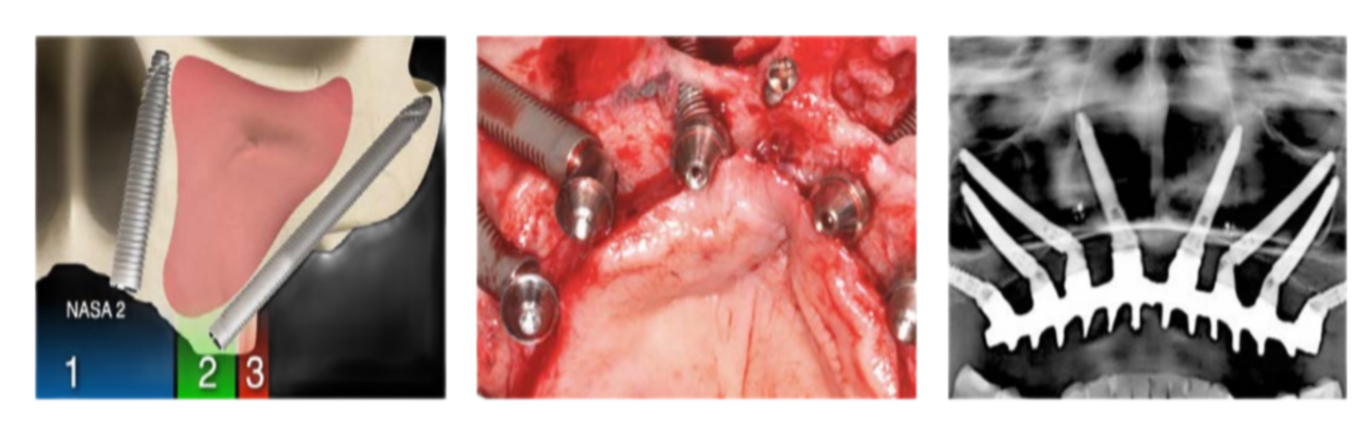
Access: through the lateral incisor.
NASA 3
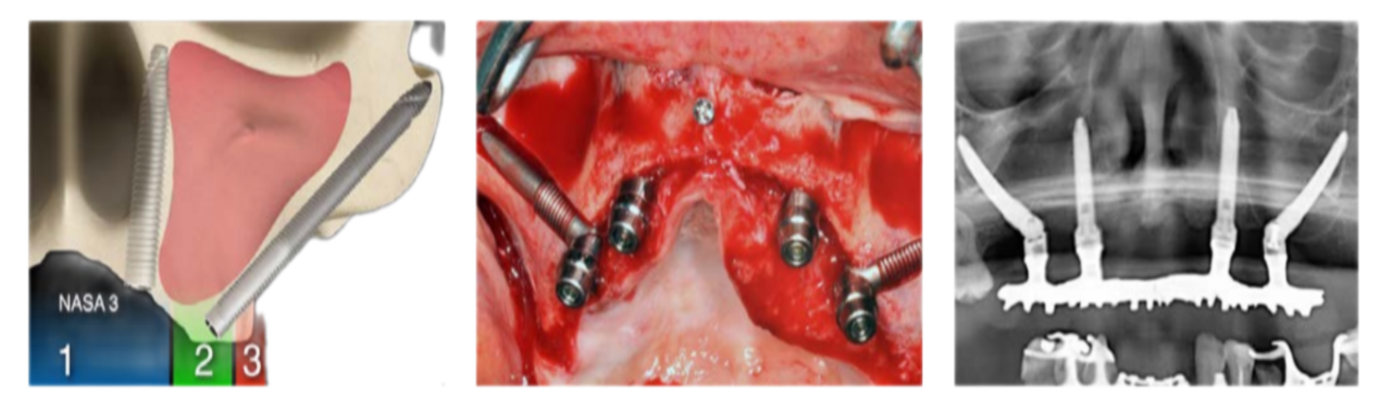
Access: through the canine.
NASA 4
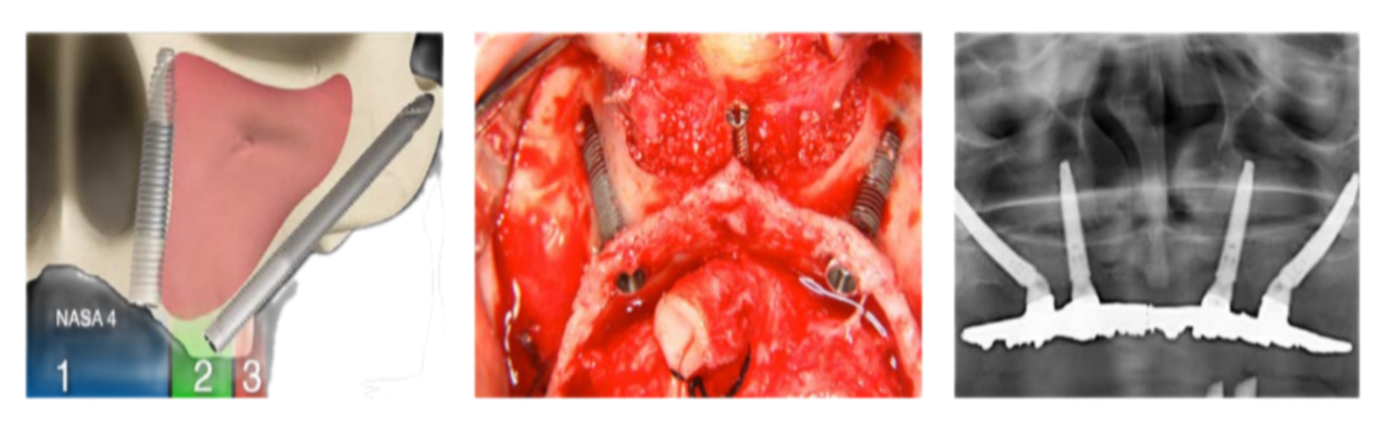
Access: through the canine with exposed coils of the implant body.