
Nuances of Restoring a Contact Point
Machine translation
Original article is written in RU language (link to read it) .
In daily practice, a dentist dealing with the treatment of molar teeth predominantly faces the need to restore Class II cavities. The most complex issue in these cavities is the modeling of the contact point.
Learn about the restoration of Class II cavities in the online course Contact Point: Effective Techniques for Restoring the Molar Group of Teeth.
During the restoration of contact surfaces, it is important to perform the following steps:
- model the contact slope of the marginal ridge;
- directly restore the contact point itself;
- recreate the triangular opening in the gingival area, which ensures the use of wedges (plastic or wooden).
Matrices and matrix systems are used to create the contact point. Here, it is important to remember the thickness of the devices used. The width of an intact contact point is about 10 microns, whereas a metal matrix is produced up to 40 microns thick, and a plastic one—50 microns. In each specific situation, it is necessary to correctly select the matrix, perform the wedging of the teeth. When restoring mesio-occlusal-distal cavities, this is particularly important, where it is necessary to install matrices on both sides of the tooth.
During the restoration of contact surfaces of molar teeth, it is impossible to do without matrix systems. Sectional and circular matrices are optimal for use in lateral sections. The shape of the matrices can be contoured or flat, and it is this factor that determines the localization of the contact point.
Circular Matrices
Examples of matrix systems with circular matrices:
- Automatrix from the manufacturer Dentsply;
- Supermat, produced by Hawe Neos.
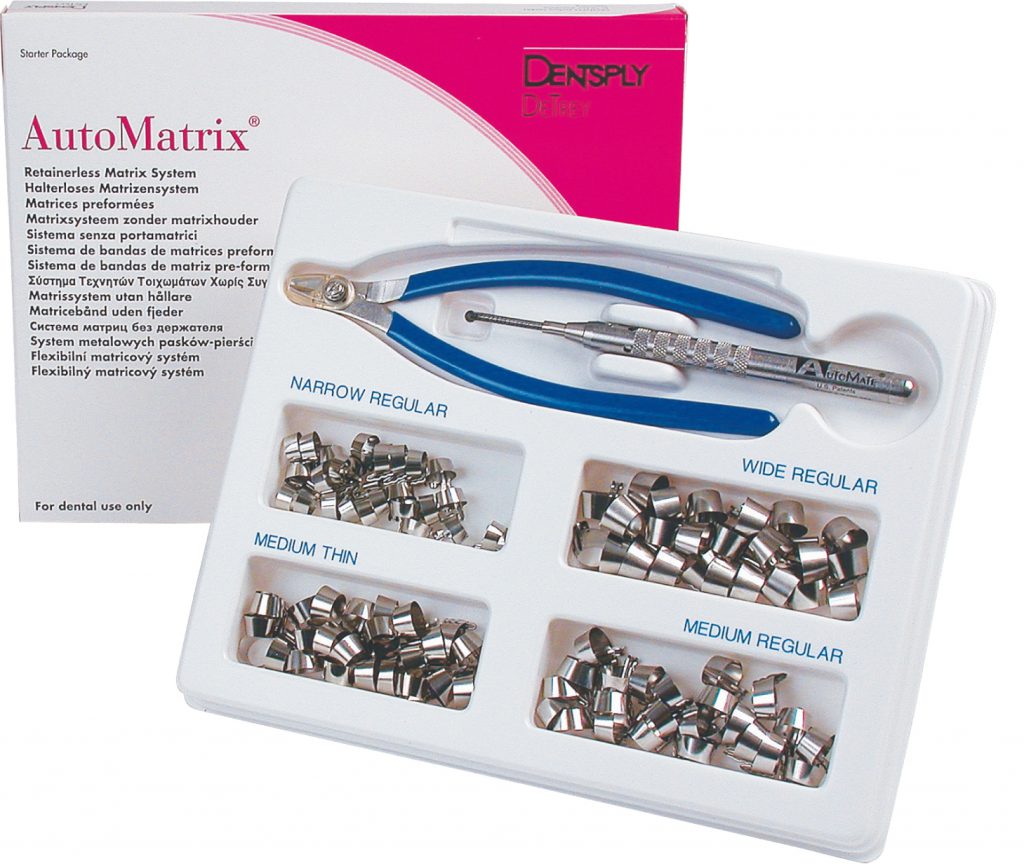
Figure 1. Automatrix system.
These types of matrices require installation on two contact points simultaneously, which necessitates significant wedging of the teeth; otherwise, achieving tight contact points will not be possible. Round matrices are indispensable for the restoration of distal cavities in third molars, or in teeth adjacent to a terminal defect, where it is impossible to place an interdental wedge.
One of the representatives of round matrix systems is the OptraLine system, produced by Vivadent. This is rather an exception among round matrices, as OptraLine is a combined matrix. Its distinctive feature is the presence of perforations on the tooth's contact surface on the opposite side from the restored cavity.
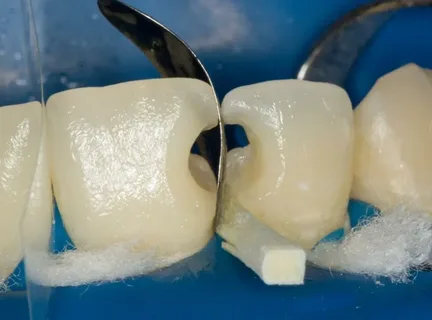
Figure 2. The matrix is secured with a wedge.
Other features of OptraLine:
- unique boomerang-shaped configuration;
- selective thinning up to 10 microns in the area of contact surfaces;
- ability of the matrix to open in two-surface cavities with an intact contact surface;
- universal, can be used with standard matrix holders.
The advantages of the OptraLine circular matrix systems are as follows:
- provide a wider and tighter contact;
- precise localization of the contact point;
- the matrix material is absent between the teeth, so there is no need for significant tooth separation with large wedges;
- provide reliable isolation and cervical adaptation;
- do not require the purchase of additional tools or learning of a special technique.
Sectional matrices
Despite the many advantages of circular matrix systems, in recent years, the restoration of contact surfaces using sectional matrices has gained increasing popularity.
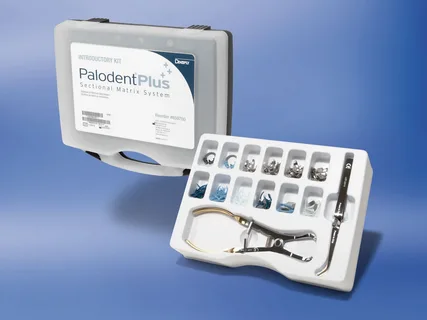
Figure 3. Palodent Plus Matrix System.
Examples of matrix systems with sectional matrices:
- Composi-Tight by 3M;
- Palodent and Palodent Plus, manufactured by Dentsply.
These are the most common sectional matrix systems. The versatility and convenience of their use lie in the ability to install these systems from one contact point or from both.
When using Composi-Tight matrices, the teeth are wedged with an interdental wedge, and then a clamping ring is installed, which tightly presses the matrix to the buccal and oral surfaces of the crown. The matrices of this system are made of stainless steel.
When using the Palodent system, the clamping ring serves the function of separating the teeth, as well as pressing the matrix against the vestibular and oral surfaces of the crown. The material used for the matrices of this system is aluminum.
Considering the anatomical features of the tooth crown, the fact that the distal surfaces are more convex, and the mesial surfaces are more straight, no matrix system took this anatomical axiom into account. Only the company Hawe Neos offered matrices that vary in convexity.
However, some authors suggested modifying the matrices themselves to achieve better adaptation to the tooth crown. For instance, S. Radlinsky suggested, using the Palodent matrix system as an example, to reduce the convexity of matrices by pulling them through a straight narrow edge of the device for contouring polyester matrices. After such a modification, the sectional matrix will match the contour of the medial surface.
Radlinsky also suggested using rings with different degrees of activation when modeling defects of molars and premolars. This is because one ring will cause excessive separation of the molars when used, but insufficient for premolars.
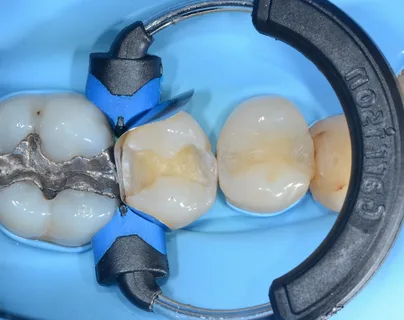
Figure 4. The matrix has been installed and adapted.
There is another useful improvement related to the shape of the matrix. Using small pliers at the corners of the installed sectional matrix, two folds are formed, which provides an inclination of the matrix edge towards the chewing surface. Thus, a smooth transition to the marginal ridge from the contact point is formed. Next, using a plugger, the contact surface is modeled, which acquires an asymmetrical position of the contact point (it shifts towards the buccal surface).
Palodent Plus is an advanced matrix system that includes the following components:
- rings,
- wedges,
- shields, or protective plates for wedges,
- the matrices themselves,
- tweezers,
- pliers.
The system includes rings of two shapes: round and oval, which are necessary for spreading the teeth, made of a nickel-titanium alloy. The installation of the rings is carried out using the pliers included in the system kit, whose teeth are applied alternately first on the outer, then on the inner embrasure of the interdental contact.
Thanks to the fact that the plastic V-shaped teeth of the ring do not enter the interdental spaces, it allows the use of the ring when the clamp is placed from the rubber dam on the tooth. The material of the ring can withstand over a thousand sterilization cycles.
The special shape of the wedges, consisting of several plates, which are angled relative to each other, allows such a wedge to pass over the gingival papilla in the interdental gap without causing damage to it. Whereas traditional wedges, when inserted, press down on the gingival papilla, often causing damage to it.
Wedges with protective shields are indispensable during the dissection of the cavity, serving to protect the adjacent tooth from damage. The protective plate is removed after the dissection, while the wedge remains in the interdental space. Wedges are available in small, medium, and large sizes, and there is a similar assortment of sizes for wedges with protective shields.
Unlike other types of contour matrices, Palodent Plus matrices are distinguished by a special bend in the area of the marginal ridge. A special tab, equipped with a perforation hole in the middle of the edge, which is responsible for forming the marginal ridge, ensures the ease of matrix application. It is important that the perforation hole is located in the center of the approximal surface, a slight shift towards the buccal side is permissible.
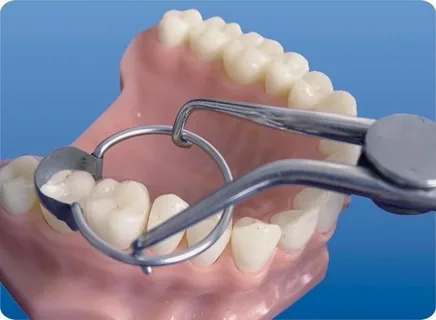
Figure 5. Ring placement forceps.
Once the matrix installation is complete, use a burnisher to mark the localization of the contact point on it. Matrices of this system are available in four sizes (from 3.5 to 6.5 mm). The tweezer included in the matrix system works similarly to a door latch; it easily secures through the matrix's perforation windows, while wedges hold the matrices in place thanks to corresponding depressions and protrusions.
The contact point in the lower jaw teeth is located along the midline, while in the upper jaw teeth it is shifted more towards the buccal side. For this reason, some specialists recommend placing the wedge on the palatal side when modeling approximal cavities on the upper jaw, and on any surface when restoring lower teeth. However, many authors believe that it is better to insert the wedge on the side where the tooth wall is more damaged.
Learn more about the restoration of molar teeth in the webinar Direct restoration of molar teeth using the technique of stress-reduced direct composite restoration.