
Hardware method of teeth whitening: main stages
Machine translation
Original article is written in RU language (link to read it) .
Thanks to the speed of the procedure and the noticeable long-lasting effect, the hardware method of teeth whitening is popular not only among dentists but also among patients. However, technology alone is not enough for good results. With the knowledge gained after completing the course Teeth Whitening: All Techniques, you will be able to determine the best method for teeth whitening in any clinical situation.
The specialist must strictly follow the instructions for using the equipment, consider possible contraindications for a specific patient, and impeccably perform all stages of whitening. The procedure of hardware teeth whitening using the American BEYOND™ system is discussed in the new review of Dental Magazine.
PREPARATION FOR THE PROCEDURE
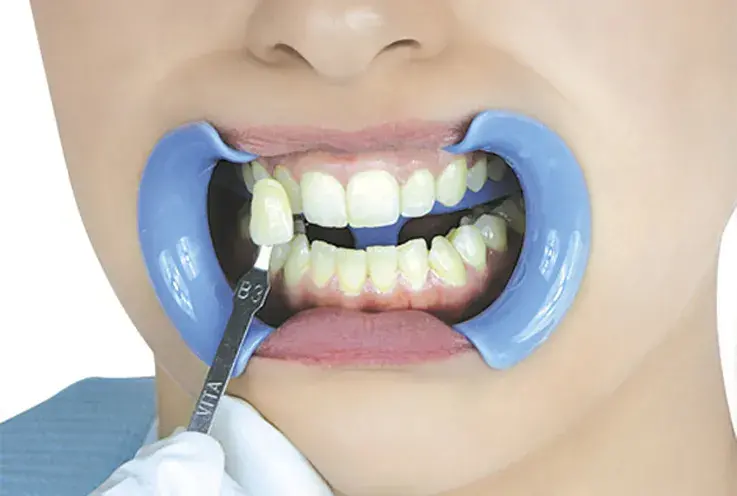
Conduct a preliminary examination of the patient's oral cavity and find out what result they expect to achieve. It is important to remember that before performing the whitening procedure in the dental office, the patient should study and sign the "Informed Consent for the Whitening Procedure." This service falls under the category of aesthetic procedures, and the dentist, despite the impeccable performance of all stages of whitening, cannot guarantee a specific result. A well-drafted informed consent document will help the doctor avoid unfounded claims. When determining the shade of enamel before and after the procedure, use a color chart.
NOTES AND CONTRAINDICATIONS
- The procedure is not recommended for pregnant or nursing women and patients under 16 years of age.
- For 24 hours after the procedure, patients should avoid consuming food and drinks containing coloring agents. The use of cigarettes should also be limited.
- Depending on the patient's usual diet, oral hygiene, and smoking habits, maintenance procedures may be required to preserve the results.
- In case of tooth sensitivity after the procedure, recommend the patient to use pain relievers.
- After the procedure is complete, do not forget to provide the patient with a care guide for teeth after whitening.
- A contraindication for using the whitening gel is the presence of an allergic reaction or chemical sensitivity to peroxides or glycols in the patient.
STORAGE AND CONTENT
Store all the contents of the whitening kit in a cool, dry place. Avoid direct sunlight. Syringes with BEYOND II Advanced Formula Whitening Gel should be stored at a temperature of about 5°C.
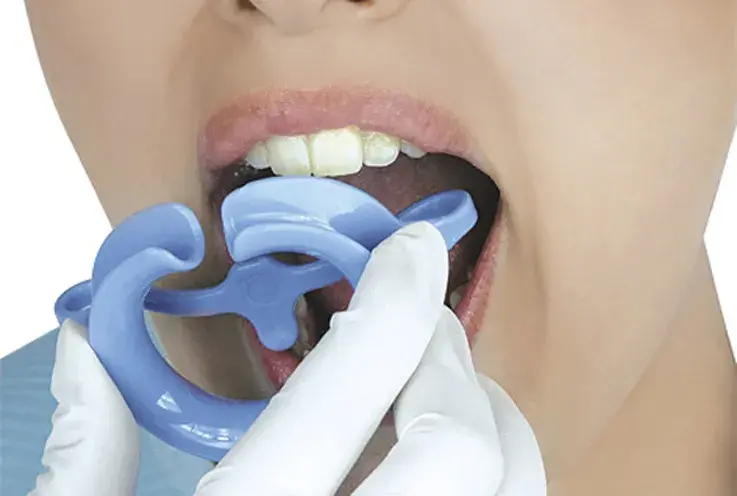
1. Apply protective cream to the patient's lips and insert a cheek retractor. Inform that it is safe to swallow saliva.
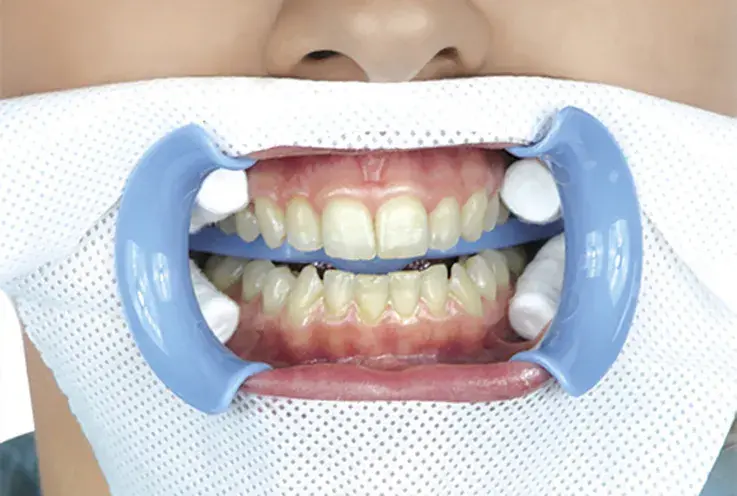
2. Protect the area of the face around the outside of the cheek retractor with a tissue napkin. Determine the existing shade of tooth enamel. Put protective glasses on the patient. Clean the teeth with a polishing paste containing pumice or polishing sand particles. Place cotton rolls on both sides of the cheek bands. Additionally, apply a protective agent to the inner surfaces of the upper and lower lips.

3. Dry the teeth and gums. Moisture can prevent complete isolation of the gums. Apply a protective light-cured liquid cofferdam to the gums. The cofferdam should seal the gingival pockets and cover the gingival groove. Any wedge-shaped defects or enamel chips should also be isolated with the liquid cofferdam to avoid postoperative sensitivity in these areas.
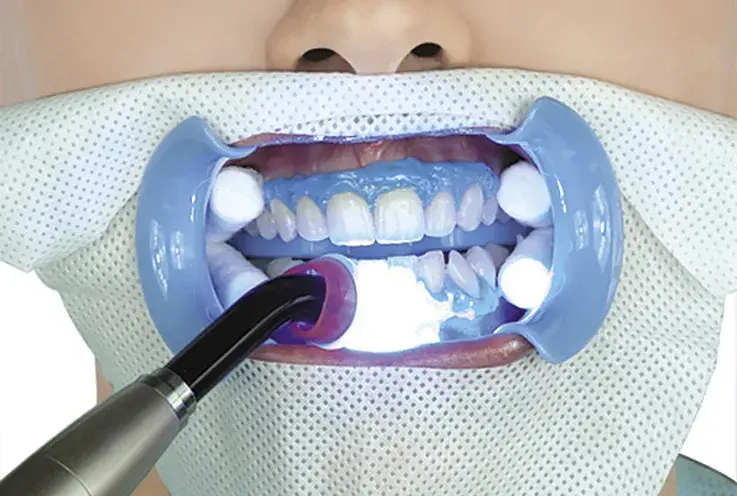
4. Initiate its light curing with circular movements of the polymerization lamp. When illuminating the cofferdam, do not keep the polymerization lamp in one place, as the heat from the lamp can cause discomfort to the patient. It is not recommended to use liquid cofferdam in patients with known sensitivity to resins. If dermatitis, rash, or any other allergic reaction occurs, rinse the application area with a strong jet of water and send the patient to a therapist.
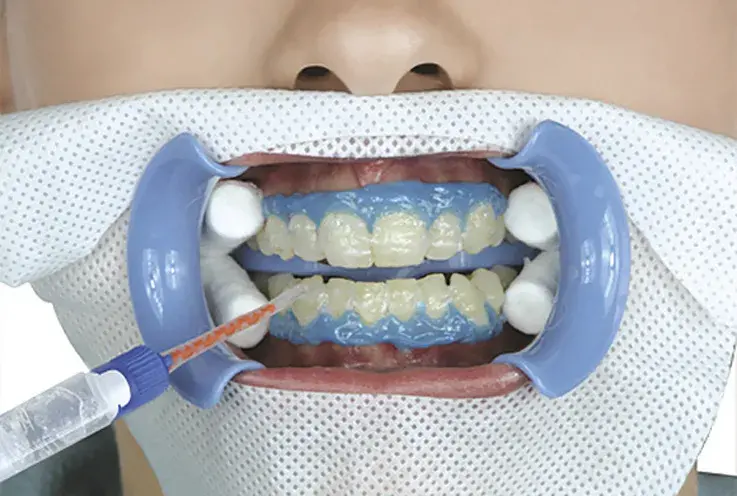
5. Attach the mixing tip to the dual-barrel syringe with whitening gel and apply a 2-3 mm thick layer of BEYOND™ II Advanced Formula Whitening Gel onto the dry tooth surface. Do not allow the whitening gel to contact the gums or the patient's oral cavity. If the whitening gel contacts the patient's gums during the procedure, the pink color of the gums may temporarily change to white. This should not be a cause for concern, as the gums will return to their natural color within a few hours after the procedure is completed.
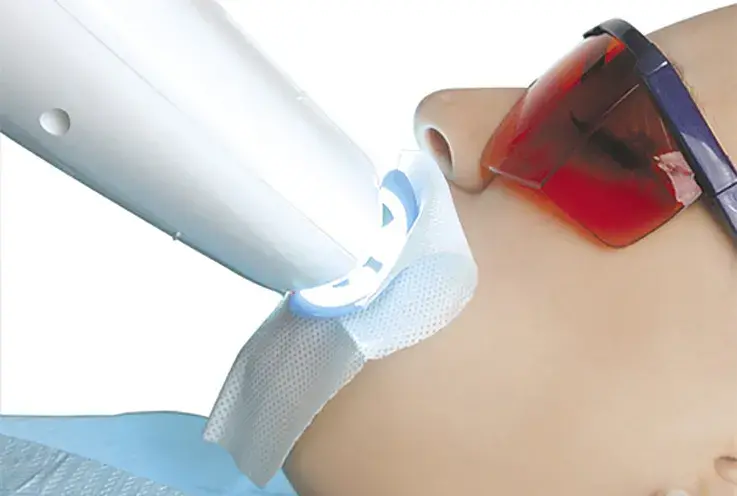
6. Position the accelerator lamp at a 90° angle to the surface of the teeth and press the Start/Stop button to begin the 10-minute whitening cycle. At the end of the 10-minute cycle, use a saliva ejector to remove the whitening gel. Do not rinse the gel off with water. Repeat steps 6—8 two more times (for a total of three 10-minute cycles). Discontinue the whitening procedure if the patient reports severe tooth sensitivity, and remove all whitening gel before applying fluoride gel.
7. After the final cycle, completely remove the whitening gel with a saliva ejector, remove the liquid dam and thoroughly wipe the teeth with cotton rolls or gauze pads. Apply sodium fluoride gel to the teeth and leave it on for one minute. At the end of the procedure, use a saliva ejector to remove the fluoride gel, remove the protective cloth, cheek retractors, cotton rolls, ask the patient to thoroughly rinse their mouth. The rinse water should be warm. Show the patient their new tooth shade.
Interested in the topic of whitening and want to expand your knowledge even further, sign up for the webinar Intracanal Whitening: Detailed Protocol, Complications, and Methods of Their Elimination by Shimon Friedman.
http://dentalmagazine.ru/